使用Amazon Alexa控制Ameba
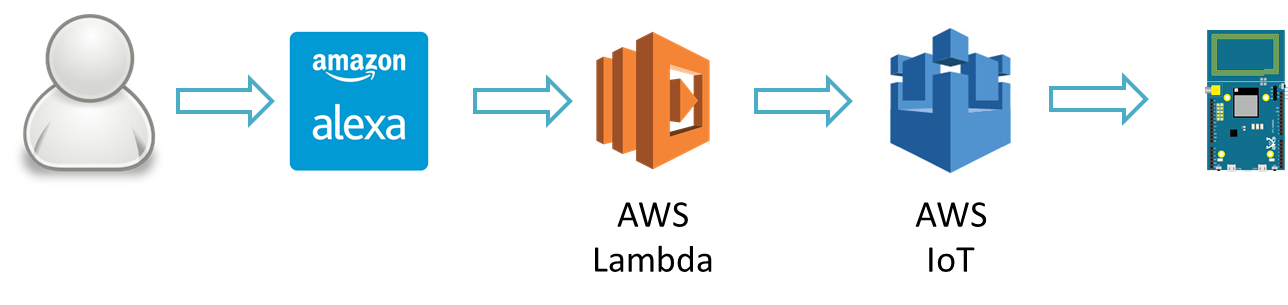
Alexa是Amazon底下的語音服務, 它可以連結至Amazon其它服務, 完成許多功能。著名的應用像是Amazon Echo, 功能定為在語音管家, 使用者可以對Amazon Echo說話, Echo解析這段語音, 做出適合的回應。 這個範例裡會介紹如何使用Alexa控制Ameba上的LED, 涵蓋的服務包括Amazon Alexa, AWS Lambda, AWS IoT, AWS IAM。材料準備
- Ameba x 1
- LED燈泡 x 1
範例說明
底下是範例裡的使用情境
(1) 使用者對支援Amazon Alexa服務的裝置說 “Turn on the light”, Alexa根據使用者提供的schema與sample utterances file,解析之後產生intent json
(2) Alexa提交intent json至AWS Lambda, Lambda根據intent以及內容, 更新AWS IoT Shadow service
(3) AWS IoT Shadow service收到Lambda的訊息, 更新shadow state
(3.1) 此時如果Ameba在線上並且subscribe對應的shadow service, 就點亮LED
(3.2) Lambda產生回應至Alexa的文字與語音訊息, 並遞交給Alexa
(4) 使用者聽到成功點亮LED的語音訊息
 其中Lambda取用其它服務時, 牽涉到權限的問題, 這部份會使用到AWS IAM的服務
底下各個章節分別介紹各個服務與範例的設定
其中Lambda取用其它服務時, 牽涉到權限的問題, 這部份會使用到AWS IAM的服務
底下各個章節分別介紹各個服務與範例的設定
其中Lambda取用其它服務時, 牽涉到權限的問題, 這部份會使用到AWS IAM的服務
底下各個章節分別介紹各個服務與範例的設定
Amazon Alexa – short introduction
Alexa Skills Kit (ASK) 是voice-driven的服務, 它可以連結至雲端服務, 讓使用者可以使用語音完成雲端服務, 並且得到語音的回應, 其中語音的解析讓使用者省去不少語音辨識的麻煩, 讓使用者可以專心於設計互動模型與雲端服務上。
Amazon Alexa – Custom Skills ag. Smart Home Skills
Alexa的服務可以分成兩類
(1) Custom Skills: 使用者可以根據自己的需求設計互動模型, 包括對話流程, 解析關鍵字, 並發出intent
(2) Smart Home Skills: 使用者使用Alexa已經建制好的smart home的模型, 並且發出intent
這兩類其實概念上很類似,Smart Home Skills省去一些麻煩,但考量到設計上的彈性, 這個範例裡我們使用Custom Skills。
Amazon官方文件裡有對這兩類的比較有更詳細的說明:
https://developer.amazon.com/public/solutions/alexa/alexa-skills-kit/docs/understanding-the-different-types-of-skills
Amazon Alexa – Create Skill
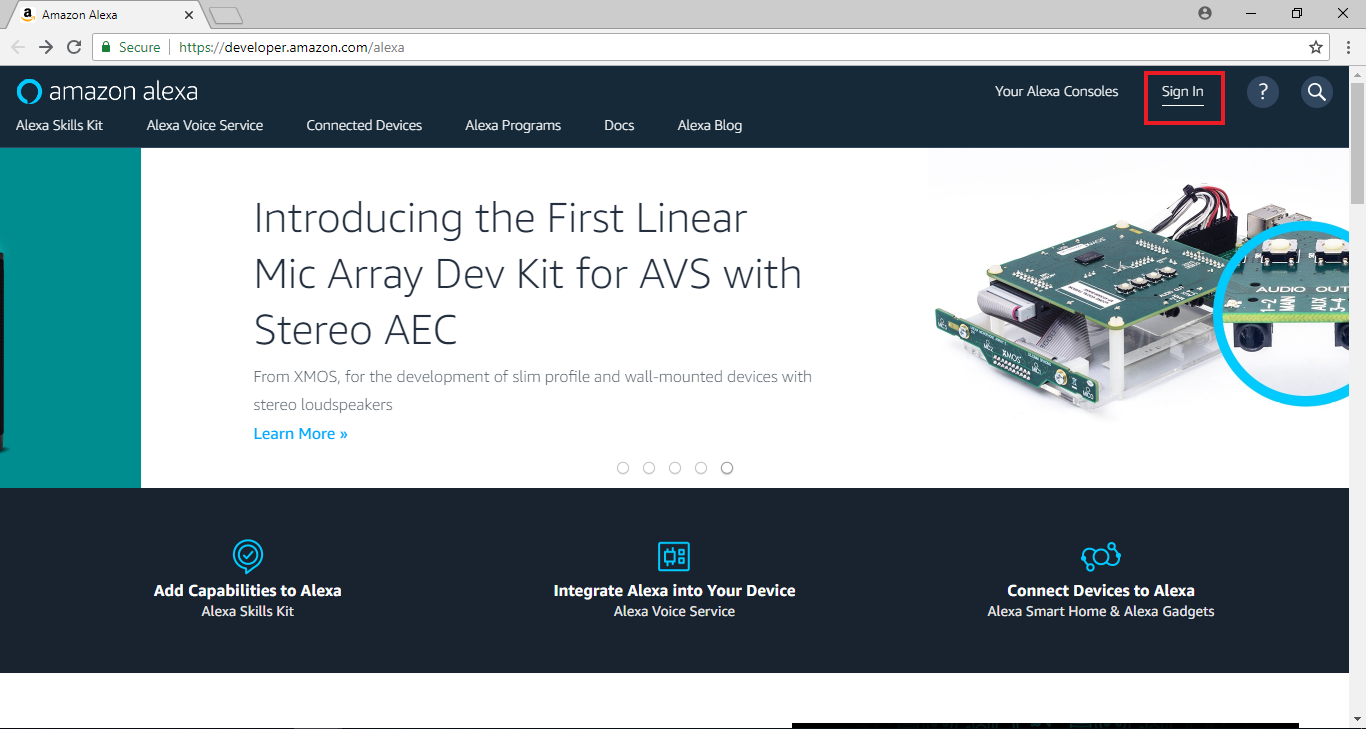
首先我們先登入Alexa的開發網頁, 點選Sign In, 填入的帳號可以與Amazon AWS的帳號不同
https://developer.amazon.com/alexa
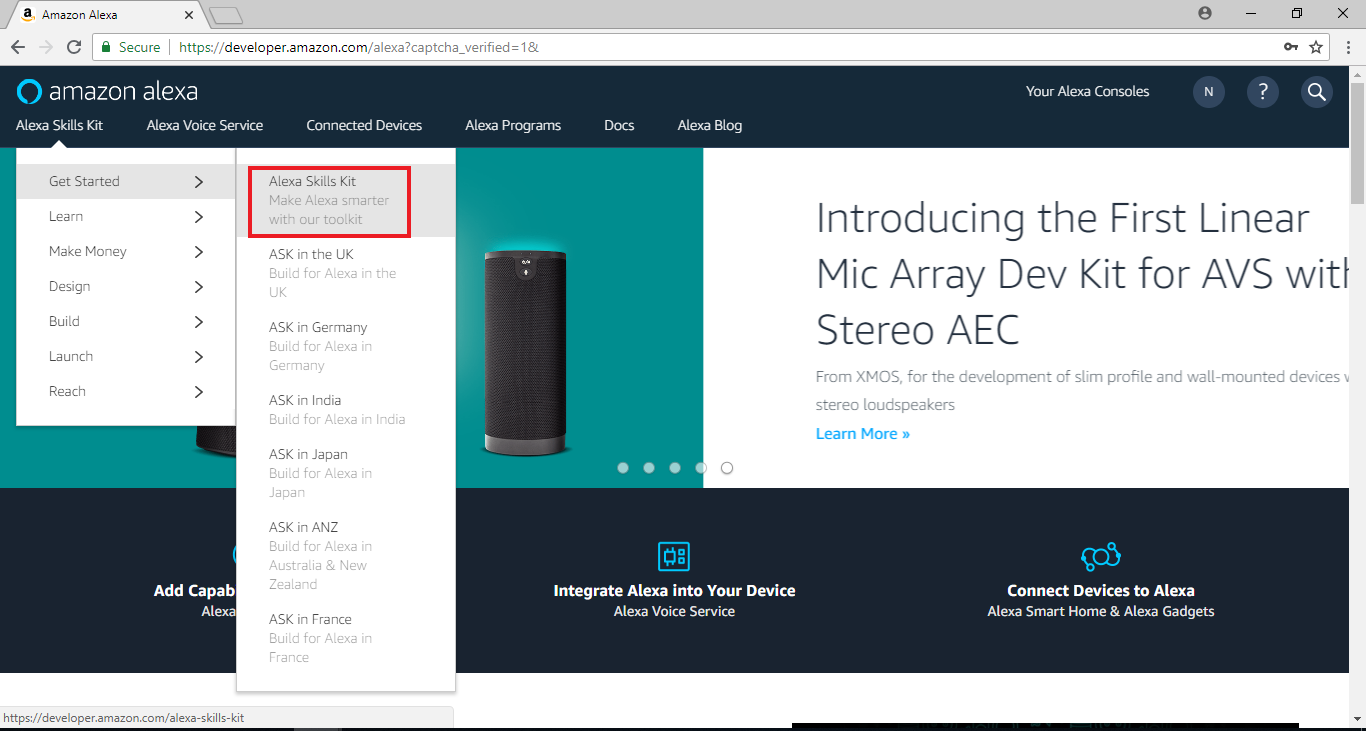
 接著點選Alex Skill kit > Get Started > Alex Skills Kit (Make Alexa smarter with our toolkit)
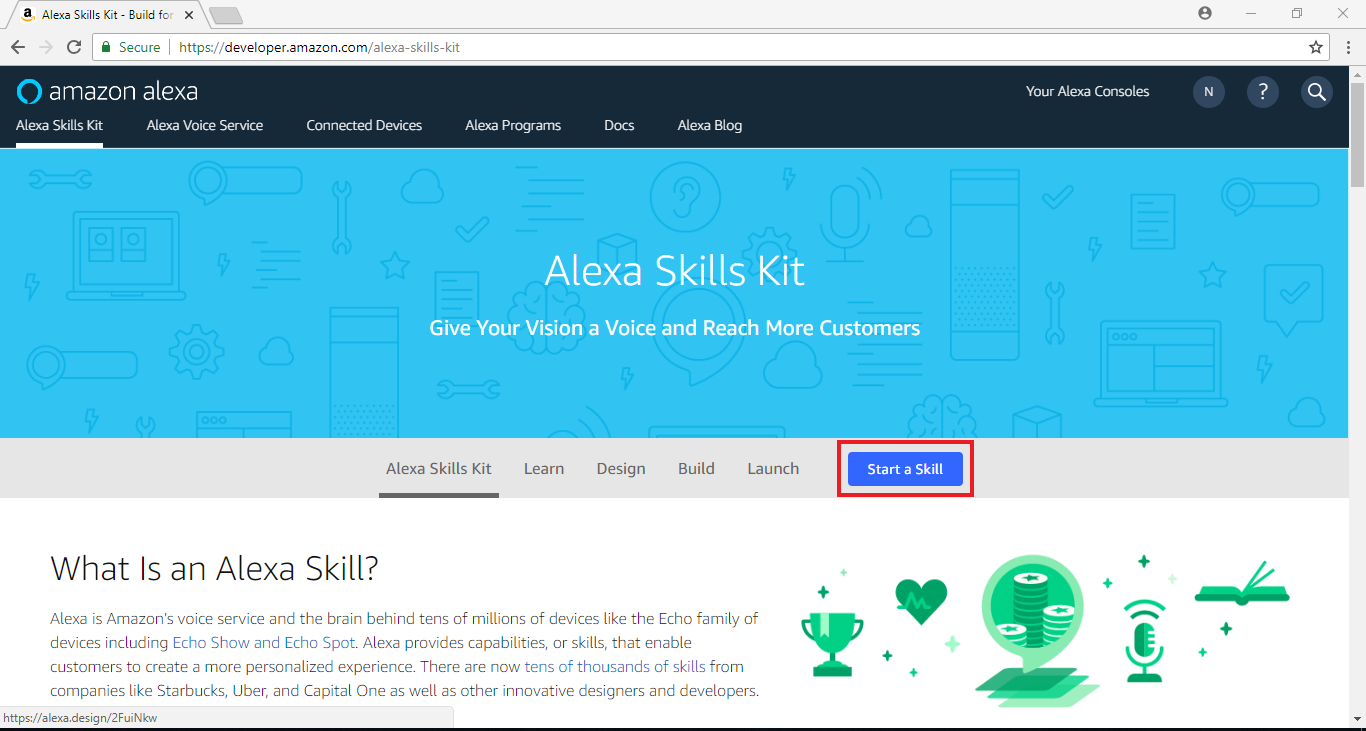
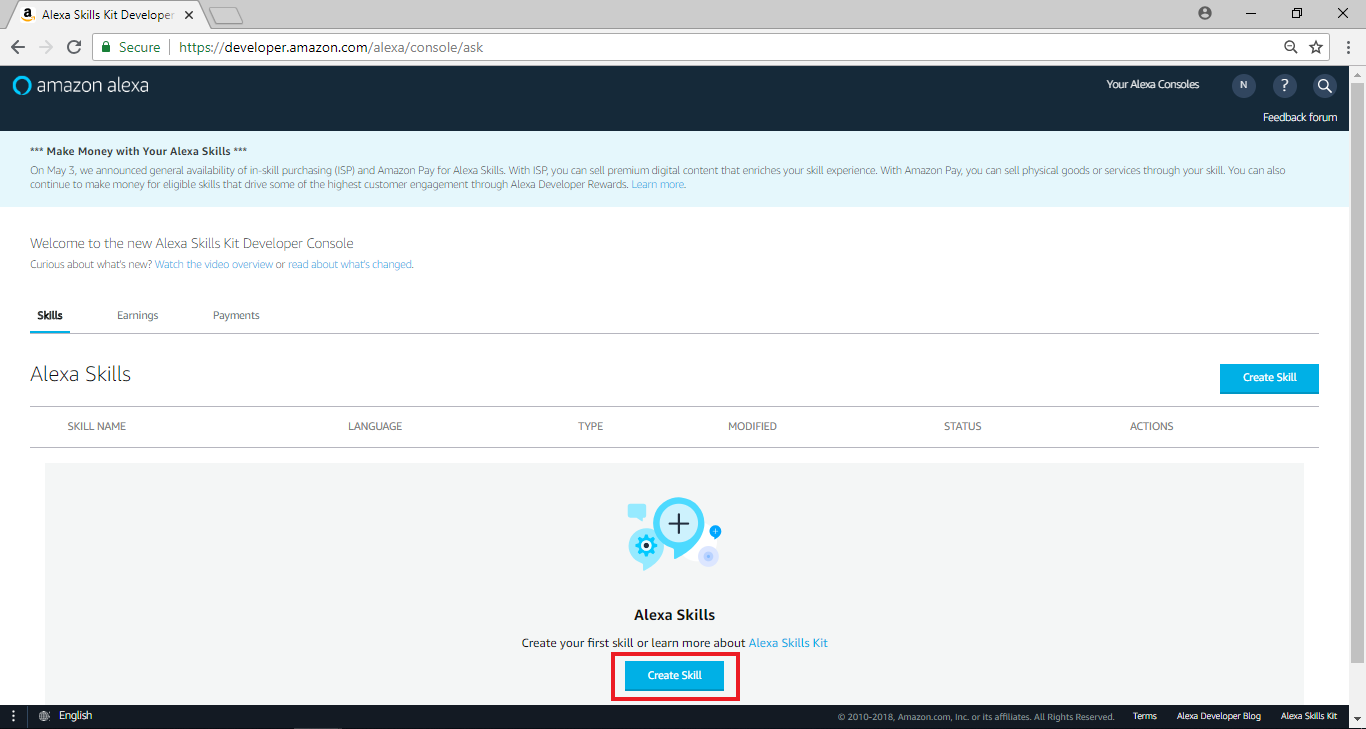
 帶到Alexa Skill Kit的頁面後,點擊”Start a Skill”
 於頁面下方點擊”Create Skill”
接著點選Alex Skill kit > Get Started > Alex Skills Kit (Make Alexa smarter with our toolkit)
帶到Alexa Skill Kit的頁面後,點擊”Start a Skill”
於頁面下方點擊”Create Skill”
Amazon Alexa – Create Flow
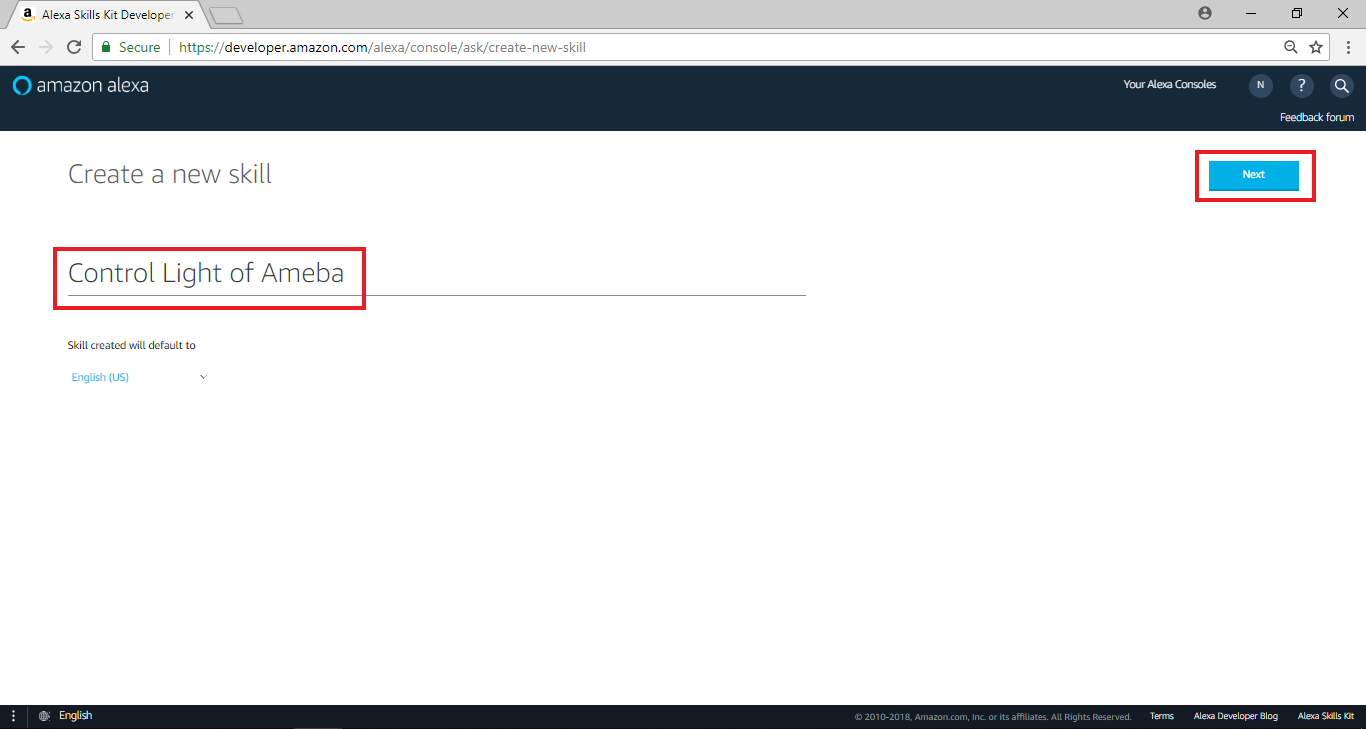
點選 “Start a Skill” 之後, 開始進入設定的流程,在skill name欄位裡輸入” Control Light of Ameba”, 這個地方填的是要顯示給一般使用者的名稱,接著點擊“Next”
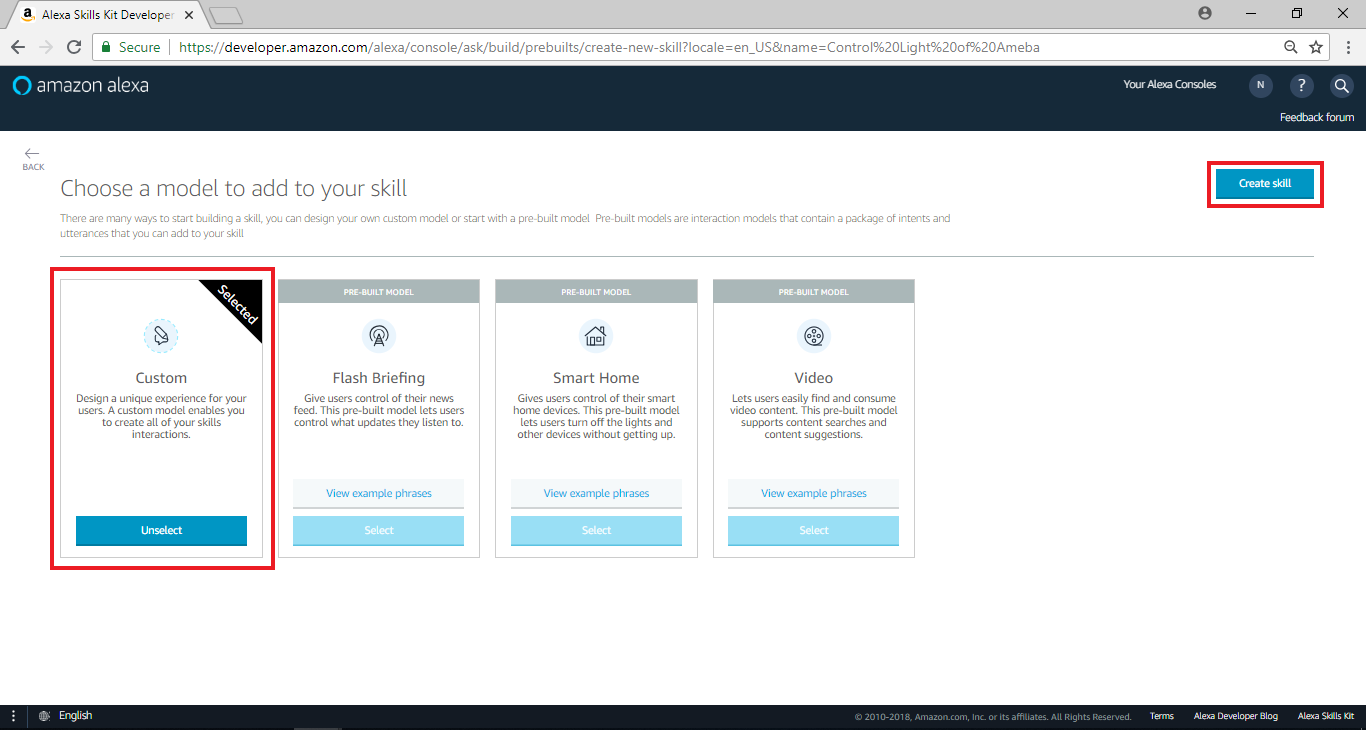
 選擇“Custom”,接著點擊“Create Skill”
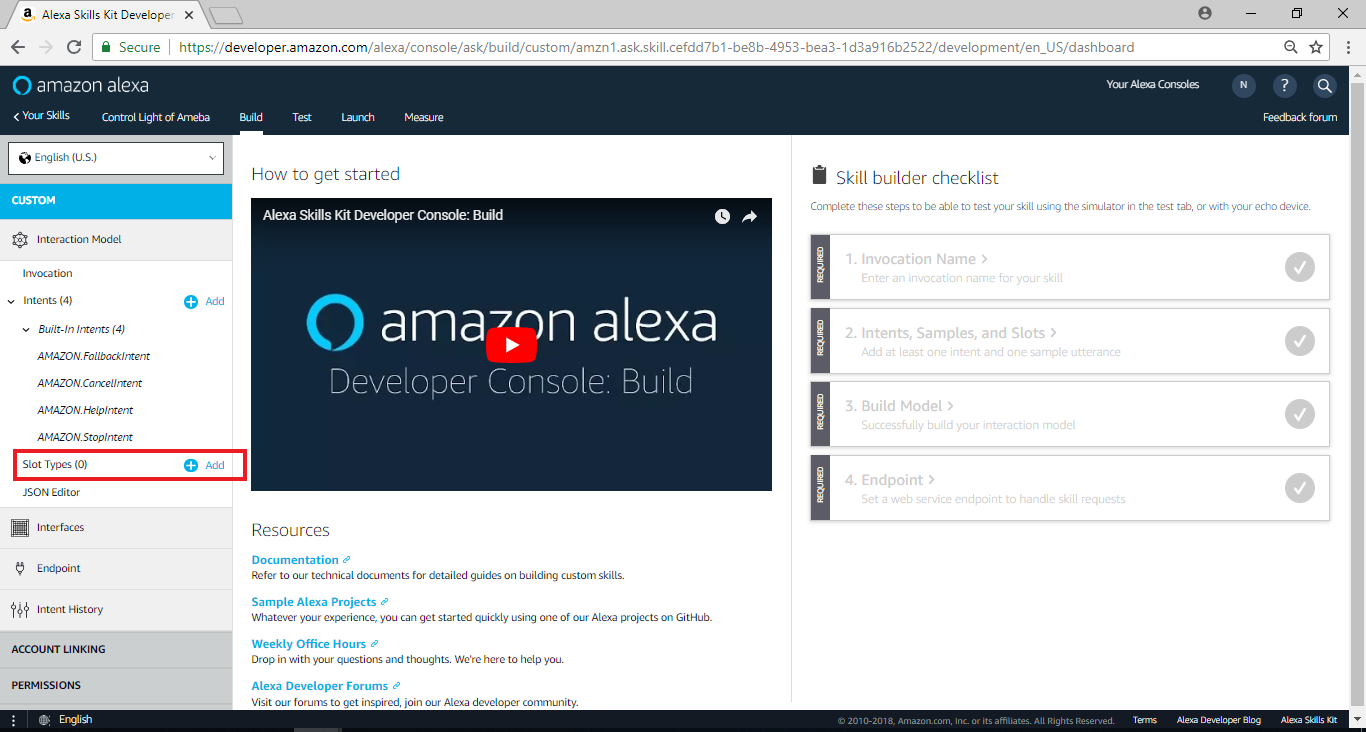
 進入下個頁面後,於左側選單Slot Type點擊“add”
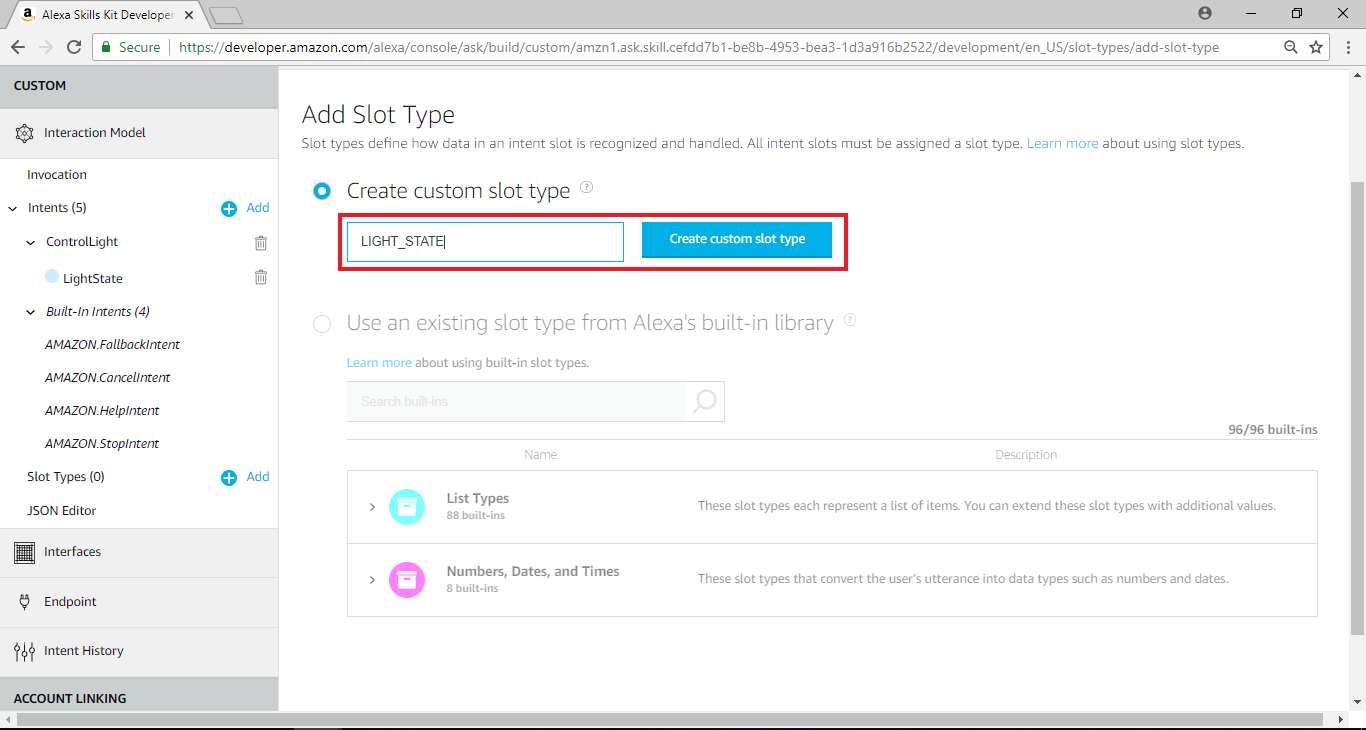
 進入Add Slot Type頁面後,於Create custom slot type欄位輸入“LIGHT_STATE”,並點擊“Create custom slot type”
進入下個頁面後,於左側選單Slot Type點擊“add”
進入Add Slot Type頁面後,於Create custom slot type欄位輸入“LIGHT_STATE”,並點擊“Create custom slot type”
進入下個頁面後,於左側選單Slot Type點擊“add”
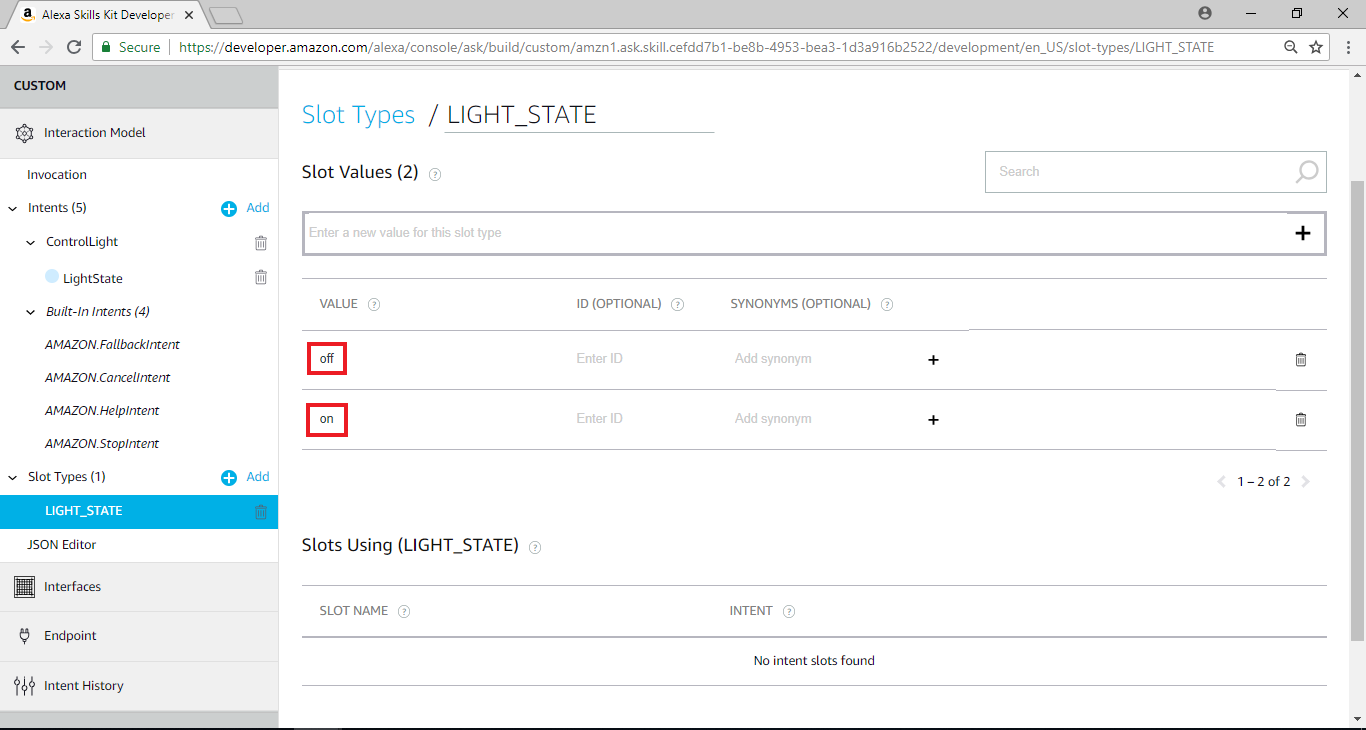
 進入新增Slot Types的頁面後,分別輸入“on”及“off”於Slot Values欄位,並點擊“+”
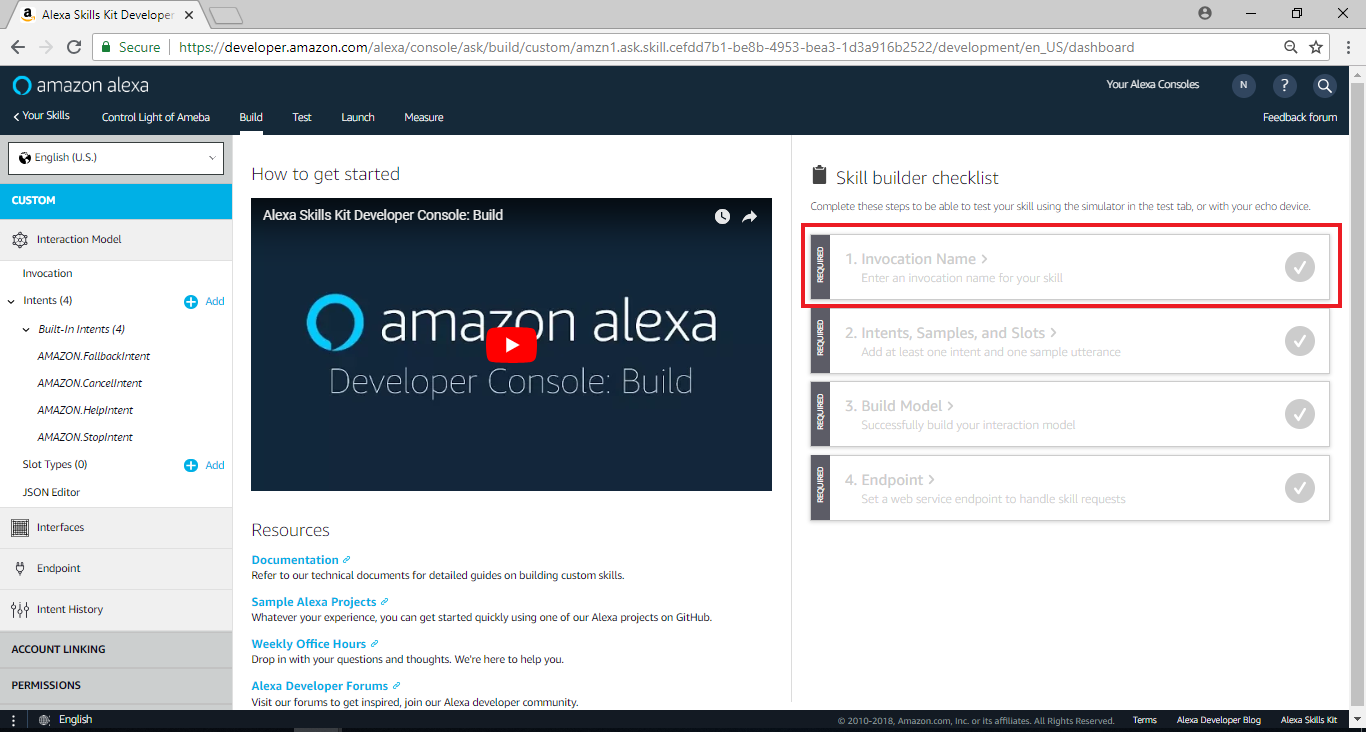
 回到先前的Skill home page,在頁面右邊Skill builder checklist裡,點擊”Invocation Name”
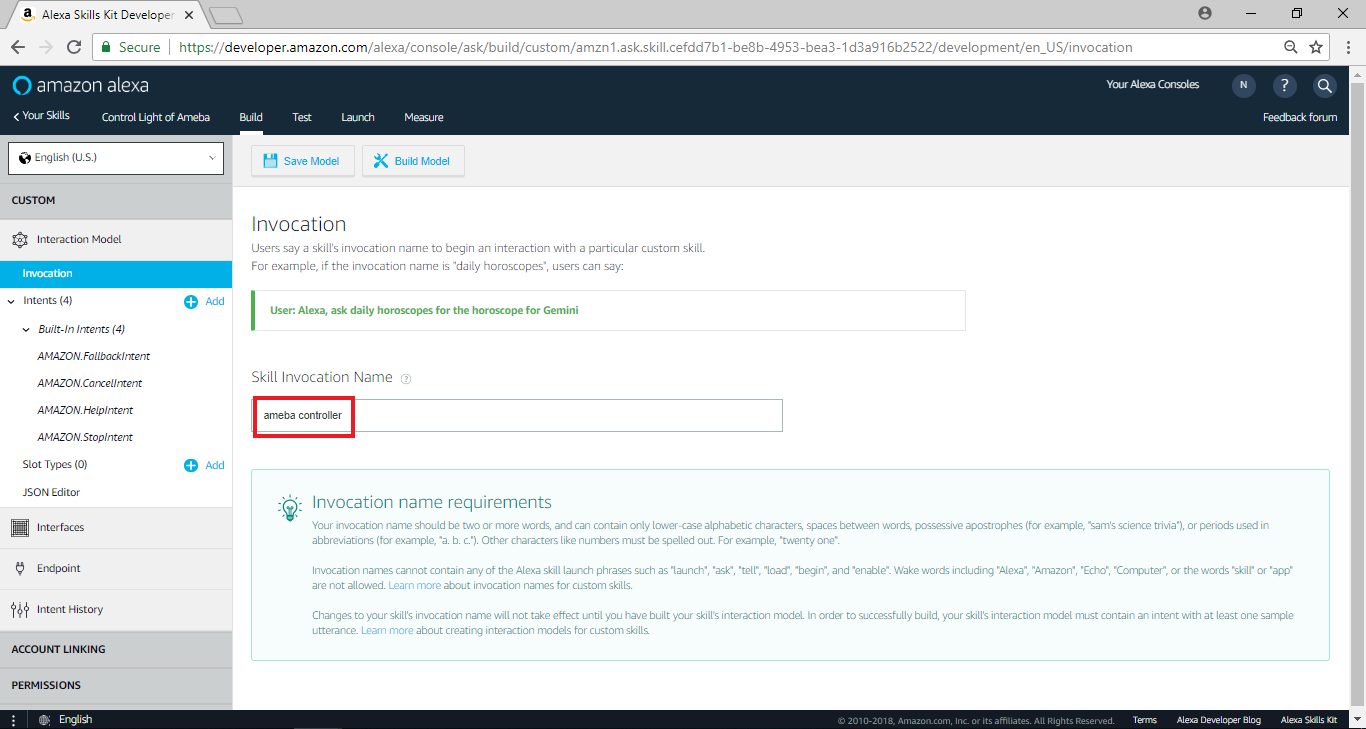
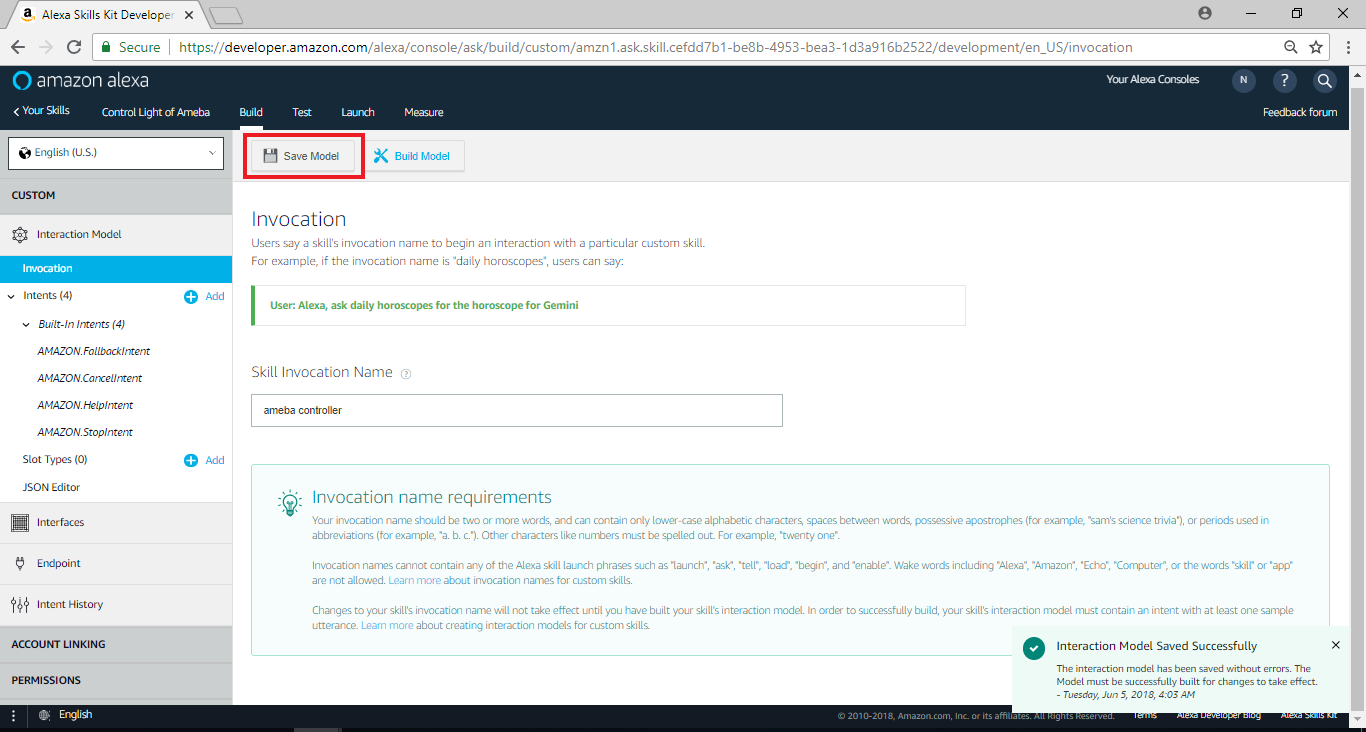
 在” Skill Invocation Name”欄位輸入”ameba controller”, 這裡填的是讓Alexa識別要啟動session的名稱。一般來說, Alexa啟動session的方式有兩種, 第一種是講出完整的內容, 讓Alexa分析互動模型來決定要啟動哪個session, 第二種是使用者只講Invocation Name, 讓Alexa啟動特定的session。這裡我們填入 “Ameba Controller”
Invocation Name的取名有一些限制, 要避開Alexa設定的關鍵字, 以及會造成誤判語意的名稱, 詳細的限制說明可以參考這裡:
https://developer.amazon.com/zh/docs/custom-skills/choose-the-invocation-name-for-a-custom-skill.html
在” Skill Invocation Name”欄位輸入”ameba controller”, 這裡填的是讓Alexa識別要啟動session的名稱。一般來說, Alexa啟動session的方式有兩種, 第一種是講出完整的內容, 讓Alexa分析互動模型來決定要啟動哪個session, 第二種是使用者只講Invocation Name, 讓Alexa啟動特定的session。這裡我們填入 “Ameba Controller”
Invocation Name的取名有一些限制, 要避開Alexa設定的關鍵字, 以及會造成誤判語意的名稱, 詳細的限制說明可以參考這裡:
https://developer.amazon.com/zh/docs/custom-skills/choose-the-invocation-name-for-a-custom-skill.html
 並點擊“Save model”
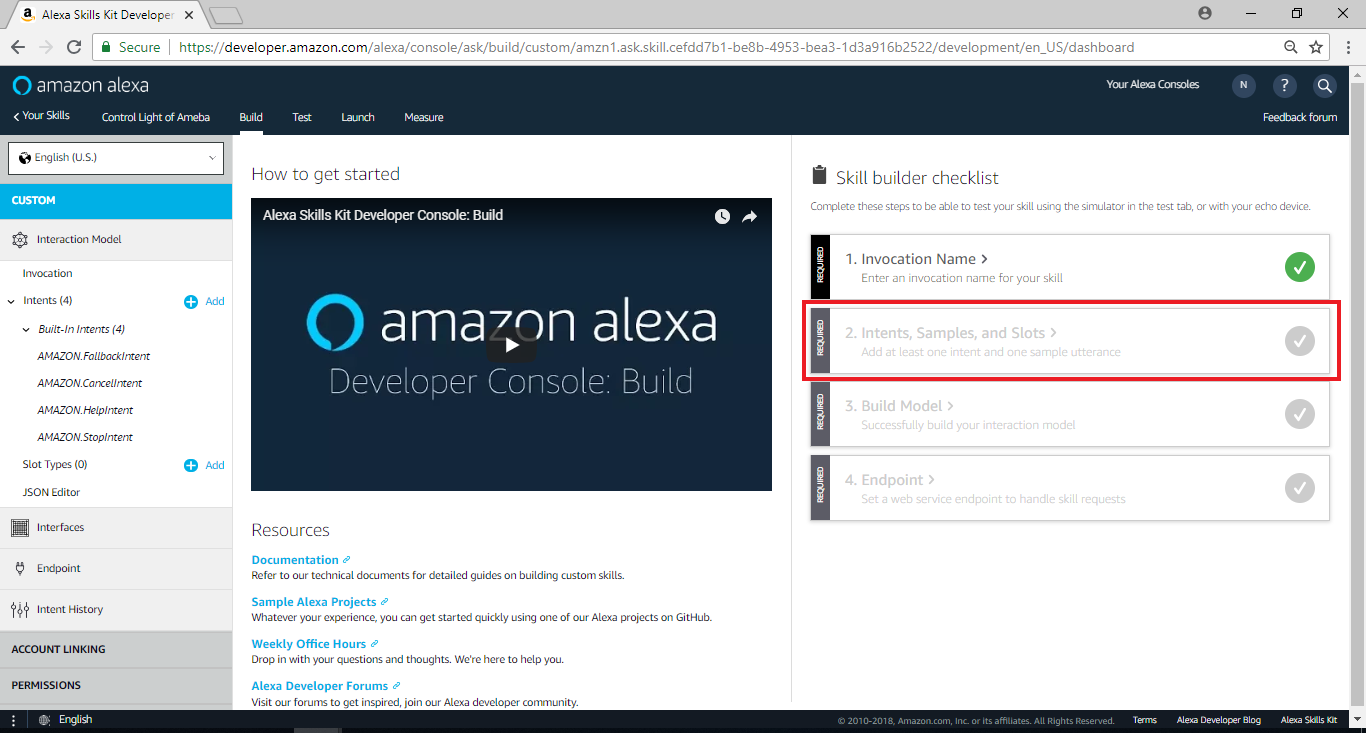
 回到Skill home page,在頁面右邊Skill builder checklist裡,點擊“Intents, Samples, and Slots”
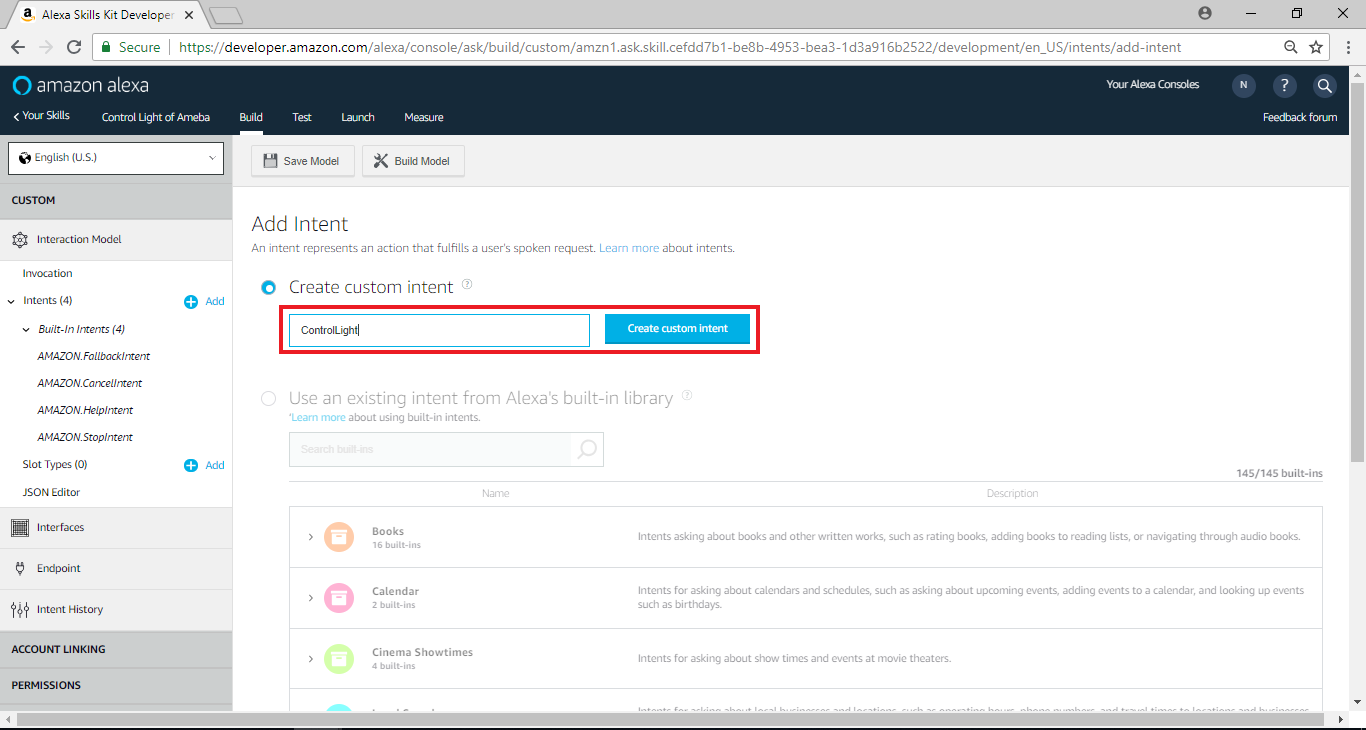
 在Add intent欄位中,在Create custom intent欄位輸入ControlLight,並點擊“Create custom intent”
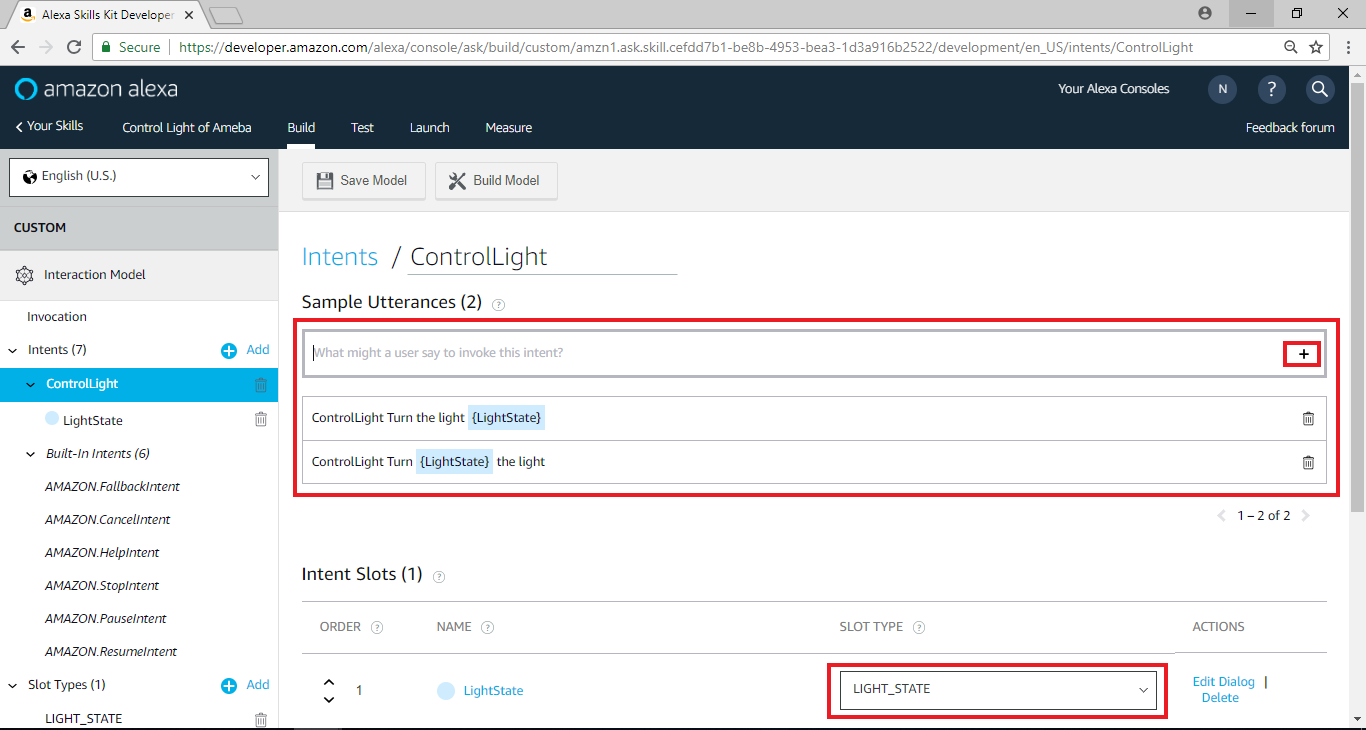
 接著我們填寫 Sample Utterances, 這裡要填的是當使用者說了什麼句子時, 可以觸發哪些intent, 我們填入以下的值
 回到Skill Home Page,下方EndPoint的選項裡需要填寫與Alexa銜接的Endpoint。當使用者觸發Alexa的intent之後, Alexa會將這個intent傳遞給其它service處理, 使用者可以自己架構這樣的server, 或是使用Amazon AWS Lambda, 這裡我們將暫停設定Alexa, 並且設定AWS Lambda, 稍後再將這部份完成

選擇“Custom”,接著點擊“Create Skill”
進入下個頁面後,於左側選單Slot Type點擊“add”
進入Add Slot Type頁面後,於Create custom slot type欄位輸入“LIGHT_STATE”,並點擊“Create custom slot type”
進入下個頁面後,於左側選單Slot Type點擊“add”
進入新增Slot Types的頁面後,分別輸入“on”及“off”於Slot Values欄位,並點擊“+”
回到先前的Skill home page,在頁面右邊Skill builder checklist裡,點擊”Invocation Name”
在” Skill Invocation Name”欄位輸入”ameba controller”, 這裡填的是讓Alexa識別要啟動session的名稱。一般來說, Alexa啟動session的方式有兩種, 第一種是講出完整的內容, 讓Alexa分析互動模型來決定要啟動哪個session, 第二種是使用者只講Invocation Name, 讓Alexa啟動特定的session。這裡我們填入 “Ameba Controller”
Invocation Name的取名有一些限制, 要避開Alexa設定的關鍵字, 以及會造成誤判語意的名稱, 詳細的限制說明可以參考這裡:
https://developer.amazon.com/zh/docs/custom-skills/choose-the-invocation-name-for-a-custom-skill.html
並點擊“Save model”
回到Skill home page,在頁面右邊Skill builder checklist裡,點擊“Intents, Samples, and Slots”
在Add intent欄位中,在Create custom intent欄位輸入ControlLight,並點擊“Create custom intent”
接著我們填寫 Sample Utterances, 這裡要填的是當使用者說了什麼句子時, 可以觸發哪些intent, 我們填入以下的值
ControlLight Turn {LightState} the light
ControlLight Turn the light {LightState}
它的格式裡, 前面帶的是intent名稱, 接著是空白或tab, 後面跟著是使用者說的句子, 以第一行來說, 代表當使用者說了 “Turn on the light”會觸發ControlLight intent,最後選Slot Type下方選擇LIGHT_STATE,並點擊“Save Model”
回到Skill Home Page,下方EndPoint的選項裡需要填寫與Alexa銜接的Endpoint。當使用者觸發Alexa的intent之後, Alexa會將這個intent傳遞給其它service處理, 使用者可以自己架構這樣的server, 或是使用Amazon AWS Lambda, 這裡我們將暫停設定Alexa, 並且設定AWS Lambda, 稍後再將這部份完成
AWS Lambda – short introduction
AWS Lambda是Amazon提供的計算服務, 它目前提供的程式語言有Node.js, Python, 以及java, 使用者可以撰寫程式碼, 並且使用AWS其它服務 (Ex. AWS IoT, logger)。Lambda讓使用者設定計算所需要的資源, 像是記憶體, 運算時間等等,Lambda會處理運算的部份。
AWS Lambda – Create and select blueprint
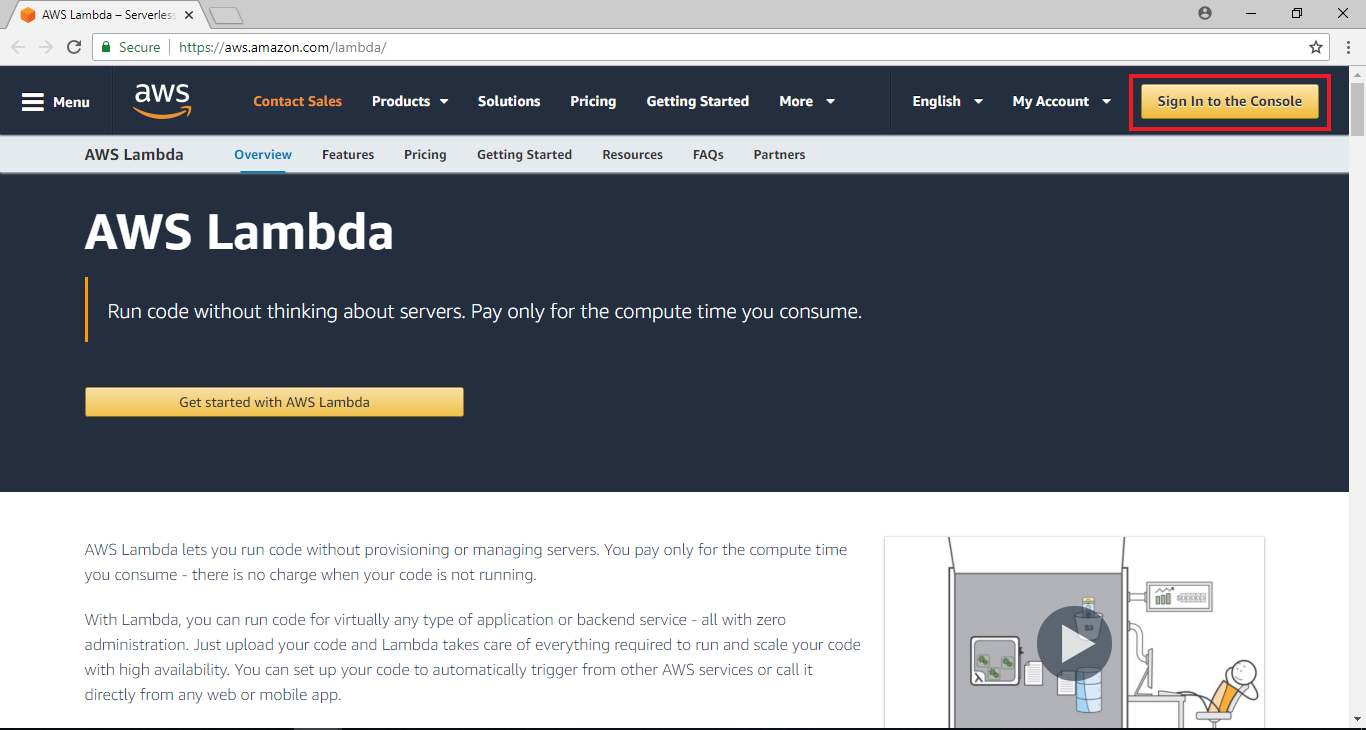
我們在瀏覽器開新的分頁, 並且進入AWS Lambda的首頁 https://aws.amazon.com/lambda/
點選右邊 “Sign in to the Console”
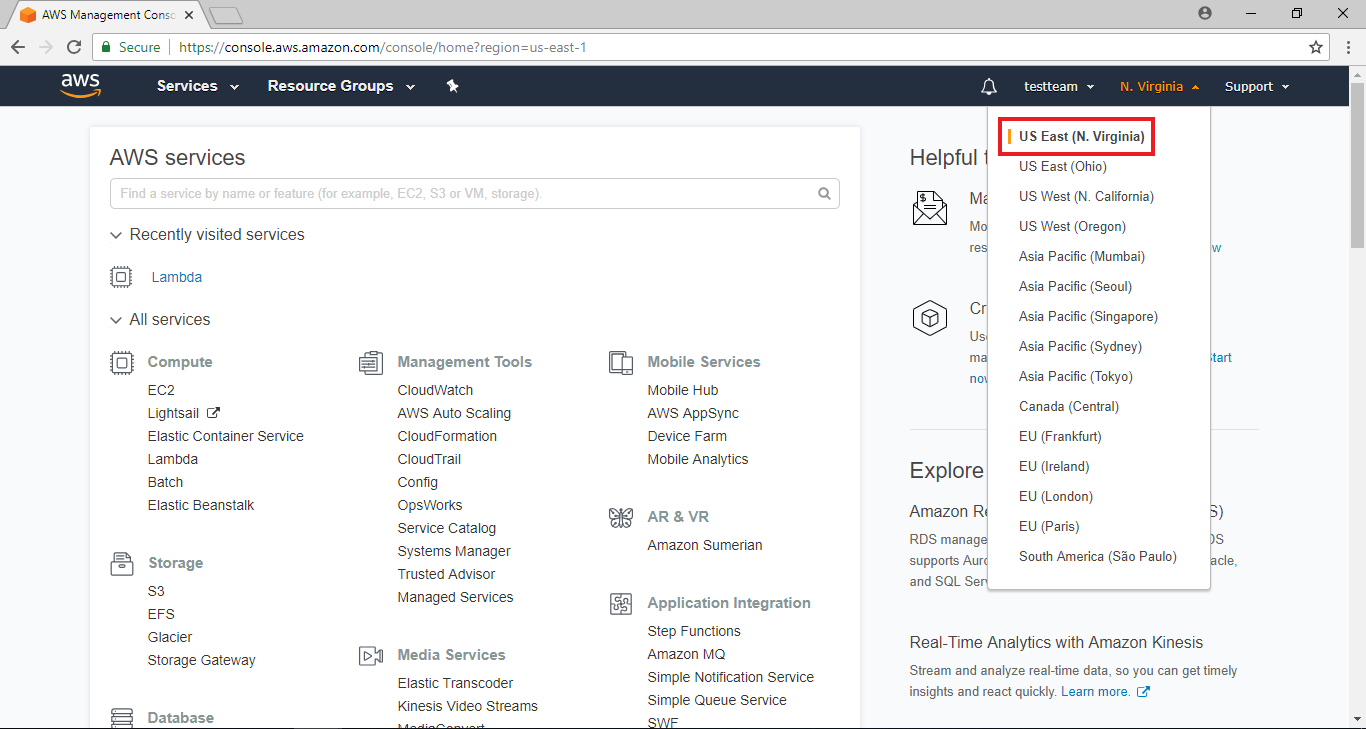
 登入之後, 會進到AWS的服務列表, 因為寫這篇文章的時候, Alexa與Lambda銜接的服務只支援us-east-1的區域, 所以我們先切換region, 點選右上角設定region, 選擇 “US East (N. Virginia)
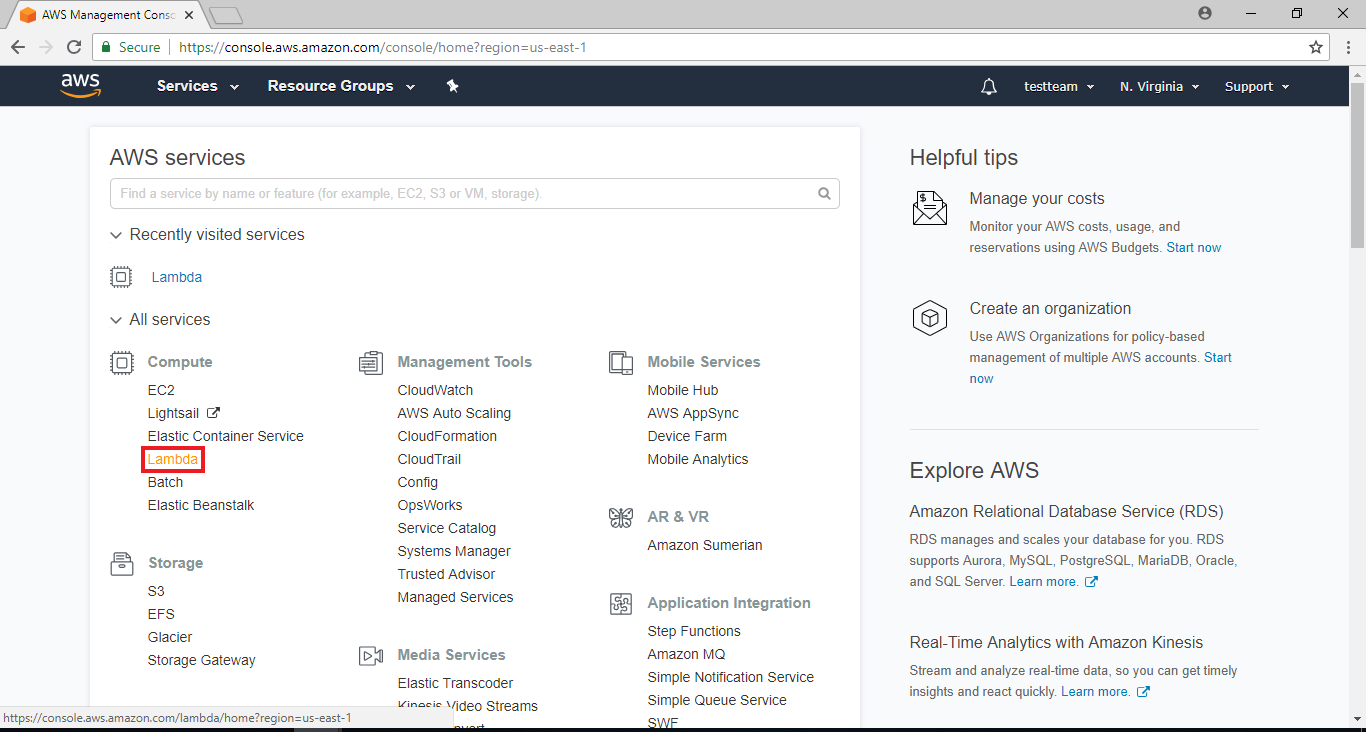
 然後在左邊Compute相關的服務裡, 點選Lambda
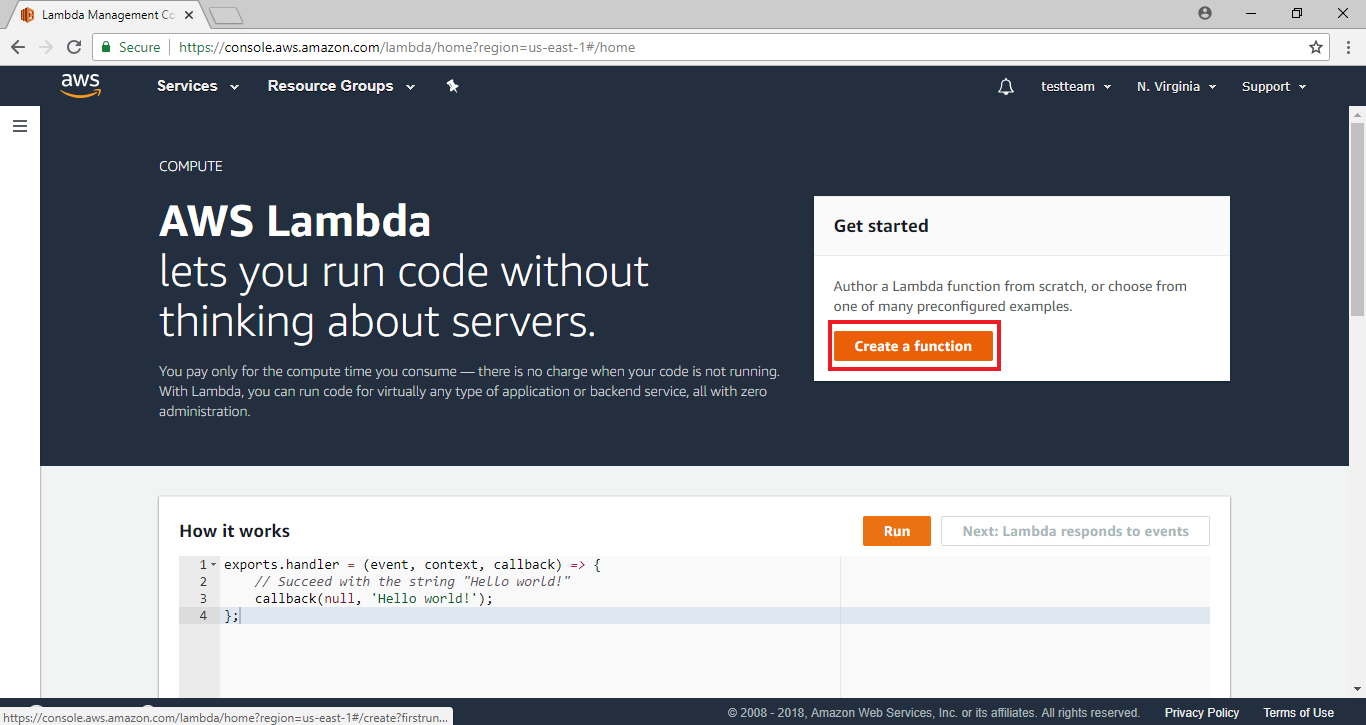
 點選 “Create a Function”
 Lambda預先設計了一些使用情境, 這些情境提供了一些sample code與default setting。要使用Alexa與Lambda銜接, 我們在Filter的地方填入Alexa
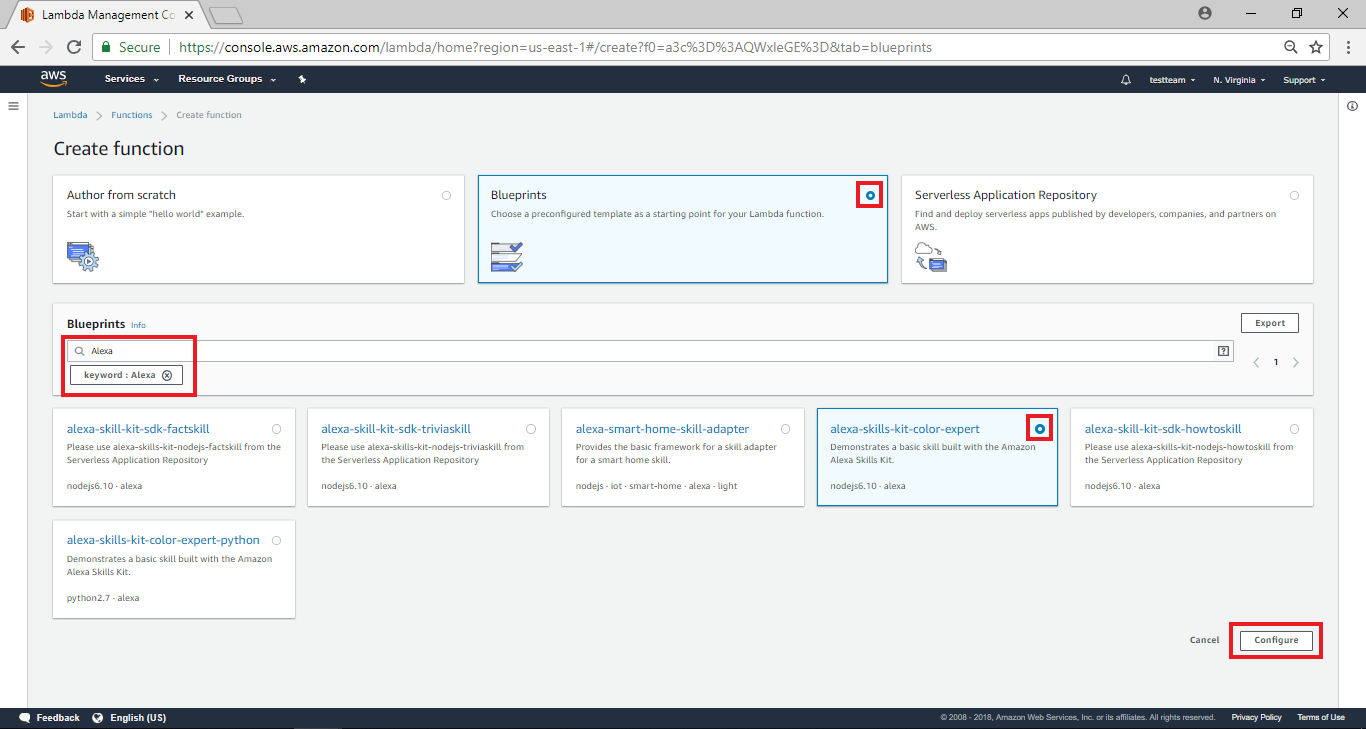 填完之後會篩選出與Alexa相關的blueprint, 其中 “alexa-skills-kit-color-expert”與 “alexa-skills-kit-color-export-python”是相似的blueprint, 差別只在於“alexa-skills-kit-color-expert”使用的程式語言是JavaScript, 而“alexa-skills-kit-color-export-python”使用python, 這裡我們選擇 “alexa-skills-kit-color-expert”,並點擊“configure”
登入之後, 會進到AWS的服務列表, 因為寫這篇文章的時候, Alexa與Lambda銜接的服務只支援us-east-1的區域, 所以我們先切換region, 點選右上角設定region, 選擇 “US East (N. Virginia)
然後在左邊Compute相關的服務裡, 點選Lambda
點選 “Create a Function”
Lambda預先設計了一些使用情境, 這些情境提供了一些sample code與default setting。要使用Alexa與Lambda銜接, 我們在Filter的地方填入Alexa
填完之後會篩選出與Alexa相關的blueprint, 其中 “alexa-skills-kit-color-expert”與 “alexa-skills-kit-color-export-python”是相似的blueprint, 差別只在於“alexa-skills-kit-color-expert”使用的程式語言是JavaScript, 而“alexa-skills-kit-color-export-python”使用python, 這裡我們選擇 “alexa-skills-kit-color-expert”,並點擊“configure”
AWS Lambda – Configure function
進入alexa-skills-kit-color-expert設定頁,在name欄位填入“ControlLight”,用來識別這個Lambda function,且選擇“Create a custom role”, “Role”的設定關係到Lambda的權限, 為了避免Lambda function使用了不該使用的服務, 我們可以設定Lambda function的權限, 這部份的服務來自於AWS IAM, 不過我們可以在這裡直接設定

AWS IAM – Create role from AWS Lambda
在Lambda帶出的AWS IAM的設定頁面裡, 我們設定 “Role Name”為 “control_light”,並點擊 “Edit”編輯Policy Document”
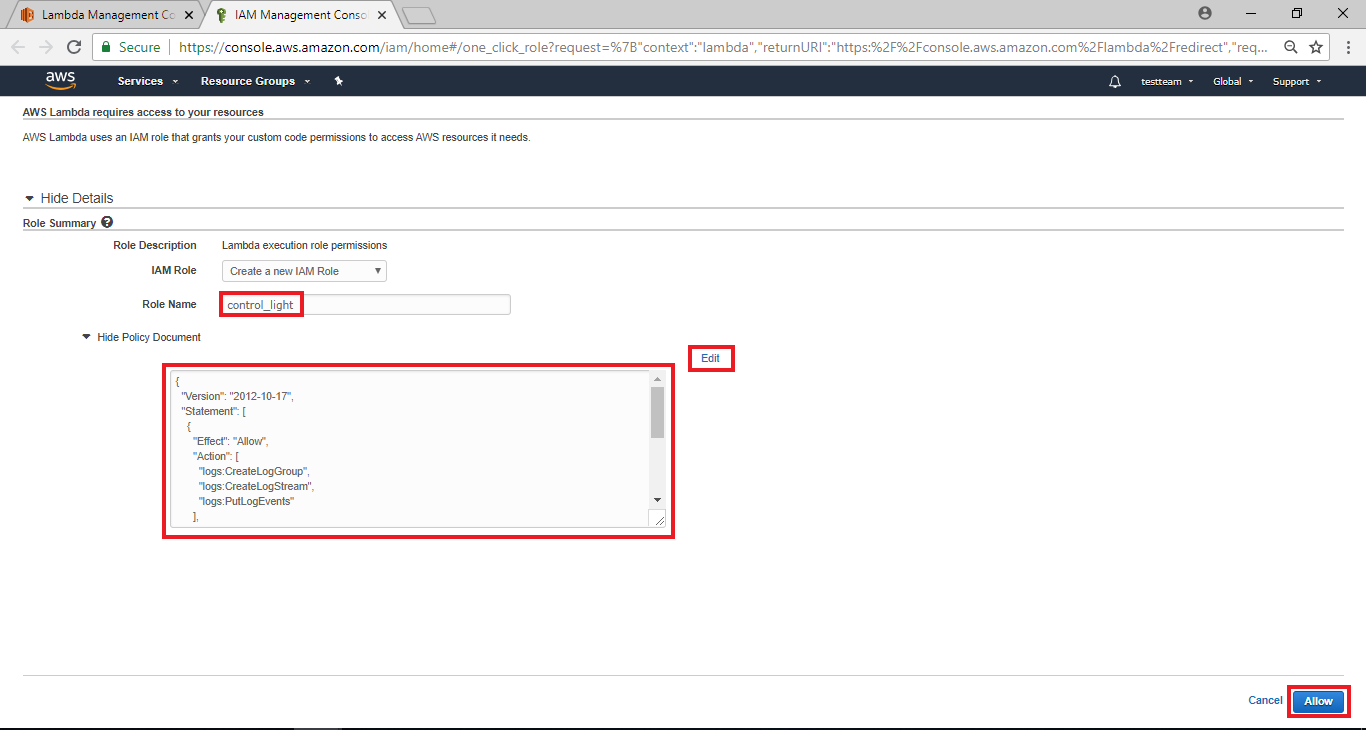 然後我們可以編輯這個role的權限, 可以看到預設值裡, 這個Role的權限只有log的權限, 因為我們需要使用AWS IoT的權限, 所以我們修改它如下
然後我們可以編輯這個role的權限, 可以看到預設值裡, 這個Role的權限只有log的權限, 因為我們需要使用AWS IoT的權限, 所以我們修改它如下
{
  "Version": "2012-10-17",
  "Statement": [
    {
      "Effect": "Allow",
      "Action": [
        "logs:CreateLogGroup",
        "logs:CreateLogStream",
        "logs:PutLogEvents"
      ],
      "Resource": "arn:aws:logs:*:*:*"
    },
    {
      "Effect": "Allow",
      "Action": [
        "iot:*"
      ],
      "Resource": "arn:aws:iot:*:*:*"
    }
  ]
}
接著點選 “Allow”
接著頁面會關閉, 我們會跳回前一個Lambda設定的頁面
AWS Lambda – Configure function (cont.)
設定新的Role並且從AWS IAM返回之後, 可以看到 “Role”以及 “Existing Role”的欄位已經有值
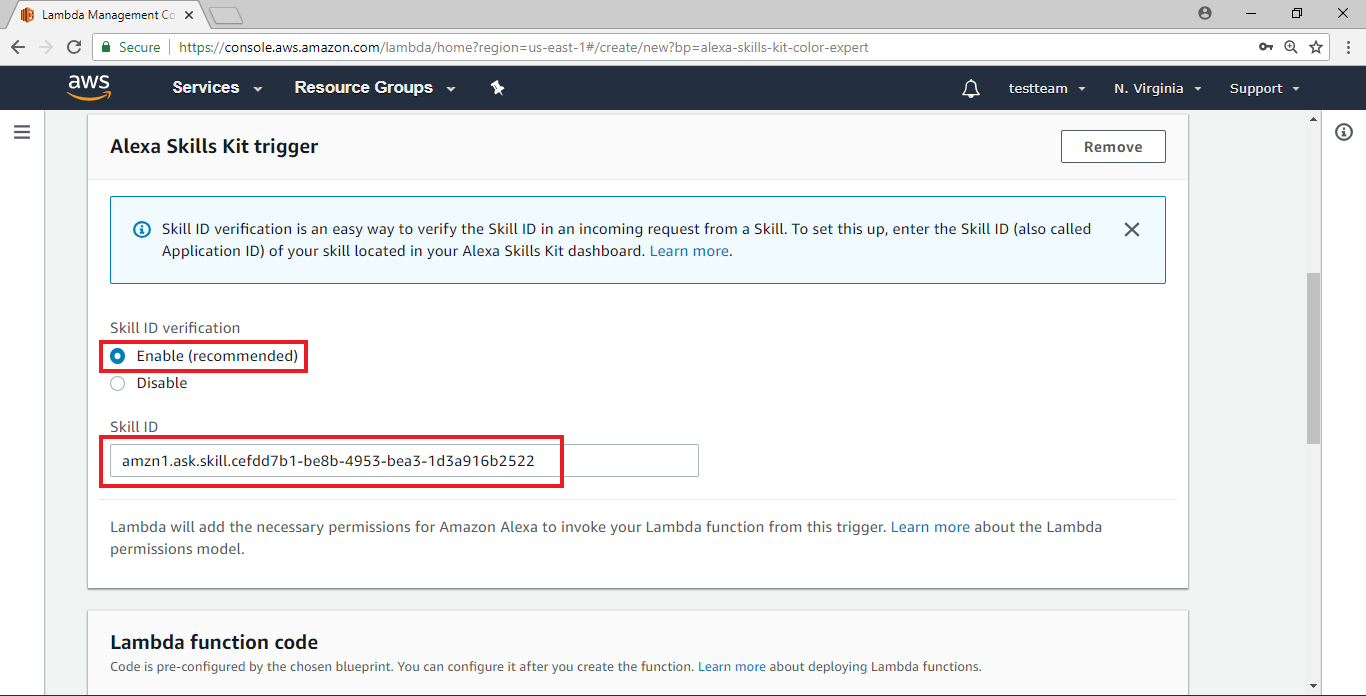
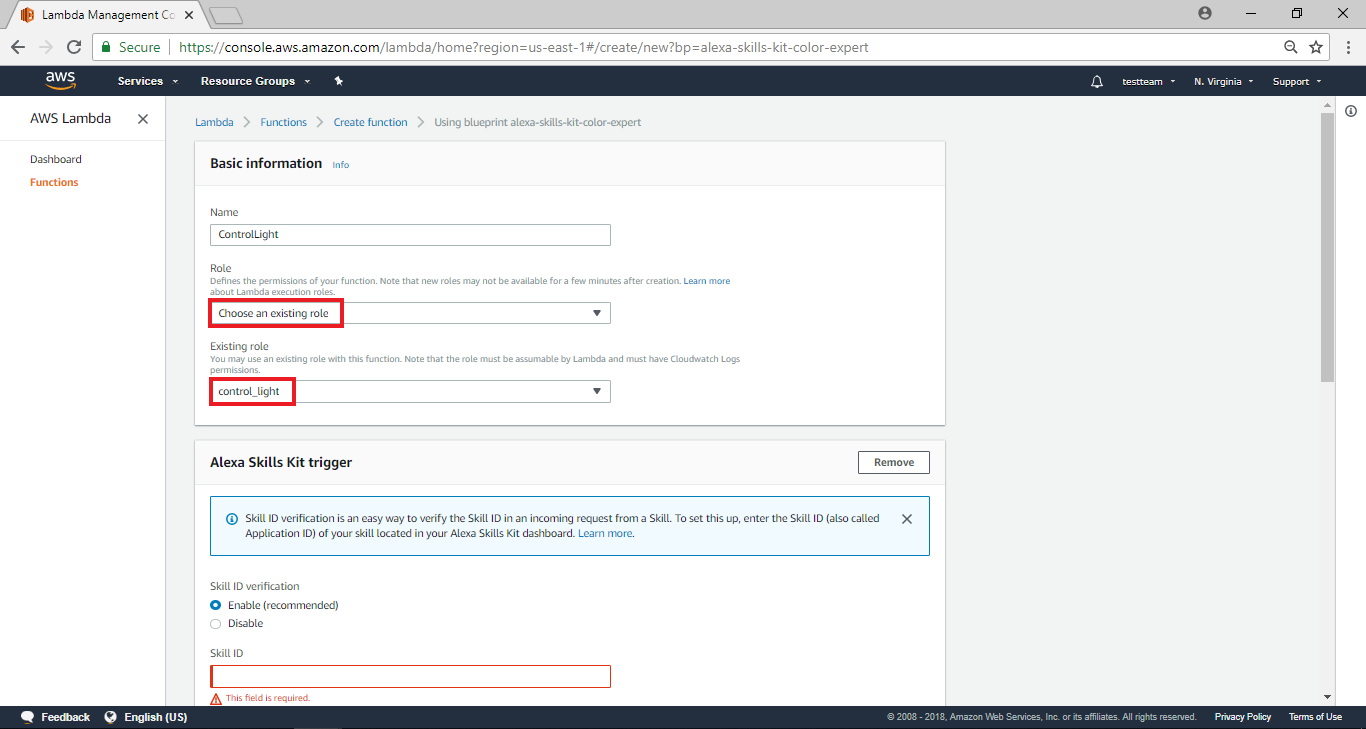 接著接到頁面下方在kill ID verification欄位選擇“Enable”,另外還有Skill ID的部份,我們在下一章節介紹如何拿到Skill ID
接著接到頁面下方在kill ID verification欄位選擇“Enable”,另外還有Skill ID的部份,我們在下一章節介紹如何拿到Skill ID
AWS Lambda – Get the Skill ID
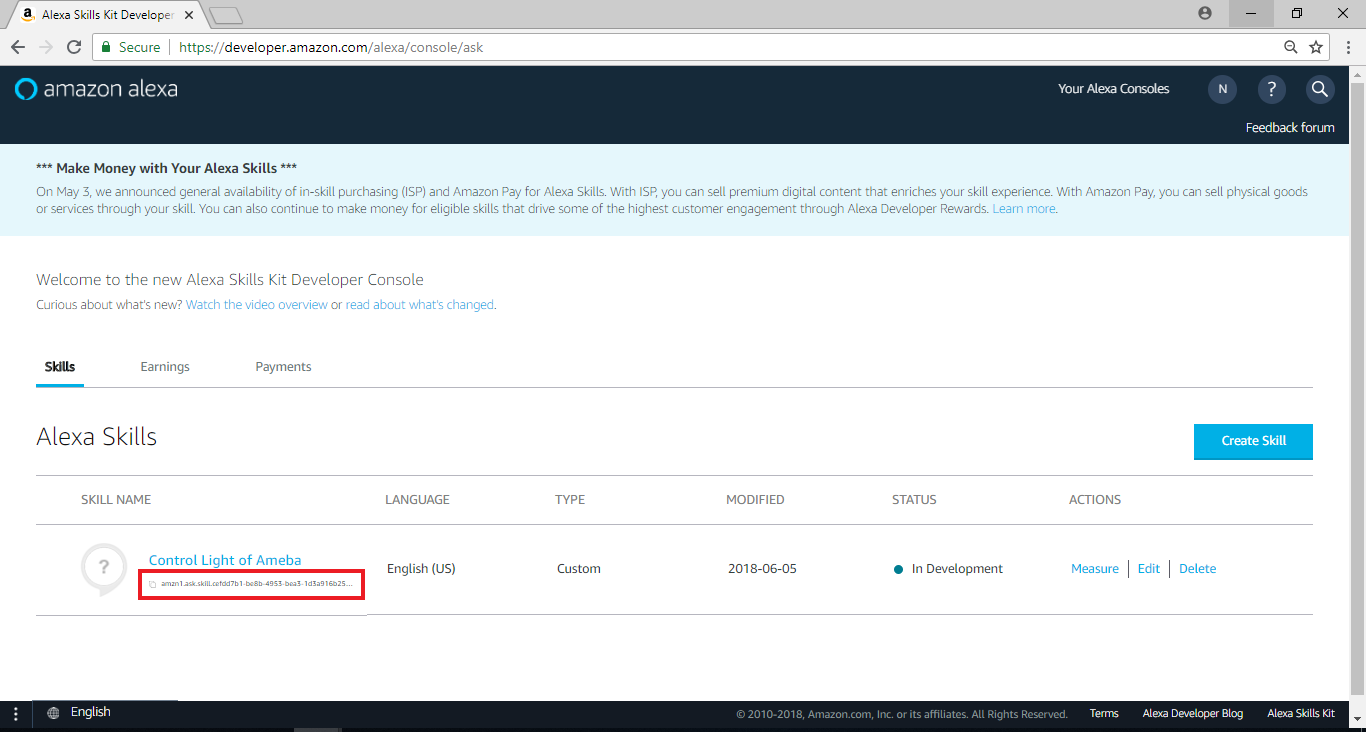
接著我們要回到Alexa Skill的首頁,我們可以看到在Skill Name欄位的下方,已出現一組字碼,這即是我們需要的SKILL ID,點擊他將會自動copy,並且回到上一步的SKILL ID欄位填入SKILL ID
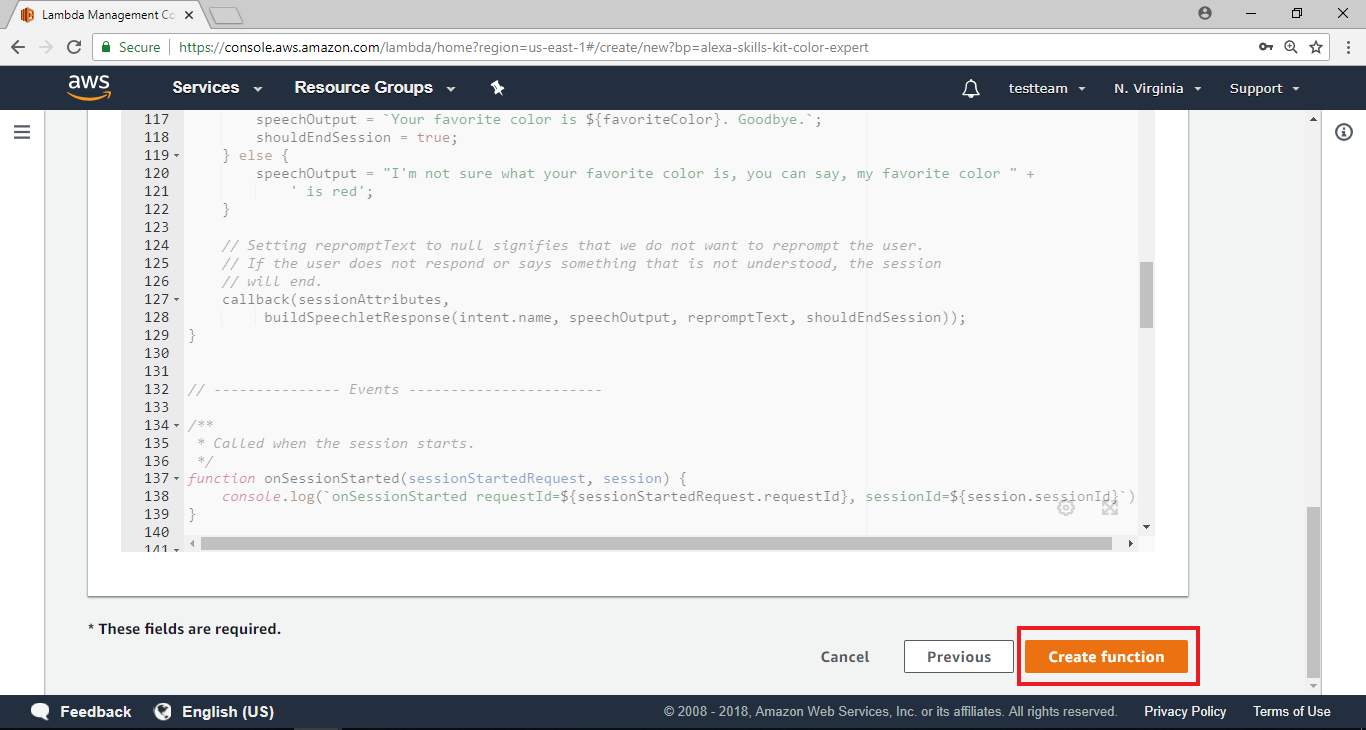
 Kill ID設定好之後,接著要將Function一起設定完成,將頁面拉至最下方,點擊“Create function”
 此時會帶入Function Home Page
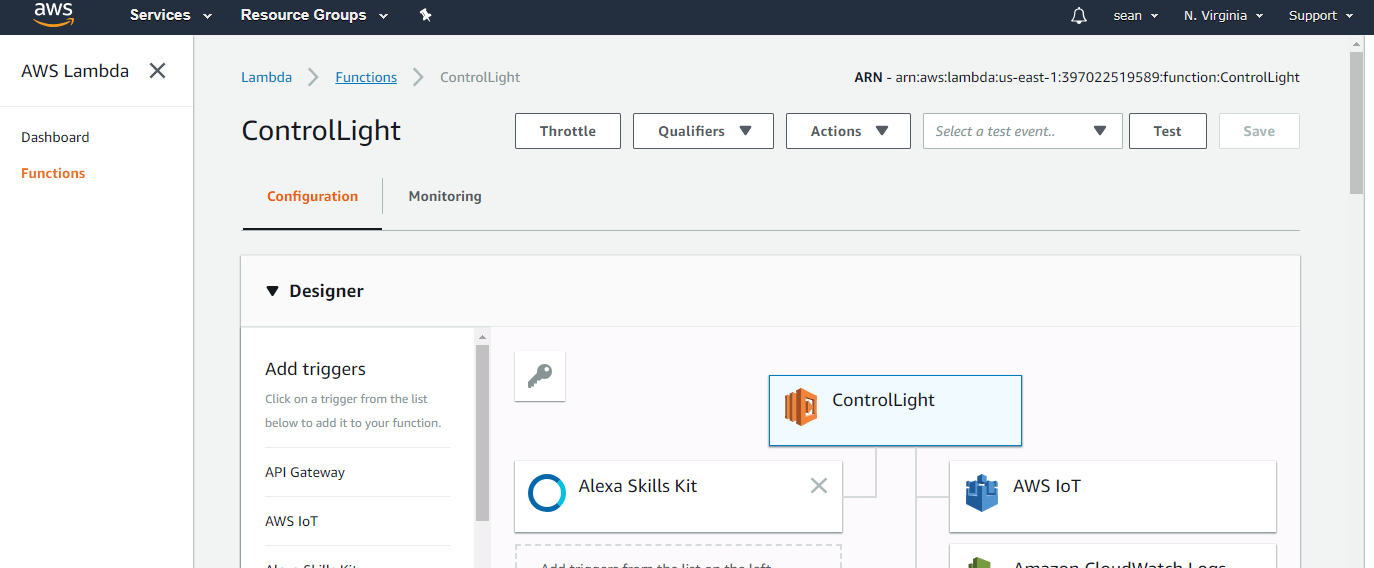
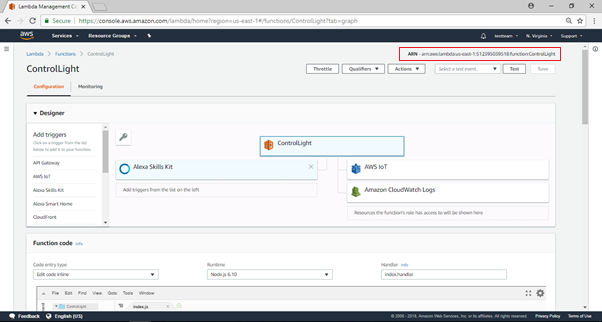 請注意,Function Home Page的右上角有一組字串 “ARN – arn:aws:lambda:us-east-1:553661462376:function:ControlLight”,就是這個Lambda function的end point, 這個會用來填入Alexa的設定頁面
在” Function code”欄位下依序選擇“Edit code inline”, “Node.js 4.3” 及“index.handler”
請注意,Function Home Page的右上角有一組字串 “ARN – arn:aws:lambda:us-east-1:553661462376:function:ControlLight”,就是這個Lambda function的end point, 這個會用來填入Alexa的設定頁面
在” Function code”欄位下依序選擇“Edit code inline”, “Node.js 4.3” 及“index.handler”
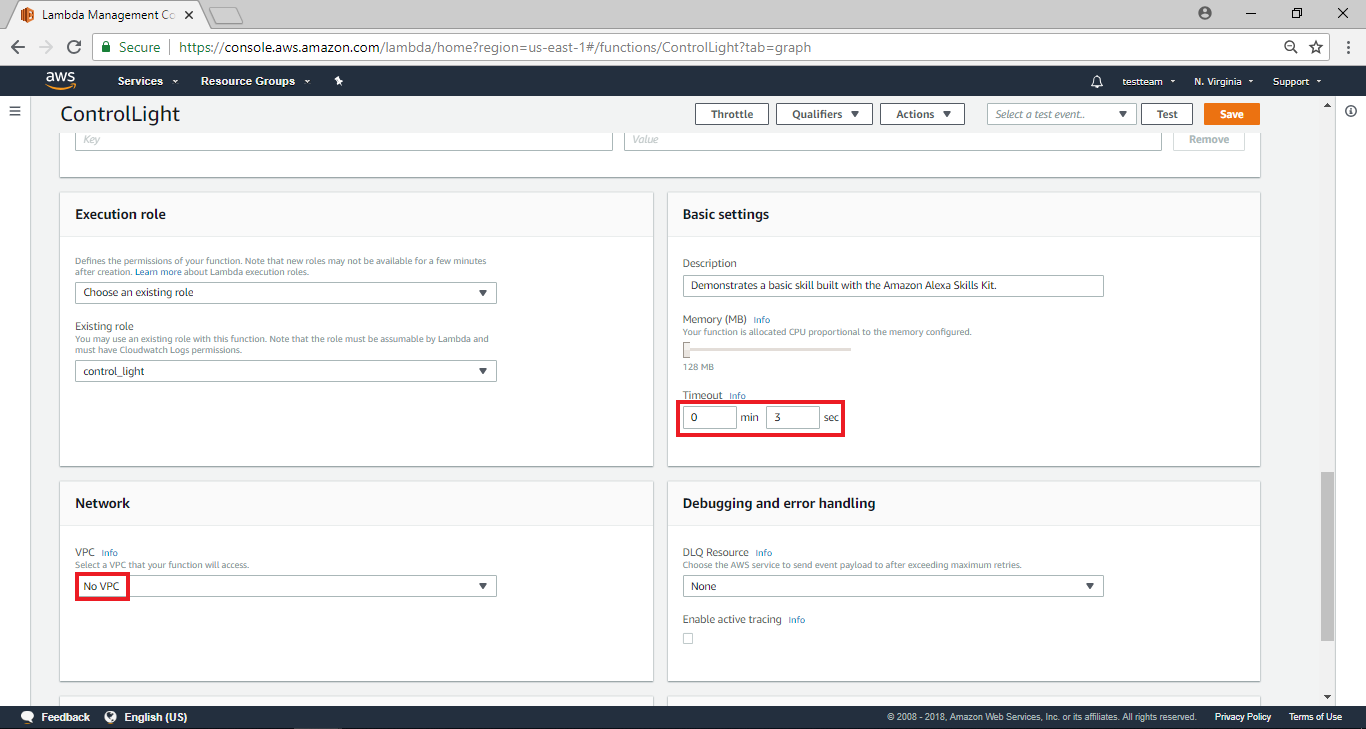
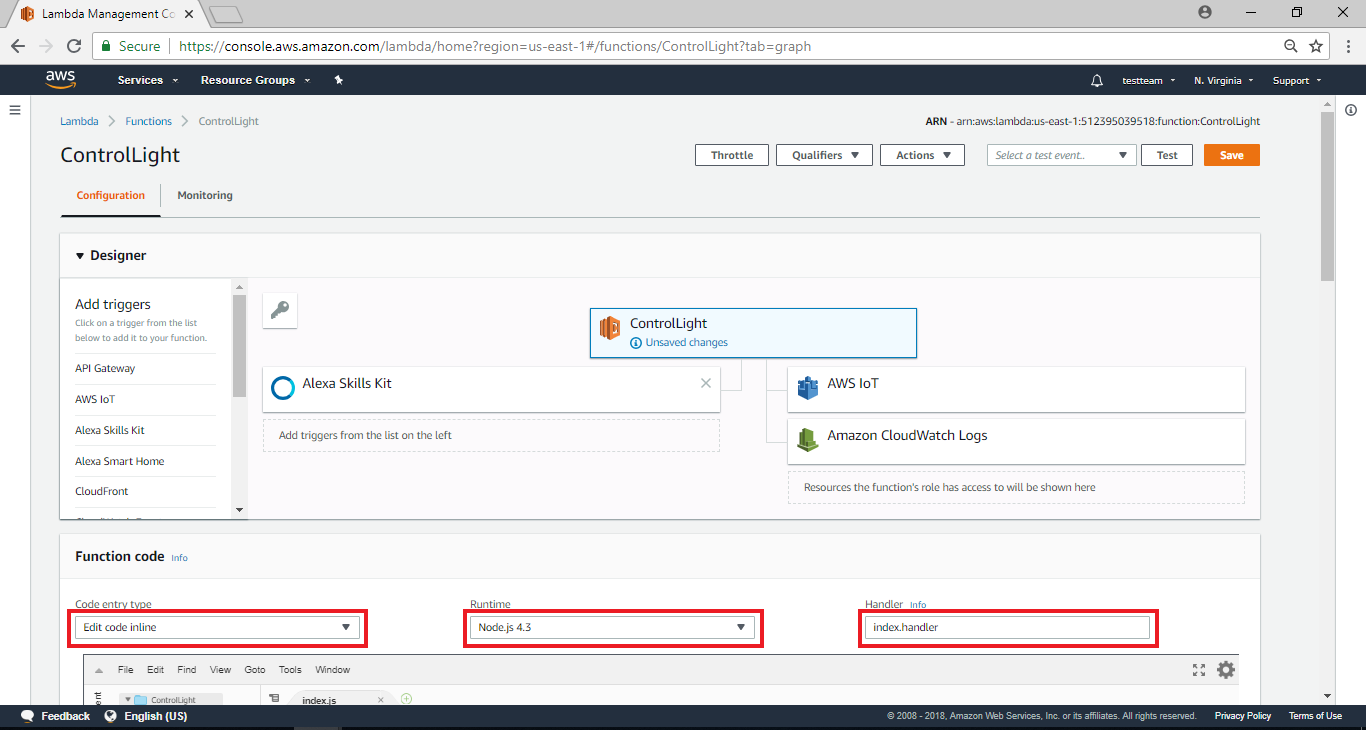 到頁面下方處,輸入“3” sec在Timeout欄位,並在Network欄位選擇“No VPC”,接著點擊右上角的Save鍵,這裡我們暫停AWS Lambda的設定,我們將會再回來編輯程式碼的部份
Kill ID設定好之後,接著要將Function一起設定完成,將頁面拉至最下方,點擊“Create function”
此時會帶入Function Home Page
請注意,Function Home Page的右上角有一組字串 “ARN – arn:aws:lambda:us-east-1:553661462376:function:ControlLight”,就是這個Lambda function的end point, 這個會用來填入Alexa的設定頁面
在” Function code”欄位下依序選擇“Edit code inline”, “Node.js 4.3” 及“index.handler”
到頁面下方處,輸入“3” sec在Timeout欄位,並在Network欄位選擇“No VPC”,接著點擊右上角的Save鍵,這裡我們暫停AWS Lambda的設定,我們將會再回來編輯程式碼的部份
AWS Lambda – Configure test events

AWS IoT – Create thing
請參考之前的文章將Ameba與AWS IoT Shadow的設定完成:
http://www.amebaiot.com/ameba-arduino-amazon-aws-iot/
example的部份, 我們使用 “File” -> “Examples” -> “AmebaMQTTClient” -> “amazon_awsiot_with_ack”
因為Alexa的限制需要將region改成us-east-1, 這部份需要特別注意:
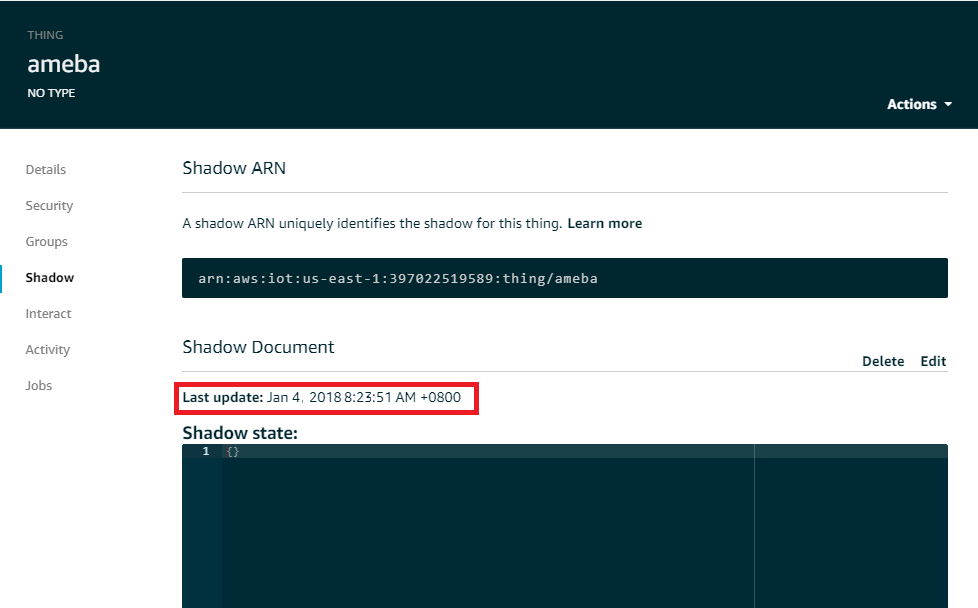
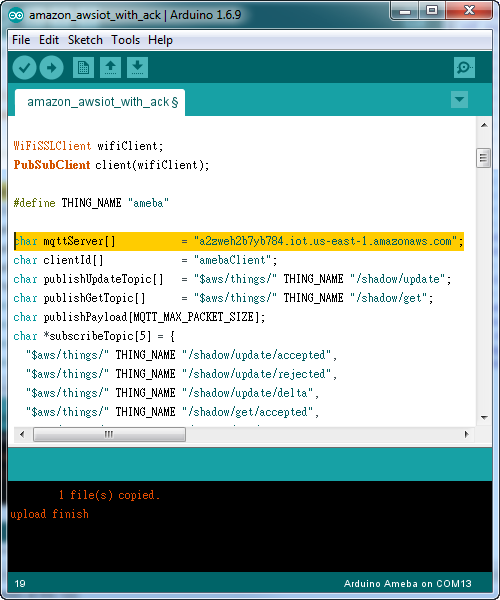 完成之後, 我們點選ameba的thing, 讓右邊的資訊欄出現, 其中REST API endpoint裡, 這個字串 “a2zweh2b7yb784.iot.us-east-1.amazonaws.com”是AWS IoT提供給其它服務使用的endpoint, 這個endpoint我們會拿來填入Lambda所需的資訊裡

完成之後, 我們點選ameba的thing, 讓右邊的資訊欄出現, 其中REST API endpoint裡, 這個字串 “a2zweh2b7yb784.iot.us-east-1.amazonaws.com”是AWS IoT提供給其它服務使用的endpoint, 這個endpoint我們會拿來填入Lambda所需的資訊裡
AWS Lambda – coding
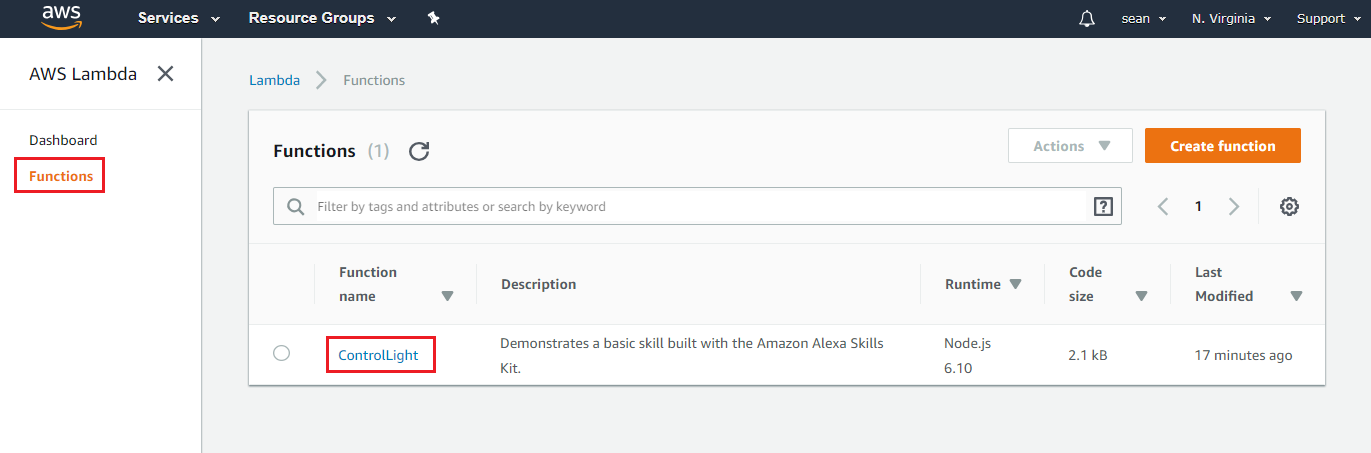
讓我們再回到Lambda web page,左邊選擇Functions,並且會看到剛剛產生的ControlLight funcion,點擊ControlLight之後,帶入Configure頁面
 將頁面拉至下方程式碼編輯處
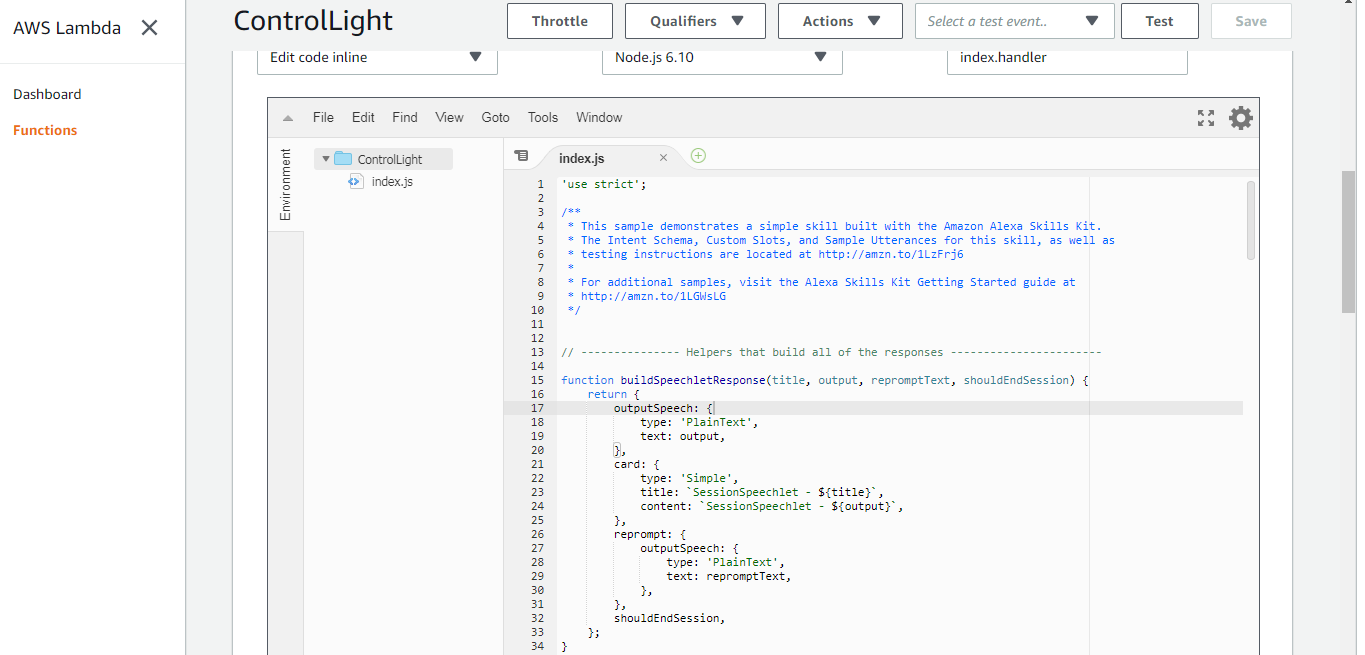 然後我們根據原本的程式碼修改如下:
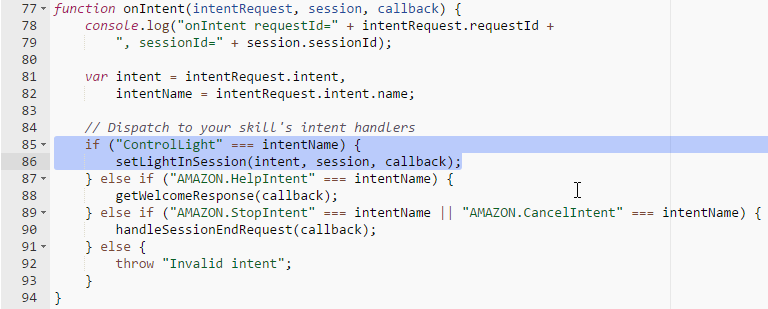
 在onIntent函式裡, 會比對intent的名字, 這邊我們會比對我們設定的intent名字 “ControlLight”, 並且呼叫 setLightInSession的處理函式
 在setLightInSession裡面, 我們可以取得intent的slots資訊, 這邊我們要取得的slot是 “LightState”
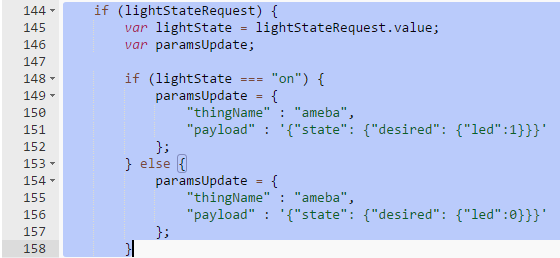
 接著我們判斷這個slot的內容, 並準備要上傳至AWS IoT thing shadow的內容, 其中 “thingName”是AWS IoT我們設定好的thing name, 而payload是thing shadow的格式
 設定好內容之後, 我們呼叫 updateThingShadow並上傳至AWS IoT thing shadow
 成功之後, 會呼叫console.log紀錄內容在log裡, 接著設定讓Alexa回應的語音與文字內容
 確認程式碼之後, 點選File->Save
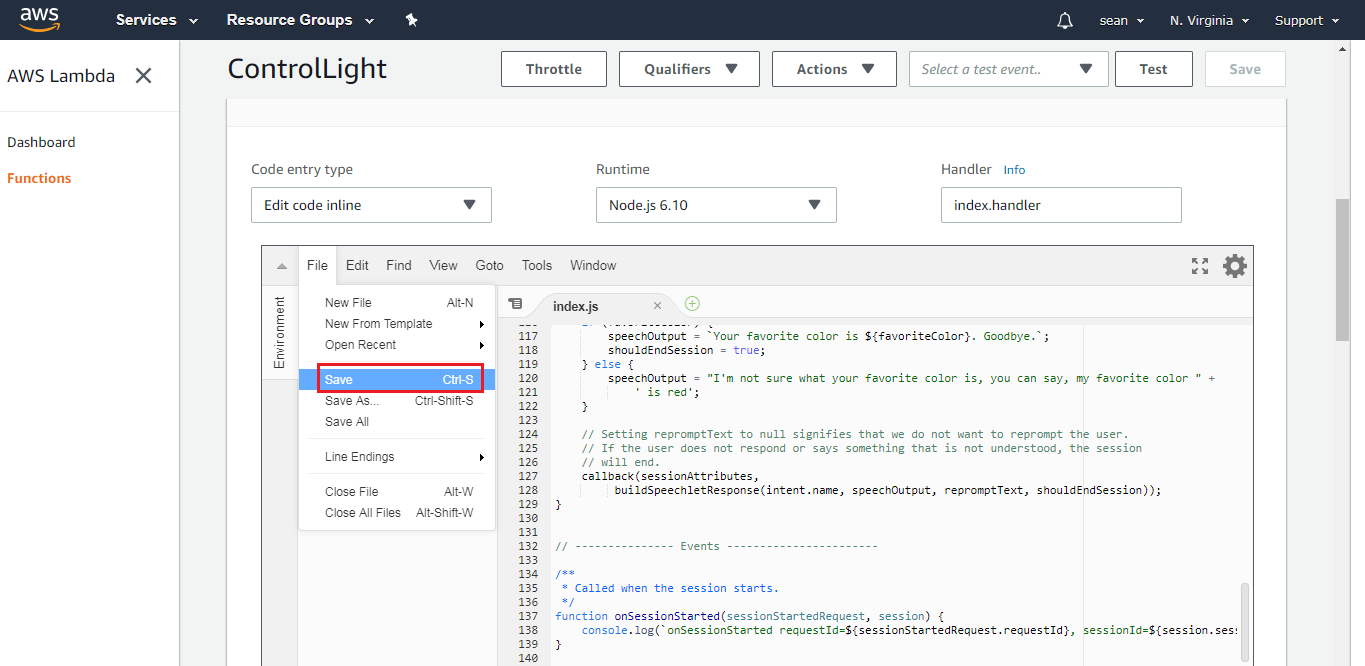 然後在頁面右上方選擇“Configure test events”
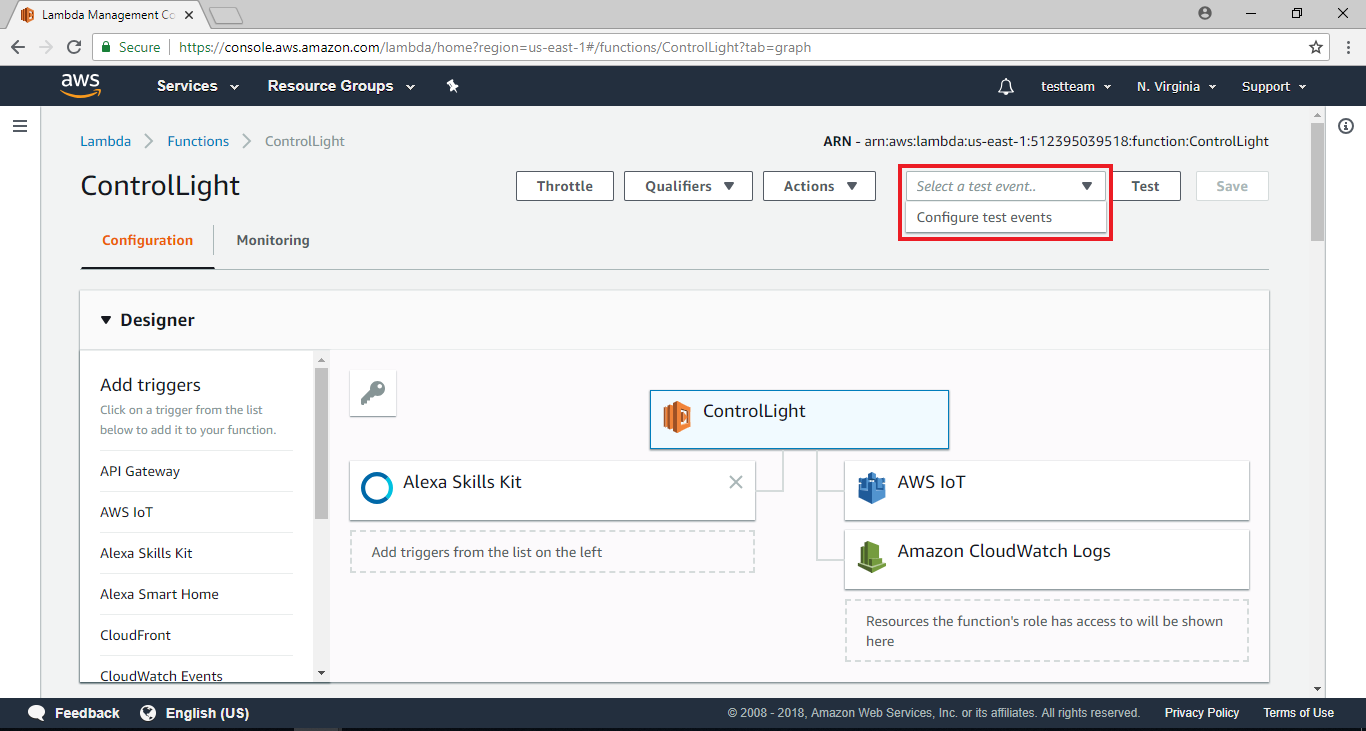 接著會跳出一視窗
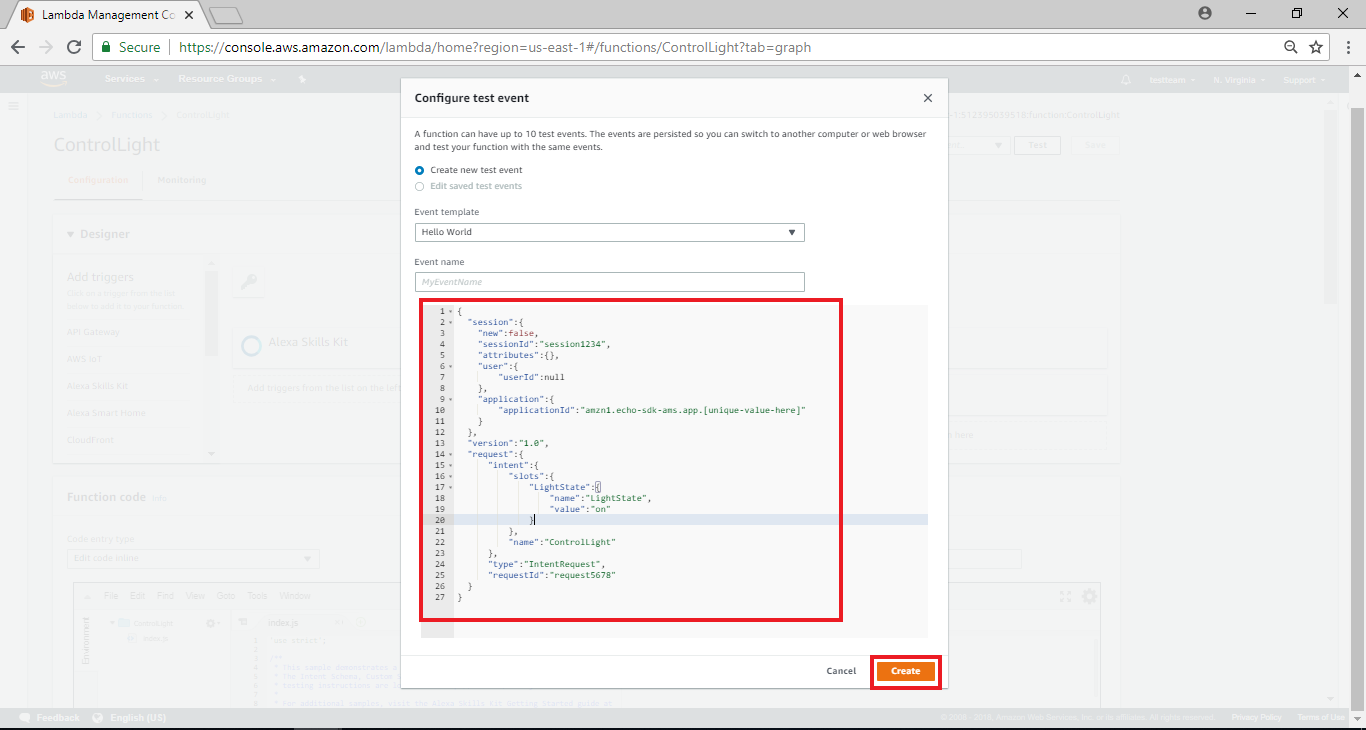 這部份在於設定測試用的event, 這個代表我們可以模擬從Alexa來的event, 以及該event攜帶的資訊, 我們將內容填入如下, 其中跟這個範例有關的修改有intent name, slot name & value
將下列程式碼貼至程式碼編輯處,並在Event Name處填入”light”,接著點擊”create”
這部份在於設定測試用的event, 這個代表我們可以模擬從Alexa來的event, 以及該event攜帶的資訊, 我們將內容填入如下, 其中跟這個範例有關的修改有intent name, slot name & value
將下列程式碼貼至程式碼編輯處,並在Event Name處填入”light”,接著點擊”create”
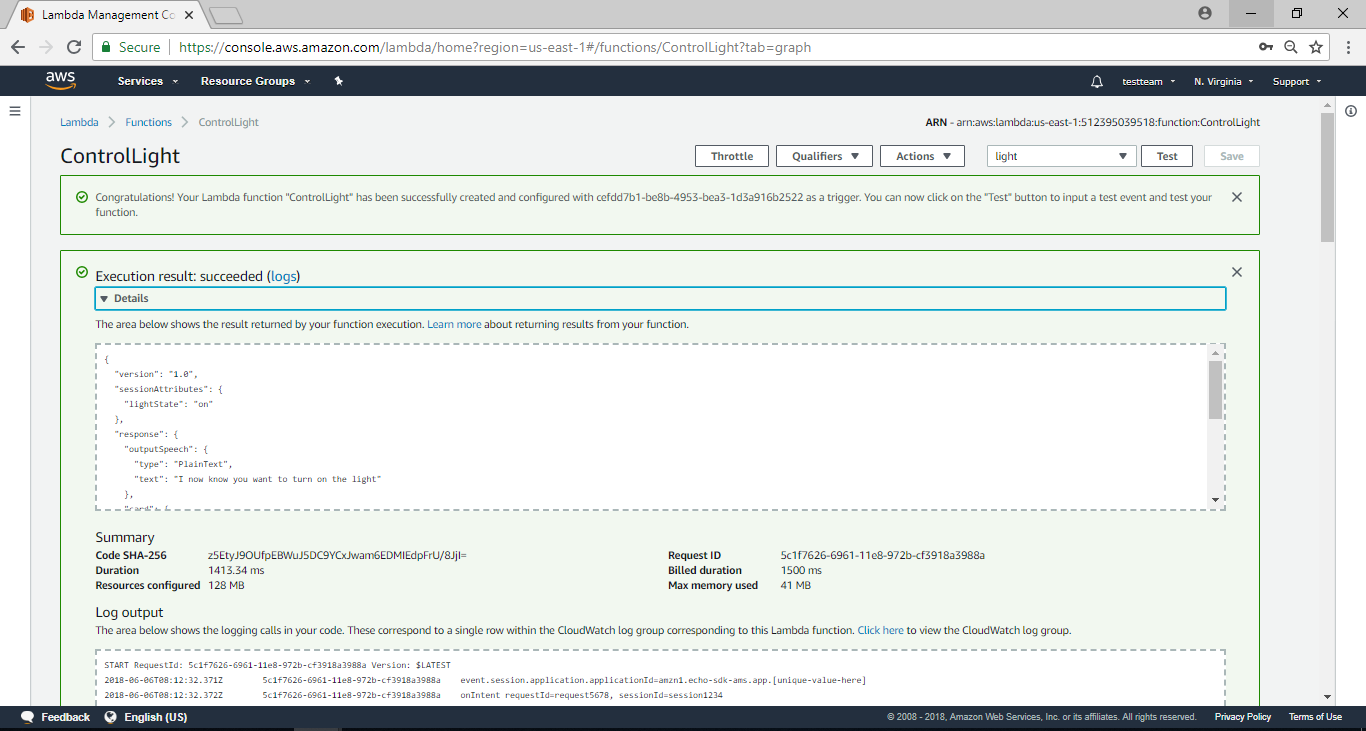
 下方會出現執行的結果與log, 在Execution result裡, 會看到response的outputSpeech裡訊息為 “I now know you want to turn on the light”, 這段文字將預期會讓Alexa以語音方式回應。下方則是log, 如果寫程式遇到麻煩需要加log, 可以在這邊看到執行期間的log
 切到AWS IoT的頁面, 點選thing ameba, 在右邊的資訊欄也會看到 “Last update” 會有一筆最新的更新, 代表AWS Lambda到AWS IoT這段功能已經成功
將頁面拉至下方程式碼編輯處
然後我們根據原本的程式碼修改如下:
/**
 * This sample demonstrates a simple skill built with the Amazon Alexa Skills Kit.
 * The Intent Schema, Custom Slots, and Sample Utterances for this skill, as well as
 * testing instructions are located at http://amzn.to/1LzFrj6
 *
 * For additional samples, visit the Alexa Skills Kit Getting Started guide at
 * http://amzn.to/1LGWsLG
 */

var AWS = require('aws-sdk');
AWS.config.region = "us-east-1";
var iotData = new AWS.IotData({endpoint: "a2zweh2b7yb784.iot.us-east-1.amazonaws.com"});

// Route the incoming request based on type (LaunchRequest, IntentRequest, // etc.) The JSON body of the request is provided in the event parameter.
exports.handler = function (event, context) {
    try {
        console.log("event.session.application.applicationId=" + event.session.application.applicationId);

        /**
         * Uncomment this if statement and populate with your skill's application ID to
         * prevent someone else from configuring a skill that sends requests to this function.
         */
        /*
        if (event.session.application.applicationId !== "amzn1.echo-sdk-ams.app.[unique-value-here]") {
             context.fail("Invalid Application ID");
        }
        */

        if (event.session.new) {
            onSessionStarted({requestId: event.request.requestId}, event.session);
        }

        if (event.request.type === "LaunchRequest") {
            onLaunch(event.request,
                event.session,
                function callback(sessionAttributes, speechletResponse) {
                    context.succeed(buildResponse(sessionAttributes, speechletResponse));
                });
        } else if (event.request.type === "IntentRequest") {
            onIntent(event.request,
                event.session,
                function callback(sessionAttributes, speechletResponse) {
                    context.succeed(buildResponse(sessionAttributes, speechletResponse));
                });
        } else if (event.request.type === "SessionEndedRequest") {
            onSessionEnded(event.request, event.session);
            context.succeed();
        }
    } catch (e) {
        context.fail("Exception: " + e);
    }
};

/**
 * Called when the session starts.
 */
function onSessionStarted(sessionStartedRequest, session) {
    console.log("onSessionStarted requestId=" + sessionStartedRequest.requestId +
        ", sessionId=" + session.sessionId);
}

/**
 * Called when the user launches the skill without specifying what they want.
 */
function onLaunch(launchRequest, session, callback) {
    console.log("onLaunch requestId=" + launchRequest.requestId +
        ", sessionId=" + session.sessionId);

    // Dispatch to your skill's launch.
    getWelcomeResponse(callback);
}

/**
 * Called when the user specifies an intent for this skill.
 */
function onIntent(intentRequest, session, callback) {
    console.log("onIntent requestId=" + intentRequest.requestId +
        ", sessionId=" + session.sessionId);

    var intent = intentRequest.intent,
        intentName = intentRequest.intent.name;

    // Dispatch to your skill's intent handlers
    if ("ControlLight" === intentName) {
        setLightInSession(intent, session, callback);
    } else if ("AMAZON.HelpIntent" === intentName) {
        getWelcomeResponse(callback);
    } else if ("AMAZON.StopIntent" === intentName || "AMAZON.CancelIntent" === intentName) {
        handleSessionEndRequest(callback);
    } else {
        throw "Invalid intent";
    }
}

/**
 * Called when the user ends the session.
 * Is not called when the skill returns shouldEndSession=true.
 */
function onSessionEnded(sessionEndedRequest, session) {
    console.log("onSessionEnded requestId=" + sessionEndedRequest.requestId +
        ", sessionId=" + session.sessionId);
    // Add cleanup logic here
}

// --------------- Functions that control the skill's behavior -----------------------

function getWelcomeResponse(callback) {
    // If we wanted to initialize the session to have some attributes we could add those here.
    var sessionAttributes = {};
    var cardTitle = "Welcome";
    var speechOutput = "Welcome to the Ameba Controller example. " +
        "Please tell me next action by saying, turn on the light";

    // If the user either does not reply to the welcome message or says something that is not
    // understood, they will be prompted again with this text.
    var repromptText = "Please tell me next action by saying, turn on the light";
    var shouldEndSession = false;

    callback(sessionAttributes,
        buildSpeechletResponse(cardTitle, speechOutput, repromptText, shouldEndSession));
}

function handleSessionEndRequest(callback) {
    var cardTitle = "Session Ended";
    var speechOutput = "Thank you for trying the Ameba Controller example. Have a nice day!";
    // Setting this to true ends the session and exits the skill.
    var shouldEndSession = true;

    callback({}, buildSpeechletResponse(cardTitle, speechOutput, null, shouldEndSession));
}

/**
 * Sets the led in the session and prepares the speech to reply to the user.
 */
function setLightInSession(intent, session, callback) {
    var cardTitle = intent.name;
    var lightStateRequest = intent.slots.LightState;
    var repromptText = "";
    var sessionAttributes = {};
    var shouldEndSession = true;
    var speechOutput = "";

    if (lightStateRequest) {
        var lightState = lightStateRequest.value;
        var paramsUpdate;

        if (lightState === "on") {
            paramsUpdate = {
                "thingName" : "ameba",
                "payload" : '{"state": {"desired": {"led":1}}}'
            };
        } else {
            paramsUpdate = {
                "thingName" : "ameba",
                "payload" : '{"state": {"desired": {"led":0}}}'
            };
        }

		//Update Device Shadow
		iotData.updateThingShadow(paramsUpdate, function(err, data) {
			if (err){
				console.log(err, err.stack);

				speechOutput = "fail to update thing shadow";
				repromptText = "fail to update thing shadow";
				callback(sessionAttributes,buildSpeechletResponse(cardTitle, speechOutput, repromptText, shouldEndSession));
			}
			else {
				console.log(data);

        		sessionAttributes = createLightStateAttributes(lightState);
                speechOutput = "I now know you want to turn " + lightState + " the light";
                repromptText = "I now know you want to turn " + lightState + " the light";
                callback(sessionAttributes,buildSpeechletResponse(cardTitle, speechOutput, repromptText, shouldEndSession));
			}
		});
    } else {
        speechOutput = "Please try again";
        repromptText = "Please try again";
        callback(sessionAttributes,buildSpeechletResponse(cardTitle, speechOutput, repromptText, shouldEndSession));
    }
}

function createLightStateAttributes(lightState) {
    return {
        lightState: lightState
    };
}

// --------------- Helpers that build all of the responses -----------------------

function buildSpeechletResponse(title, output, repromptText, shouldEndSession) {
    return {
        outputSpeech: {
            type: "PlainText",
            text: output
        },
        card: {
            type: "Simple",
            title: "SessionSpeechlet - " + title,
            content: "SessionSpeechlet - " + output
        },
        reprompt: {
            outputSpeech: {
                type: "PlainText",
                text: repromptText
            }
        },
        shouldEndSession: shouldEndSession
    };
}

function buildResponse(sessionAttributes, speechletResponse) {
    return {
        version: "1.0",
        sessionAttributes: sessionAttributes,
        response: speechletResponse
    };
}
一些需要注意的修改如下:
在這邊, region要填入正確的region, 在endpoint的地方需要填入AWS IoT的endpoint, 也就是在thing 的資訊欄裡, REST API endpoint的資訊, 請根據你創建的thing填入對應的endpoint
在onIntent函式裡, 會比對intent的名字, 這邊我們會比對我們設定的intent名字 “ControlLight”, 並且呼叫 setLightInSession的處理函式
在setLightInSession裡面, 我們可以取得intent的slots資訊, 這邊我們要取得的slot是 “LightState”
接著我們判斷這個slot的內容, 並準備要上傳至AWS IoT thing shadow的內容, 其中 “thingName”是AWS IoT我們設定好的thing name, 而payload是thing shadow的格式
設定好內容之後, 我們呼叫 updateThingShadow並上傳至AWS IoT thing shadow
成功之後, 會呼叫console.log紀錄內容在log裡, 接著設定讓Alexa回應的語音與文字內容
確認程式碼之後, 點選File->Save
然後在頁面右上方選擇“Configure test events”
接著會跳出一視窗
這部份在於設定測試用的event, 這個代表我們可以模擬從Alexa來的event, 以及該event攜帶的資訊, 我們將內容填入如下, 其中跟這個範例有關的修改有intent name, slot name & value
將下列程式碼貼至程式碼編輯處,並在Event Name處填入”light”,接著點擊”create”
{
  "session": {
    "new": false,
    "sessionId": "session1234",
    "attributes": {},
    "user": {
      "userId": null
    },
    "application": {
      "applicationId": "amzn1.echo-sdk-ams.app.[unique-value-here]"
    }
  },
  "version": "1.0",
  "request": {
    "intent": {
      "slots": {
        "LightState": {
          "name": "LightState",
          "value": "on"
        }
      },
      "name": "ControlLight"
    },
    "type": "IntentRequest",
    "requestId": "request5678"
  }
}
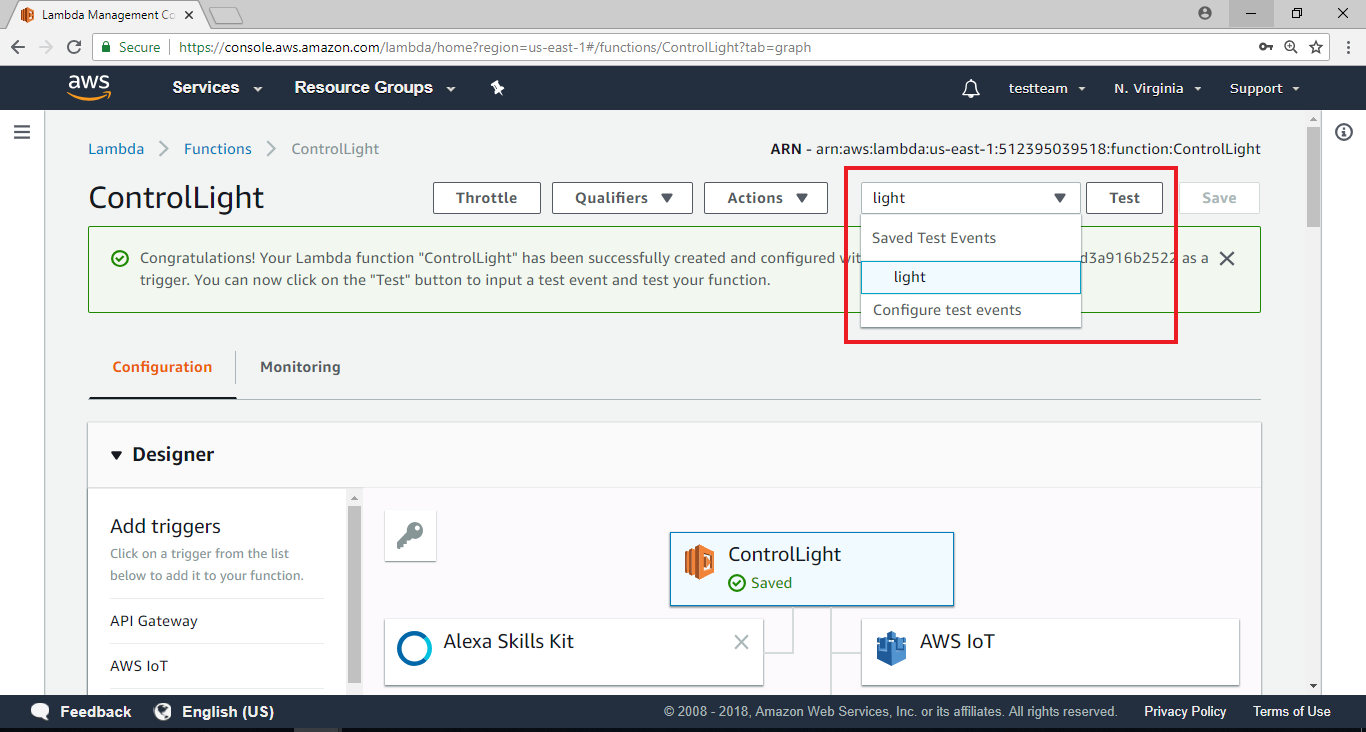
回到上一頁後,在上方處選擇剛建立的light event,並點擊”Test”
下方會出現執行的結果與log, 在Execution result裡, 會看到response的outputSpeech裡訊息為 “I now know you want to turn on the light”, 這段文字將預期會讓Alexa以語音方式回應。下方則是log, 如果寫程式遇到麻煩需要加log, 可以在這邊看到執行期間的log
切到AWS IoT的頁面, 點選thing ameba, 在右邊的資訊欄也會看到 “Last update” 會有一筆最新的更新, 代表AWS Lambda到AWS IoT這段功能已經成功
Amazon Alexa – EndPoint Configuration
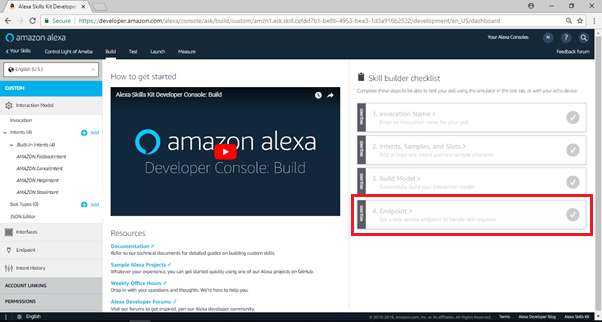
回到Amazon Alexa Skill的主頁,這次我們要來設定EndPoint,點擊右下方4.Endpoint
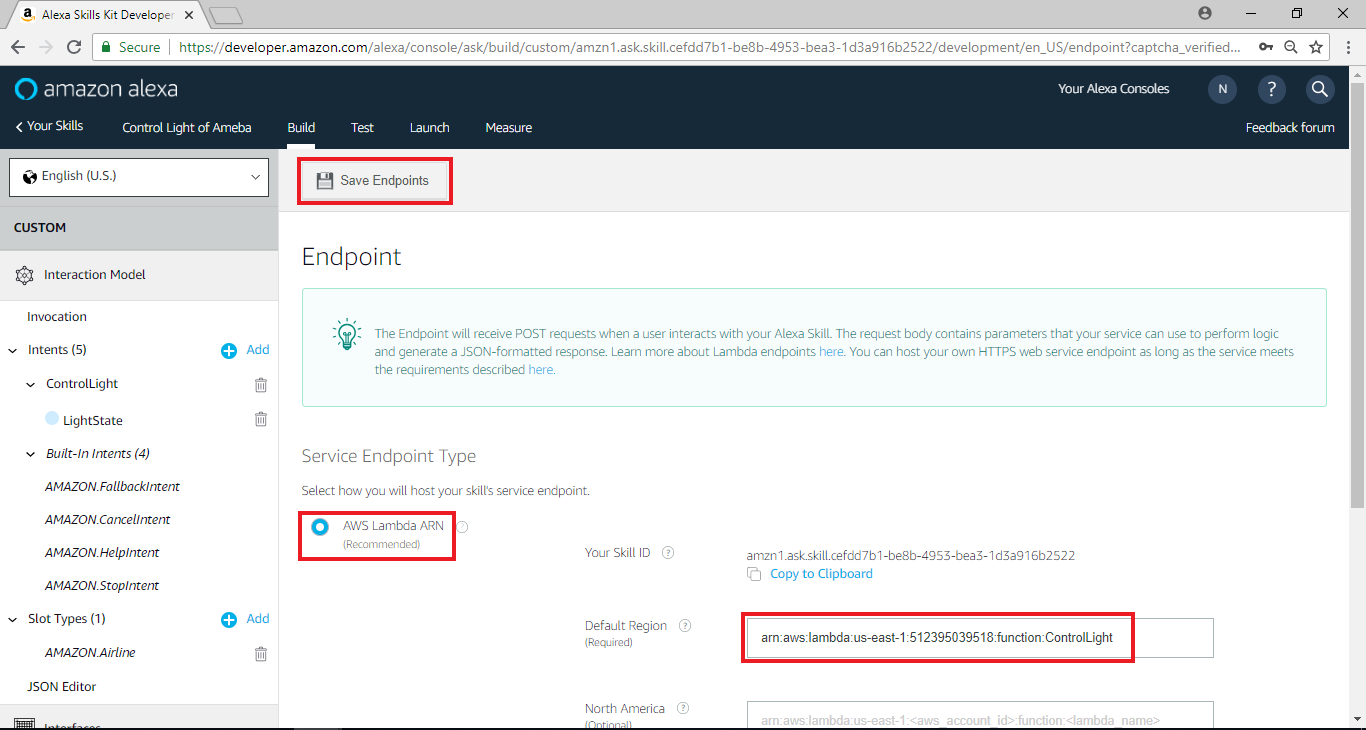
 接著進入編輯Endpoint的頁面,選擇”AWS Lambda ARN”為Service Endpoint Type,並且將剛剛拿到的ARN 字串,“arn:aws:lambda:us-east-1:553661462376:function:ControlLight”,貼至Default region欄位,請根據你創建的Lambda function的endpoint填入對應的值, (請注意, 這個endpoint並不是AWS IoT裡thing的REST API endpoint, 而是Lumbda function右上角的ARN的內容) ,並點擊“Save Endpoint”
接著進入編輯Endpoint的頁面,選擇”AWS Lambda ARN”為Service Endpoint Type,並且將剛剛拿到的ARN 字串,“arn:aws:lambda:us-east-1:553661462376:function:ControlLight”,貼至Default region欄位,請根據你創建的Lambda function的endpoint填入對應的值, (請注意, 這個endpoint並不是AWS IoT裡thing的REST API endpoint, 而是Lumbda function右上角的ARN的內容) ,並點擊“Save Endpoint”
Amazon Alexa – Test
在Test頁面, 我們可以做一些基本測試
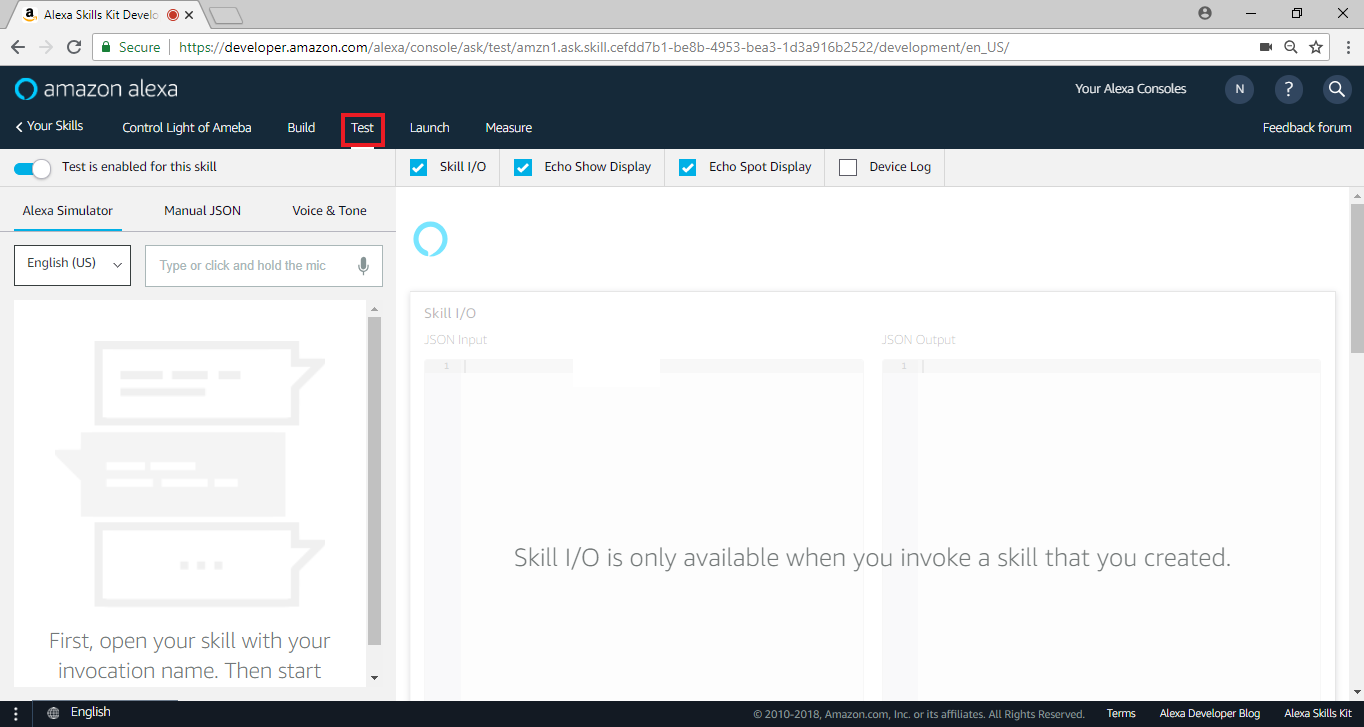 在左側輸入“ameba controller”來啟動這個skill,我們可以測試Alexa收到的語音資料裡, 它會如何發音
它使用SSML tags讓Alexa發出特定的語音像是拼出hello, 點選播放鍵就可以聽看看語音的結果
這邊的文字也就是Lambda回傳的outputSpeech內容, 所以我們可以在Lambda的回傳語音訊息裡有更多彈性
在左側輸入“ameba controller”來啟動這個skill,我們可以測試Alexa收到的語音資料裡, 它會如何發音
它使用SSML tags讓Alexa發出特定的語音像是拼出hello, 點選播放鍵就可以聽看看語音的結果
這邊的文字也就是Lambda回傳的outputSpeech內容, 所以我們可以在Lambda的回傳語音訊息裡有更多彈性
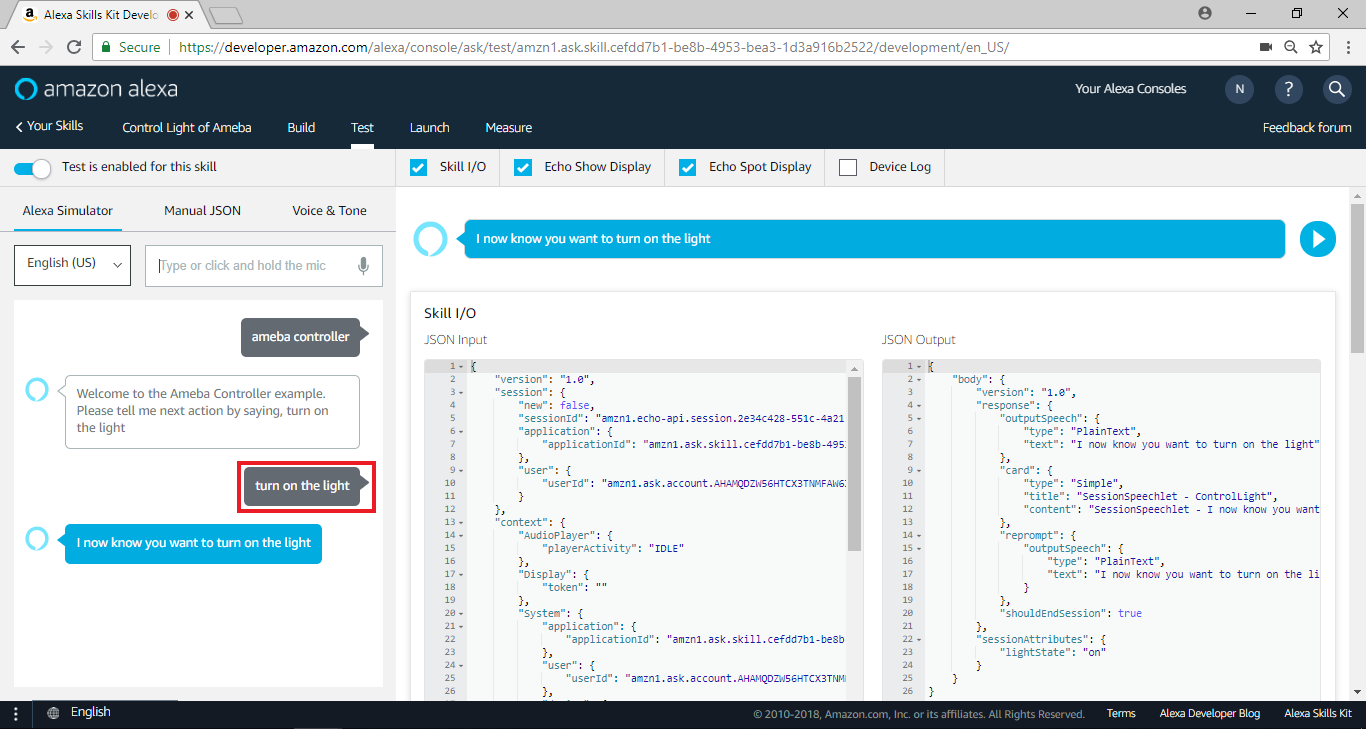
 我們可以填入使用者發出的語音訊息, 並且讓Alexa假裝聽到這個訊息做對應的處理,接著輸入“Turn on the light”控制燈光的開啟
 這段語音訊息會被Alexa處理, 送至Lambda function, Lambda function處理完之後再回傳結果, 我們點選“Voice & Tone”和”Play”可以聆聽這段結果
 同時我們可以切換瀏覽器頁籤至AWS IoT確定thing ameba有收到這份更新
到這個階段, 我們已經將整個功能都做完了。由於這個skill只是測試用途, 我們並不會接著做上架的設定, 使用者如果有興趣可以接著做 “Publishing Information” 與 “Privacy & Compliance”
但是在 “Test”階段, 使用者已經可以使用自己創建的Skill, 我們接著看該如何實際測試
同時我們可以切換瀏覽器頁籤至AWS IoT確定thing ameba有收到這份更新
到這個階段, 我們已經將整個功能都做完了。由於這個skill只是測試用途, 我們並不會接著做上架的設定, 使用者如果有興趣可以接著做 “Publishing Information” 與 “Privacy & Compliance”
但是在 “Test”階段, 使用者已經可以使用自己創建的Skill, 我們接著看該如何實際測試
在左側輸入“ameba controller”來啟動這個skill,我們可以測試Alexa收到的語音資料裡, 它會如何發音
它使用SSML tags讓Alexa發出特定的語音像是拼出hello, 點選播放鍵就可以聽看看語音的結果
這邊的文字也就是Lambda回傳的outputSpeech內容, 所以我們可以在Lambda的回傳語音訊息裡有更多彈性
我們可以填入使用者發出的語音訊息, 並且讓Alexa假裝聽到這個訊息做對應的處理,接著輸入“Turn on the light”控制燈光的開啟
這段語音訊息會被Alexa處理, 送至Lambda function, Lambda function處理完之後再回傳結果, 我們點選“Voice & Tone”和”Play”可以聆聽這段結果
同時我們可以切換瀏覽器頁籤至AWS IoT確定thing ameba有收到這份更新
到這個階段, 我們已經將整個功能都做完了。由於這個skill只是測試用途, 我們並不會接著做上架的設定, 使用者如果有興趣可以接著做 “Publishing Information” 與 “Privacy & Compliance”
但是在 “Test”階段, 使用者已經可以使用自己創建的Skill, 我們接著看該如何實際測試
測試 – 支援Alexa的裝置
首先我們需要支援Alexa的裝置, Amazon有推出支援Alexa的裝置, 你可以在這邊找到相關的訊息:
https://www.amazon.com/Amazon-Echo-Bluetooth-Speaker-with-WiFi-Alexa/dp/B00X4WHP5E
或者你可以使用支援Alexa的手機應用程式, 這裡我們使用IOS的應用程式:
https://itunes.apple.com/us/app/lexi-for-alexa-voice-services/id1092933088
一般來說這類app需要你登入amazon的帳戶
測試 – 管理Amazon Alexa
在實際使用支援Alexa的裝置時, 我們可以管理我們可以使用哪些Skill, 比如說我們可以訂閱披薩公司推出的skill, 並用該skill訂購披薩
你可以登入網頁版的管理頁面:
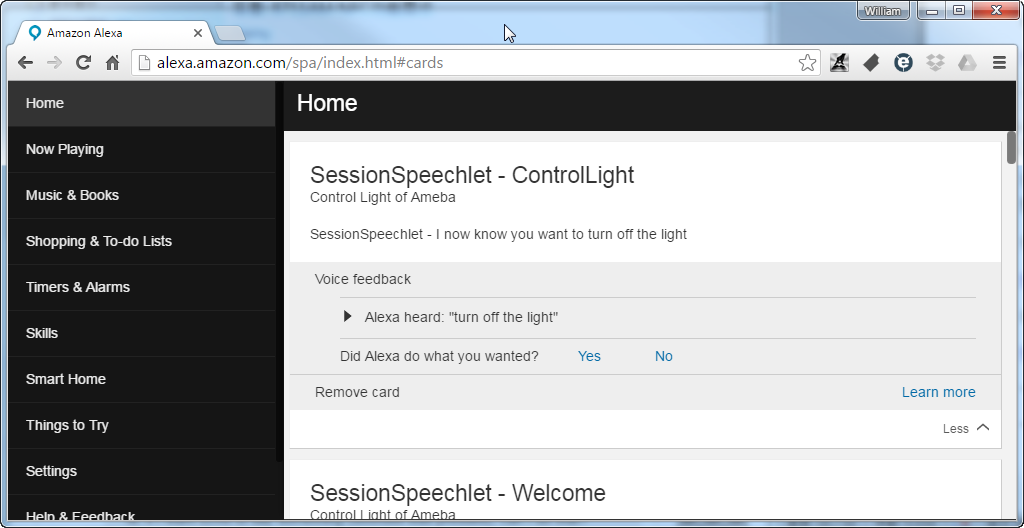
http://alexa.amazon.com/spa/index.html#cards
或是使用手機應用程式, 但要注意目前app只開放美國地區下載
https://www.amazon.com/gp/help/customer/display.html?nodeId=201602060
在首頁裡, 會出現上一次Alexa聽到的訊息, 這可以幫助你釐清是程式寫錯或者是Alexa聽錯
測試 – Demo
實際在測試時, 因為turn on與turn off的語句與Amazon Smart home kit的關聯性太高, 開關燈的其它的字眼也容易觸發Smart home kit, 造成我們開發的skill無法被觸發, 所以我們分兩段呼叫我們的skill: 底下是影片事件流程
1. User: “Alexa, ask Ameba Controller”
這裡的 “Alexa, ask…”會讓Alexa嘗試找尋 Invocation Name, 我們在 “Amazon Alexa – Skill Information” 這小節裡將 Invocation Name設定成 “Ameba Controller”, 所以當我們這樣說, Alexa會開啟Ameba Controller的session
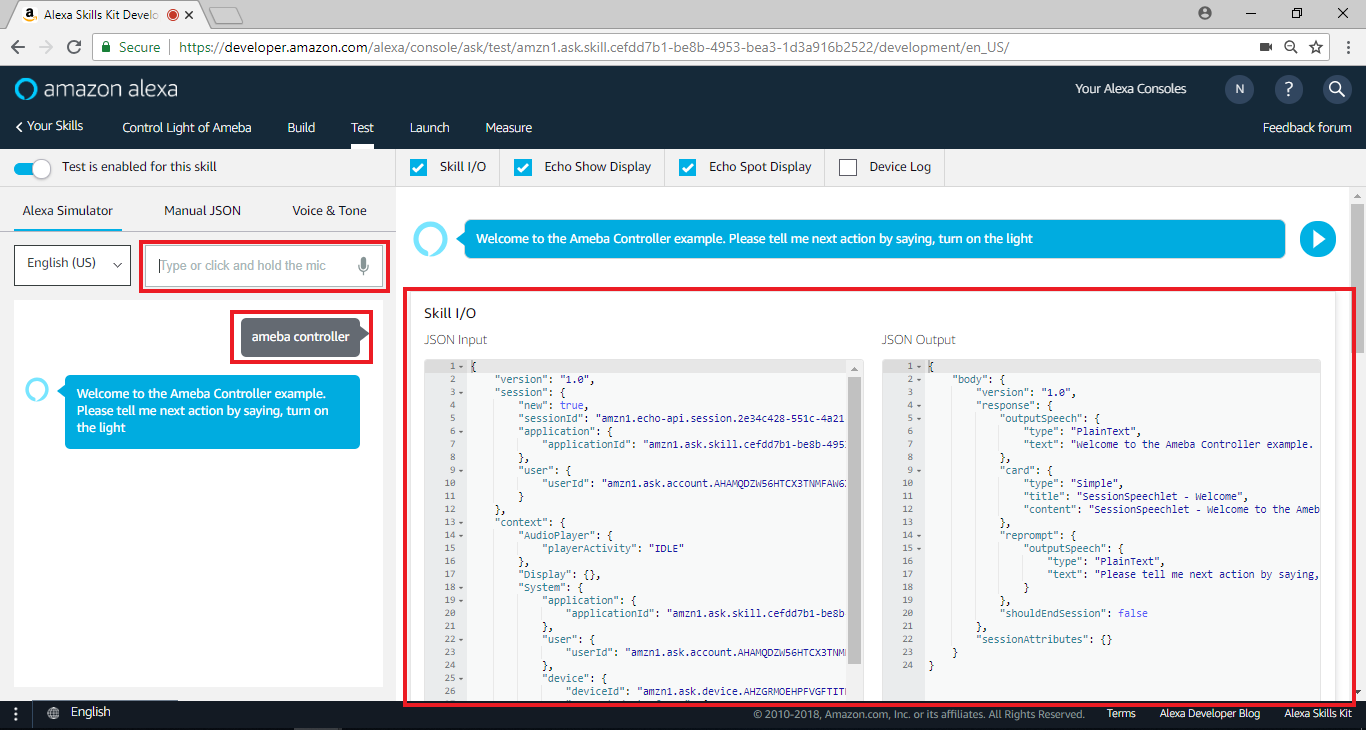
2. Alexa: “Welcome to the Ameba Controller example. Please tell me next action by saying, turn on the light”
這段話出自於Lambda function裡的 getWelcomeResponse(), 代表Lambda function 有收到IntentRequest的命令
3. User: “Turn on the light”
此時會等一陣子, Lambda會嘗試將開燈的命令傳至AWS IoT thing shadow
4. Alexa: “I now know you want to turn on the light”
此時燈亮, Lambda function在上傳命令至AWS IoT thing shadow之後會關閉session, 整個流程就完成了
關燈的流程是差不多的, 就不贅述了
