Use Amazon Alexa to control Ameba
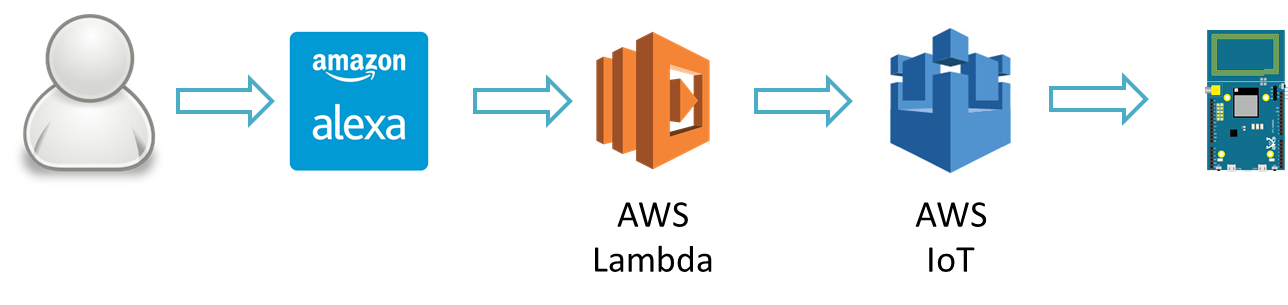
Alexa is a Amazon’s cloud voice service that allow developers to voice-control connected Amazon services. An example application is Amazon Echo, which is a voice-control assistant. When users speak to Amazon Echo, it analyzes the received voice and make appropriate response. In this example, we introduce how to connect Amazon services (including Amazon Alexa, AWS Lambda, AWS IoT, AWS IAM) and use Alexa to control LED on Ameba.Preparation
- Ameba x 1
- LED x 1
Example
At first, we summarize the usage scenario in this example.
(1) When a user says “Turn on the light” to the test device (which supports Amazon Alexa), Alexa analyzes the voice command according to the schema and sample utterances file (provided by user beforehand), and generates intent json.
(2) Alexa submit the intent json to AWS Lambda. According to the intent, Lambda service then sends update message to AWS IoT Shadow service.
(3) AWS IoT Shadow service updates shadow state according to the update message from Lambda service.
(3.1) If Ameba is online and has subscribed the shadow service, Ameba turns on the LED.
(3.2) Then Lambda generates the text and voice response message and send to Alexa.
(4) Finally, the user can hear the voice message to indicate the LED has been successfully turned on.
 In order to use Amazon Lambda to access other services, we need the AWS IAM service to manage access permission.
In following sections we will introduce each AWS services and required setup procedure.
In order to use Amazon Lambda to access other services, we need the AWS IAM service to manage access permission.
In following sections we will introduce each AWS services and required setup procedure.
In order to use Amazon Lambda to access other services, we need the AWS IAM service to manage access permission.
In following sections we will introduce each AWS services and required setup procedure.
Amazon Alexa – short introduction
Alexa Skills Kit (ASK) is a voice-driven service. It can be connected to cloud services and user can voice-control the connected services and receive voice response. The voice analysis feature provided by Alexa is ready-to-use, makes the developers can focus on the design of the cloud service and the user interaction model.
Amazon Alexa – Custom Skills ag. Smart Home Skills
Alexa provides two types of services:
(1) Custom Skills: developers can custom design the required interaction model, including conversation flow, analysis keyword, then send intent.
(2) Smart Home Skills: alternaively, developers can use the smart home models provided by Alexa, and send intent.
Taking the design flexibility into account, we use custom skills in this example.
Further description is provided in Amazon official document:
https://developer.amazon.com/public/solutions/alexa/alexa-skills-kit/docs/understanding-the-different-types-of-skills
Amazon Alexa – Create Skill
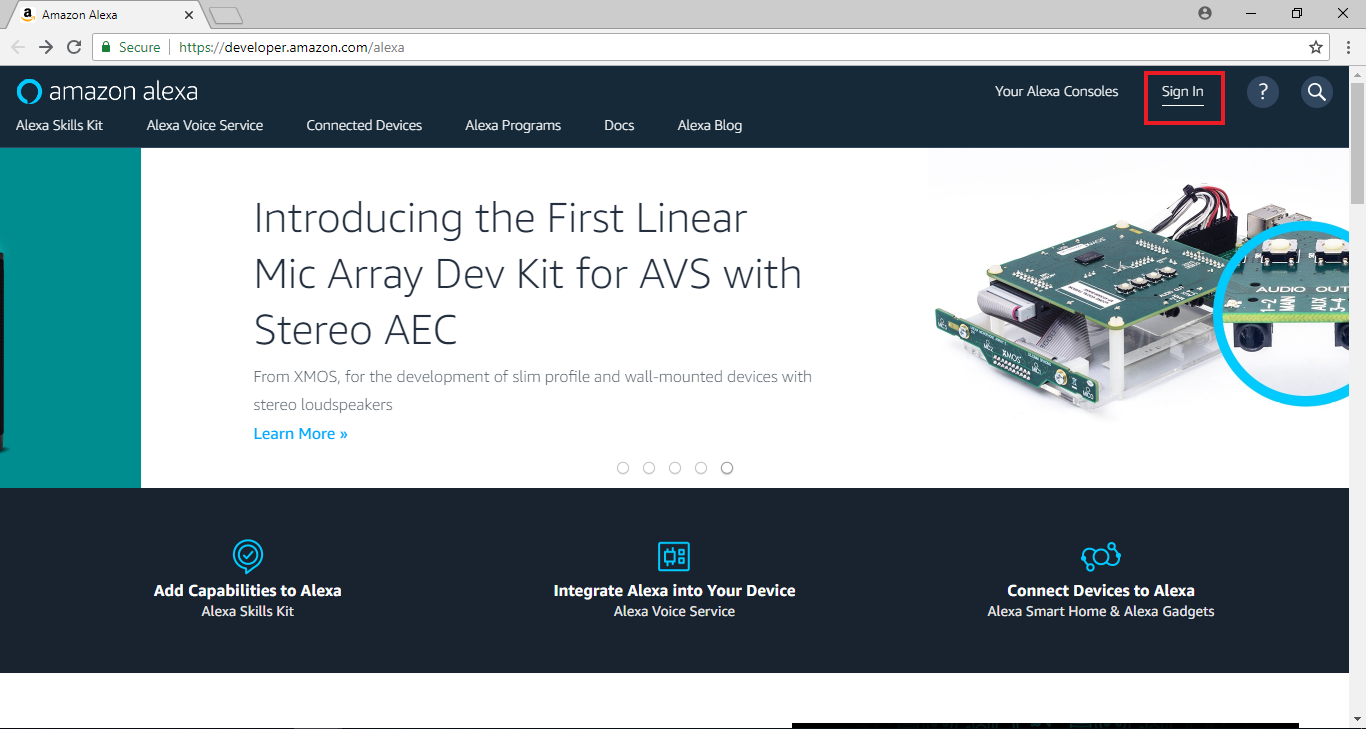
First, in Alexa webpage click Sign In. The account can be different with the Amazon AWS account
https://developer.amazon.com/alexa
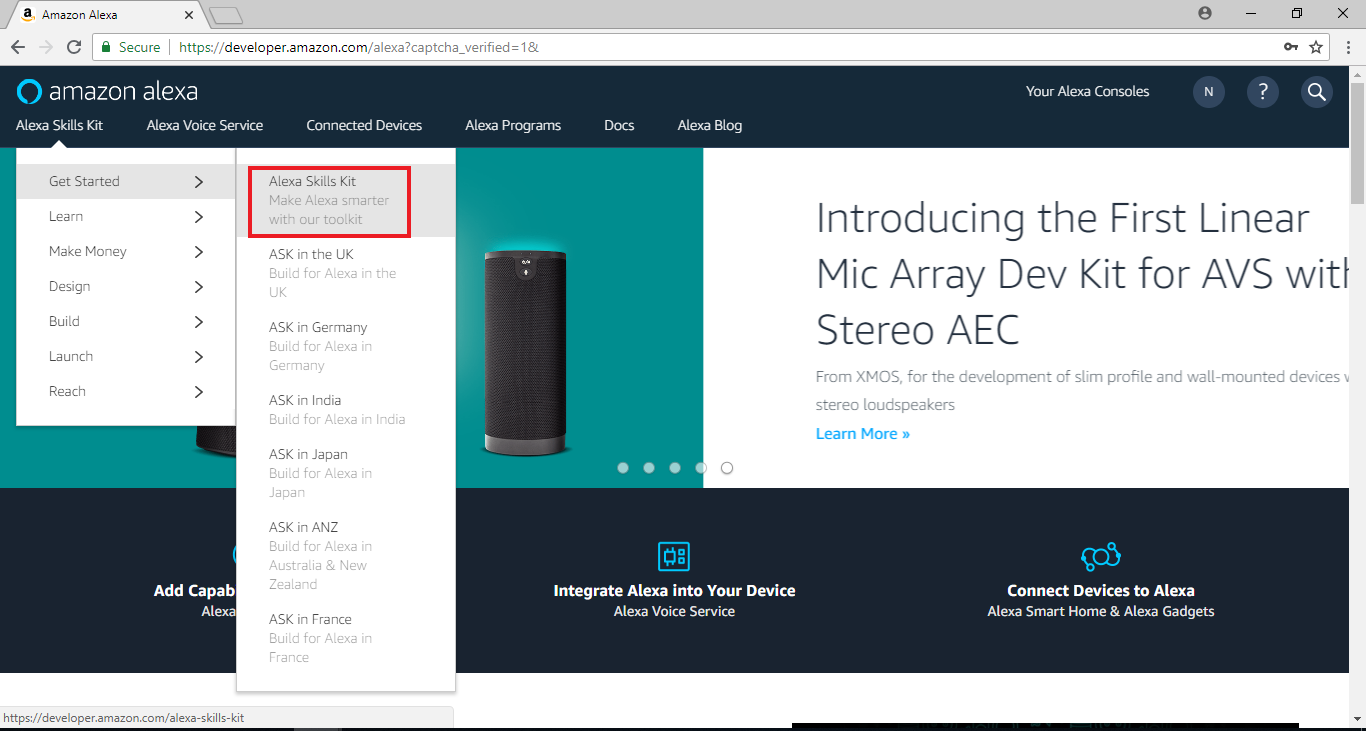
 Then click the ALEXA tab
Click Alex Skill kit > Get Started > Alex Skills Kit (Make Alexa smarter with our toolkit)
Then click the ALEXA tab
Click Alex Skill kit > Get Started > Alex Skills Kit (Make Alexa smarter with our toolkit)
 Go to Alexa Skill Kit page and click ”Start a Skill”
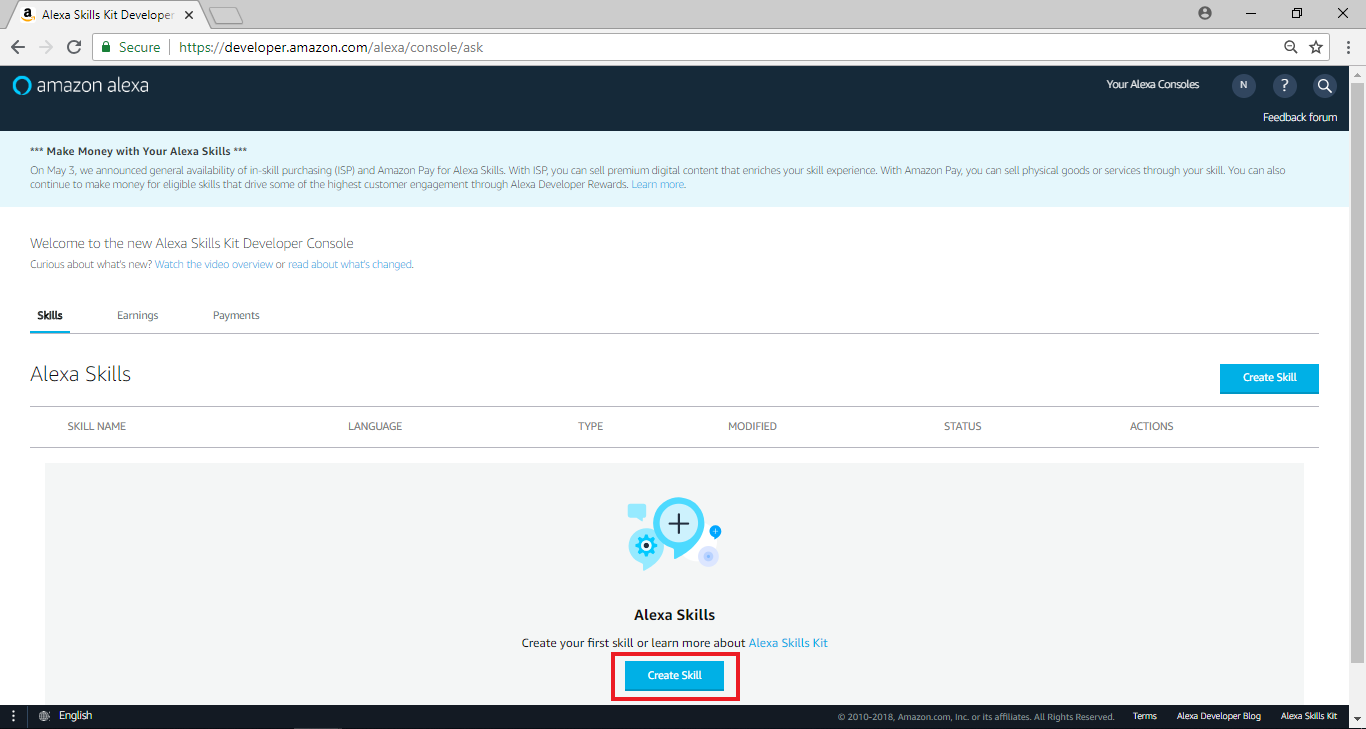
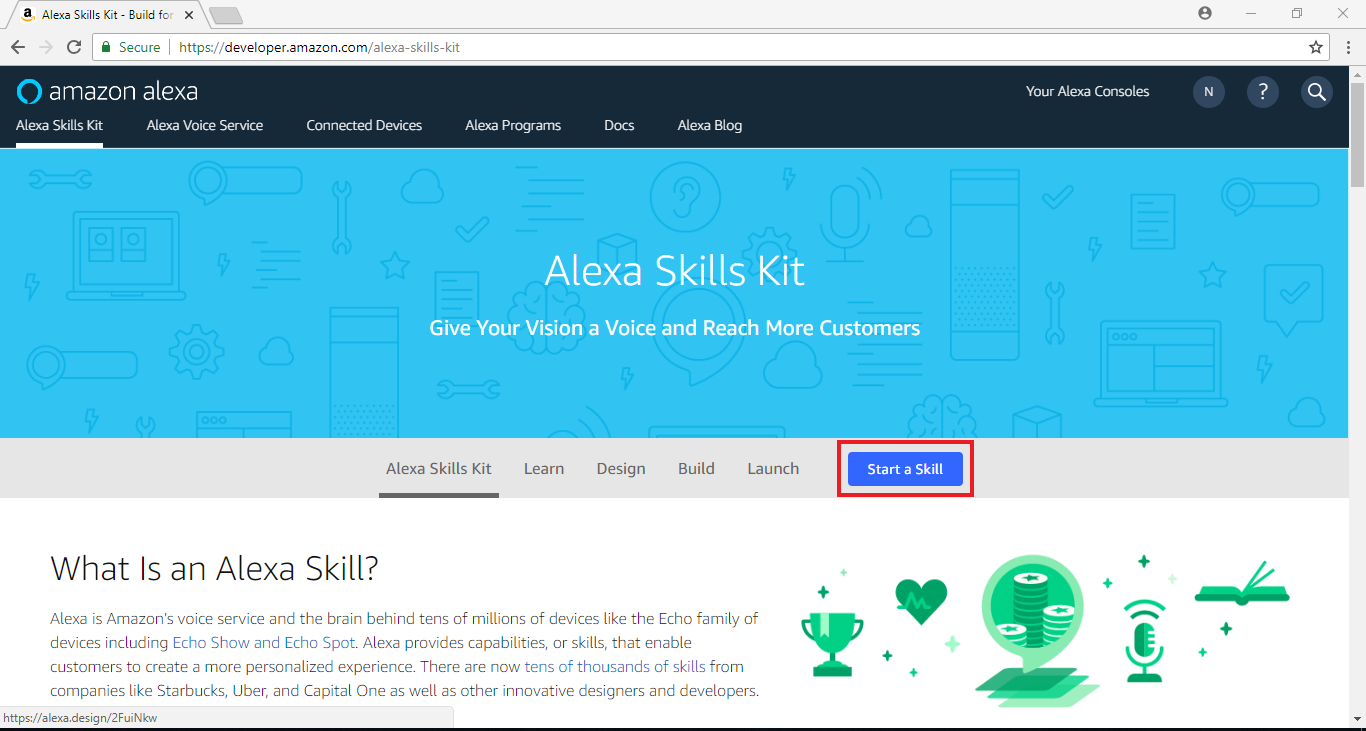 Click ”Create Skill” on the bottom
Then click the ALEXA tab
Click Alex Skill kit > Get Started > Alex Skills Kit (Make Alexa smarter with our toolkit)
Go to Alexa Skill Kit page and click ”Start a Skill”
Click ”Create Skill” on the bottom
Amazon Alexa – Create Flow
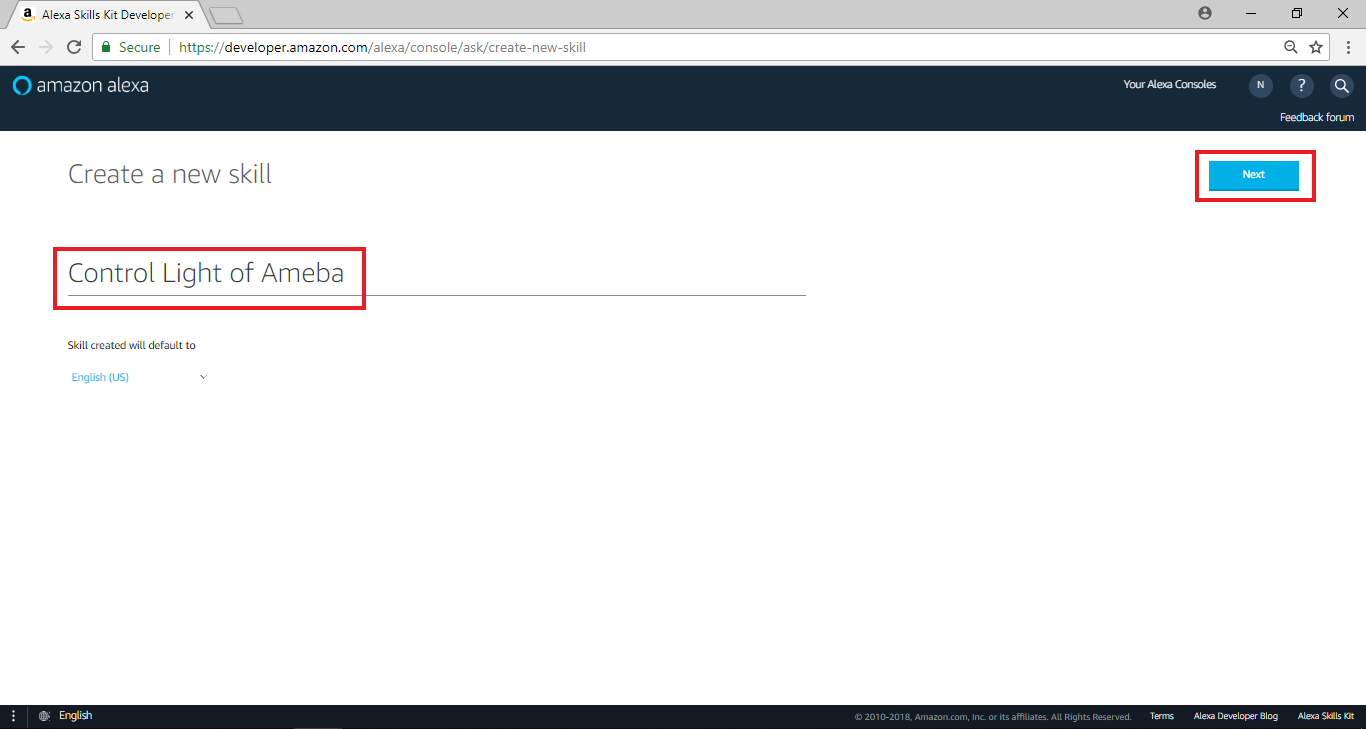
Click “Start a Skill” then start to the setting process, fill in ”Control Light of Ameba” in skill name field.
This place is filled with the name to be displayed to the general user. Then, click “Next”.
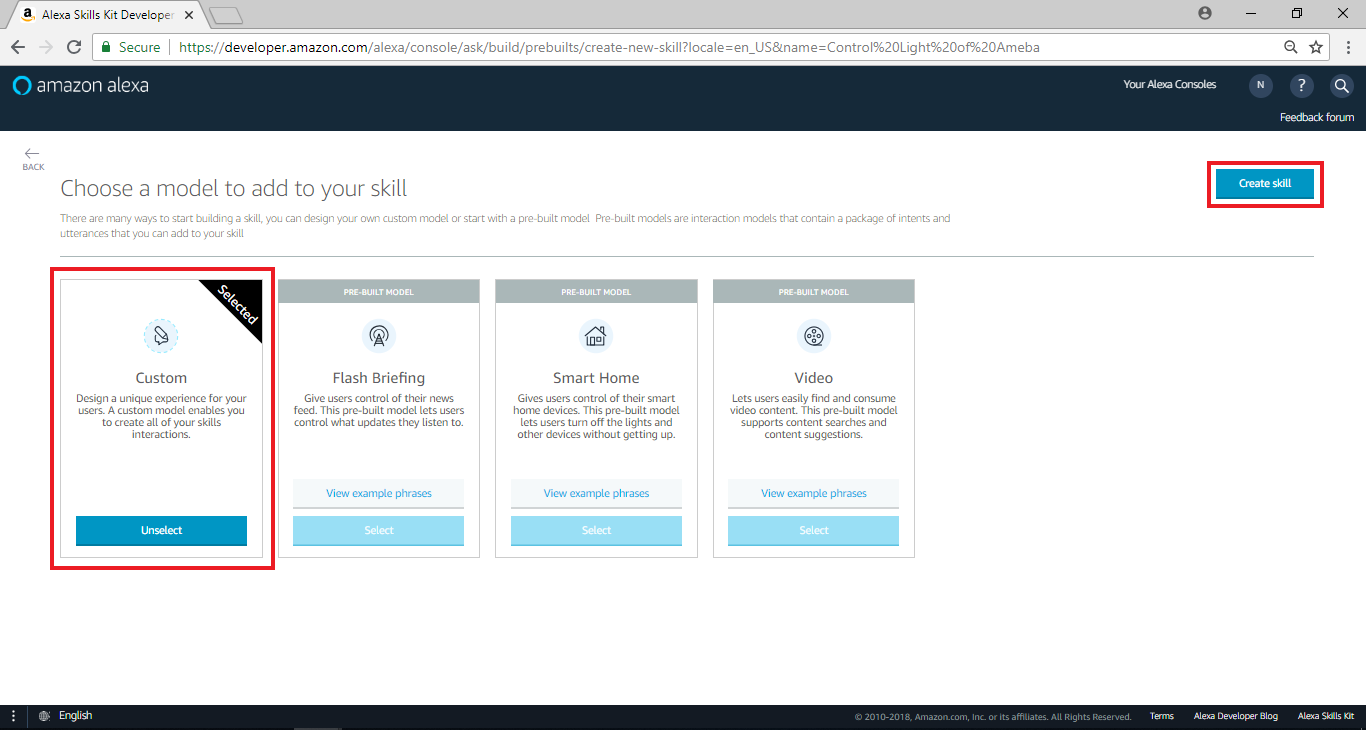
 Choose “Custom” then click “Create Skill”
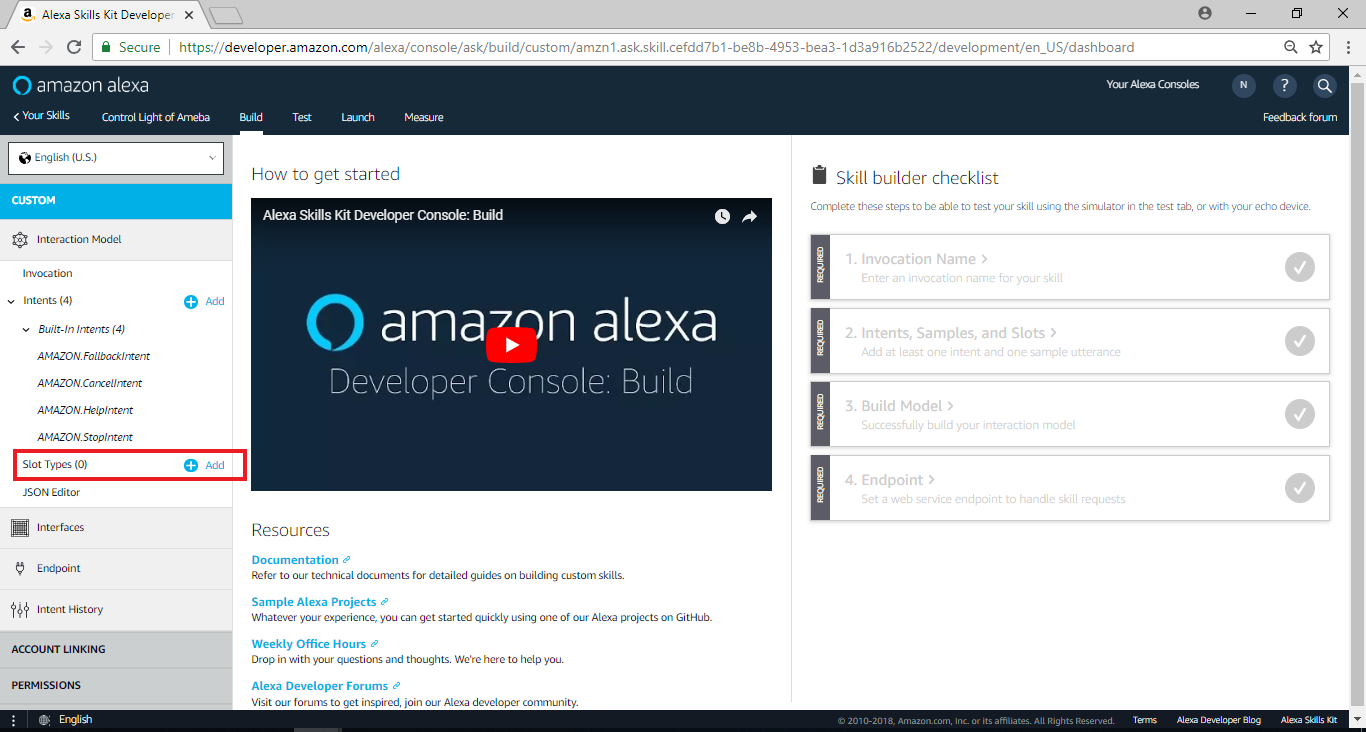
 Go to next page, and click “add” on Slot Type on the left
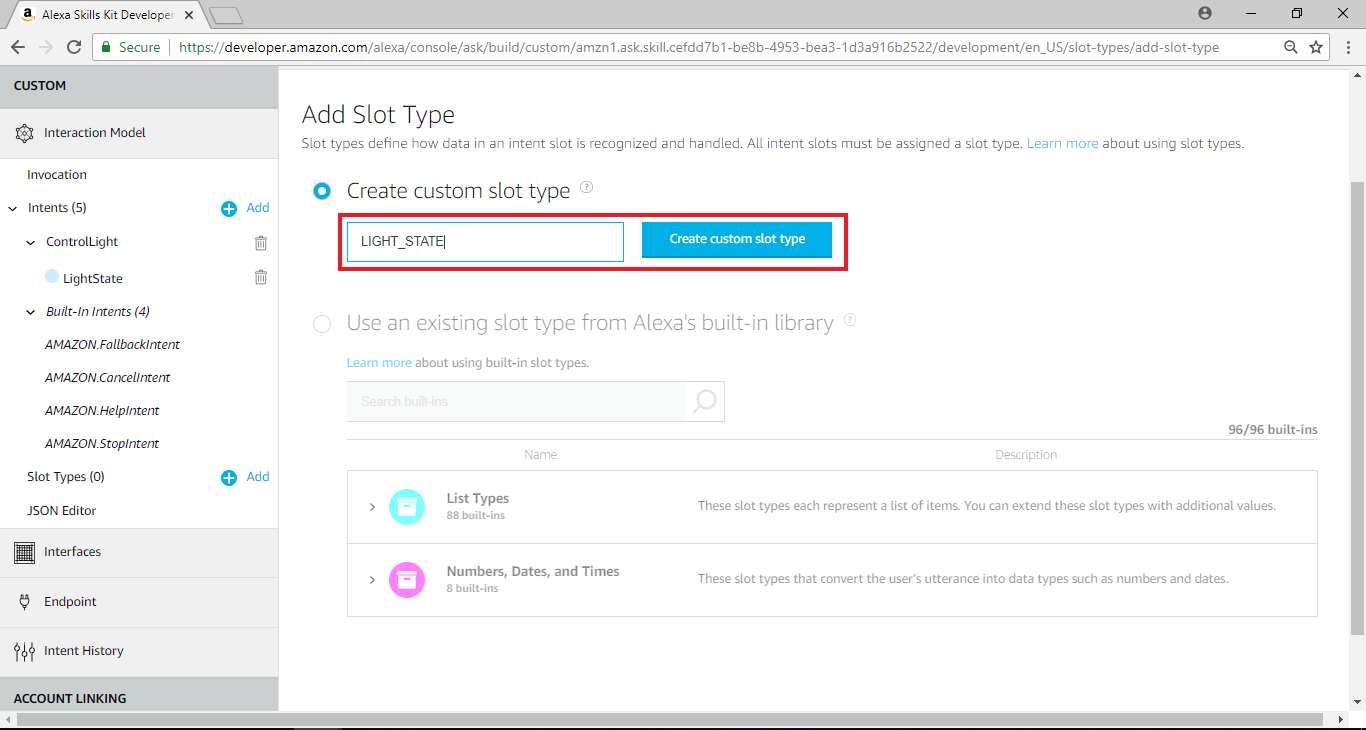
 Go to Add Slot Type page, fill in “LIGHT_STATE” in Create custom slot type field. Click “Create custom slot type”.
Go to next page, and click “add” on Slot Type on the left
Go to Add Slot Type page, fill in “LIGHT_STATE” in Create custom slot type field. Click “Create custom slot type”.
Go to next page, and click “add” on Slot Type on the left
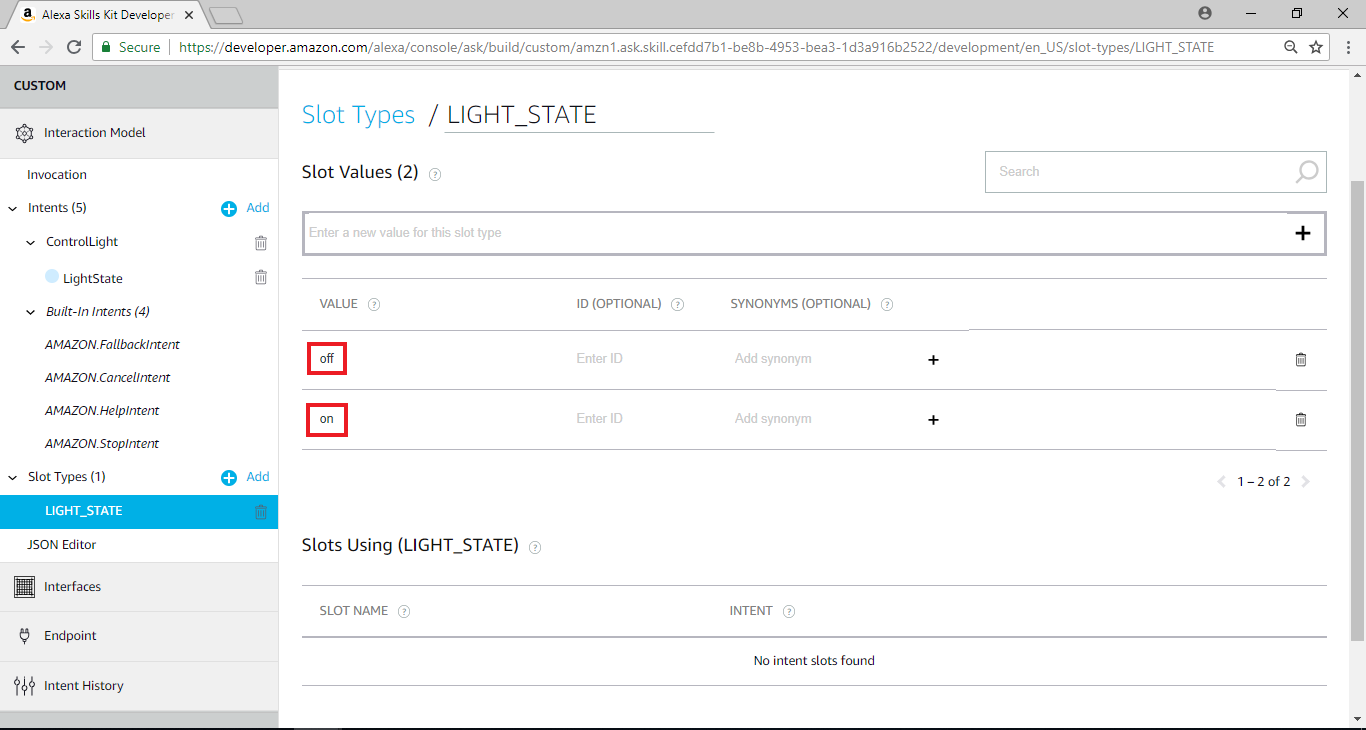
 Go to added Slot Types page, fill in “on” and “off” in Slot Values field and click “+”.
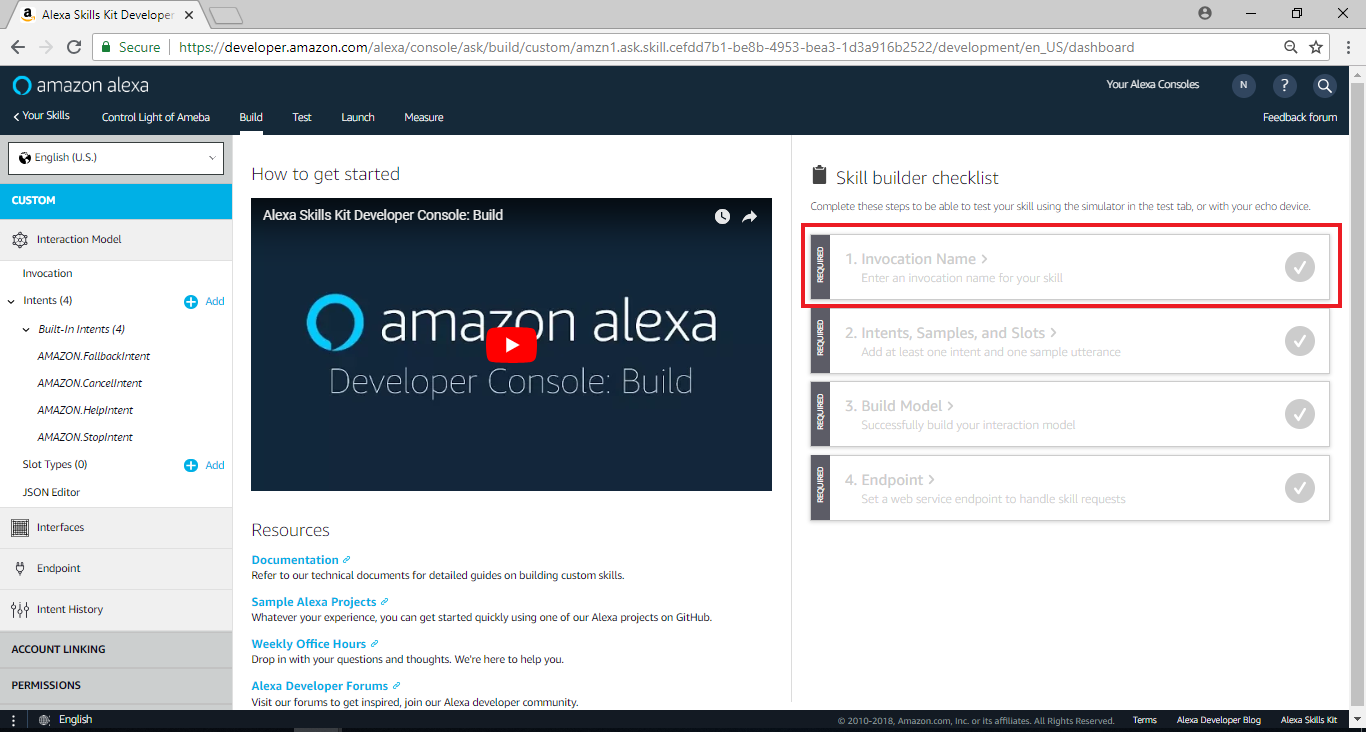
 Go to previous Skill home page, click ”Invocation Name” of Skill builder checklist on the right.
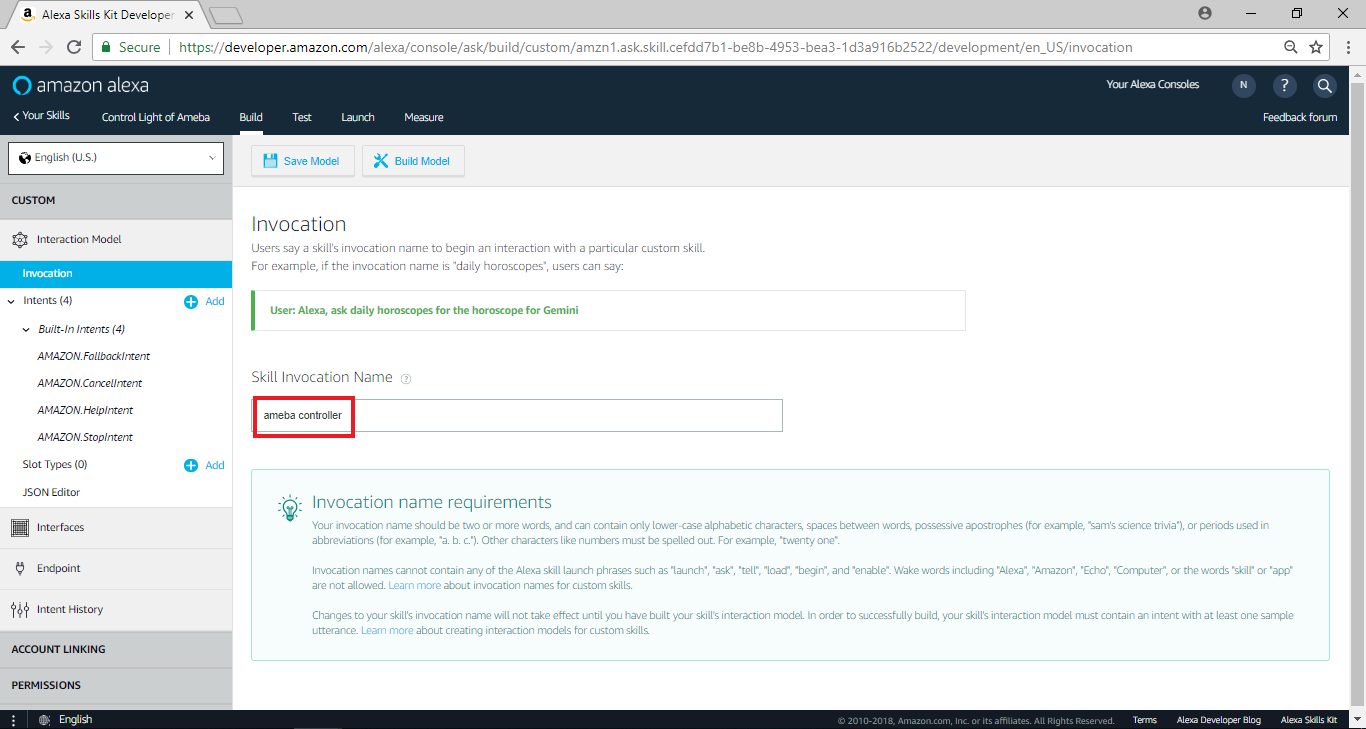
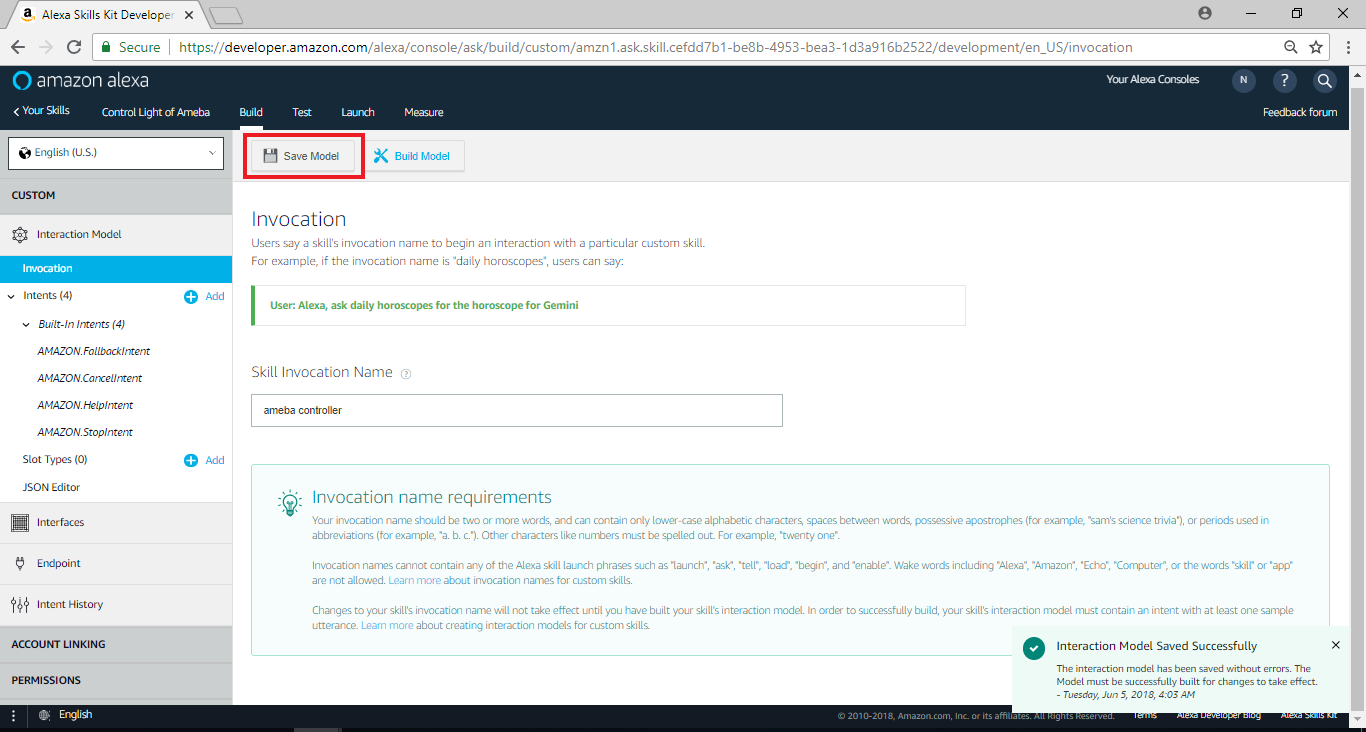
 Fill in ”ameba controller” in ”Skill Invocation Name” field. This name lets Alexa recognize the session to start. Generally, there are two ways to start Alexa session. The first one is to speak complete content to make Alexa analyze the interaction model to decide which session to launch.
The second one is to speak only Invocation Name to make Alexa start certain session. We fill in “Ameba Controller” in this example.
Need to avoid Alexa keywords and the words that may cause misjudgment for Invocation Name.
Please refer to the detailed restrictions:
https://developer.amazon.com/zh/docs/custom-skills/choose-the-invocation-name-for-a-custom-skill.html
Fill in ”ameba controller” in ”Skill Invocation Name” field. This name lets Alexa recognize the session to start. Generally, there are two ways to start Alexa session. The first one is to speak complete content to make Alexa analyze the interaction model to decide which session to launch.
The second one is to speak only Invocation Name to make Alexa start certain session. We fill in “Ameba Controller” in this example.
Need to avoid Alexa keywords and the words that may cause misjudgment for Invocation Name.
Please refer to the detailed restrictions:
https://developer.amazon.com/zh/docs/custom-skills/choose-the-invocation-name-for-a-custom-skill.html
 Click “Save model”
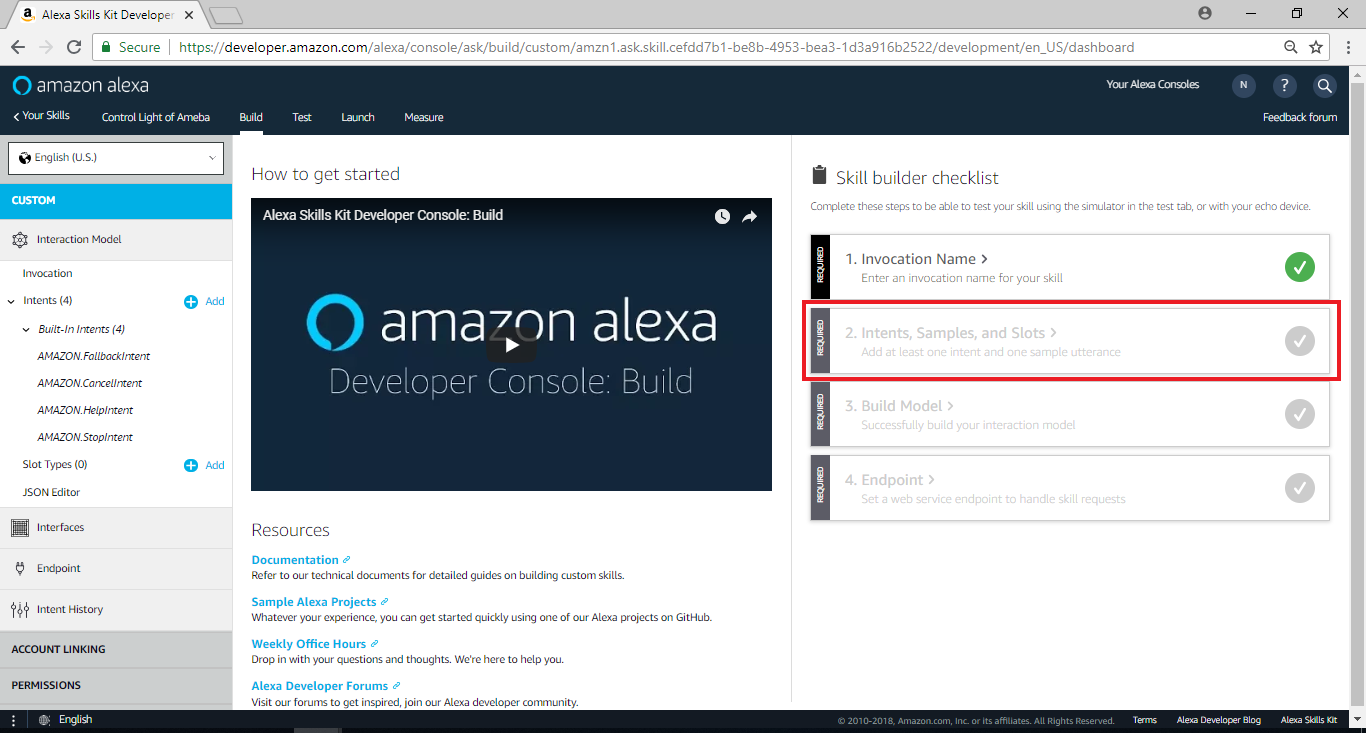
 Go back to Skill home page and click “Intents, Samples, and Slots” of Skill builder checklist.
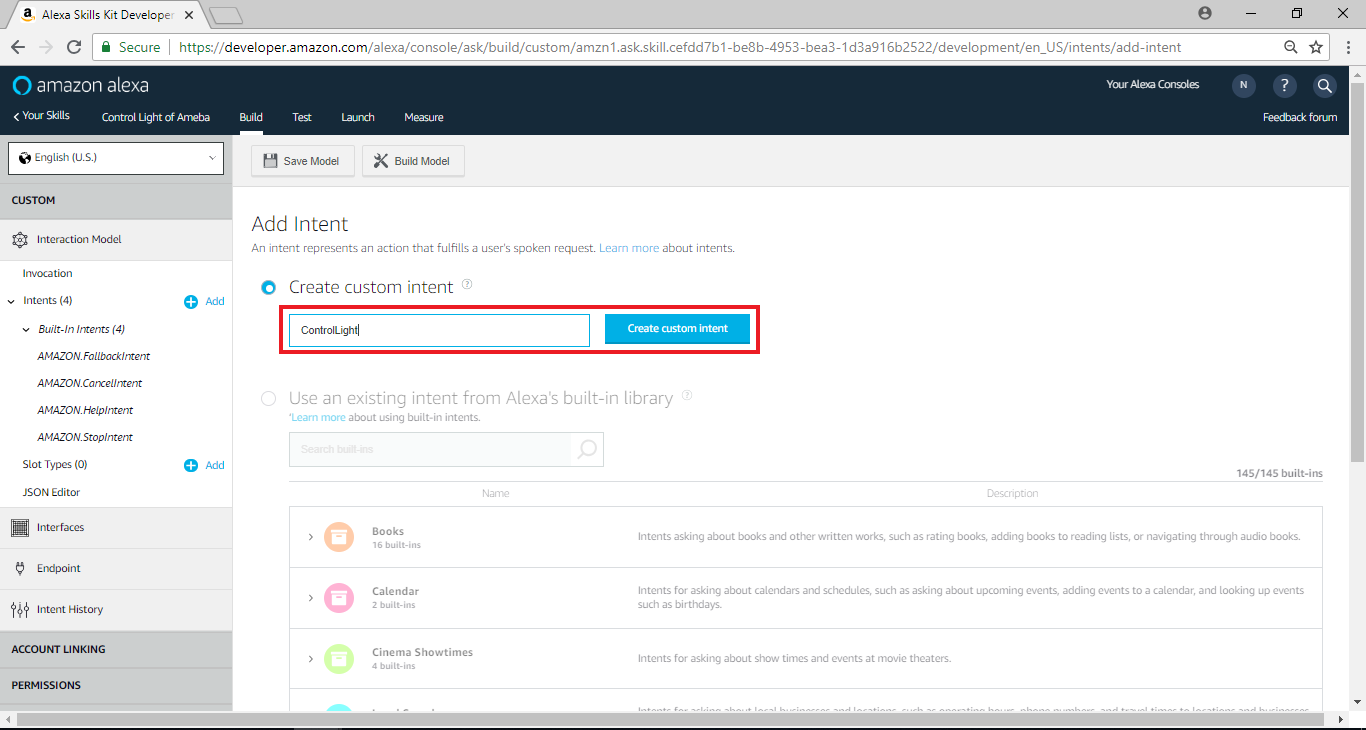
 In Add intent field, fill in ControlLight in Create custom intent field and click “Create custom intent”
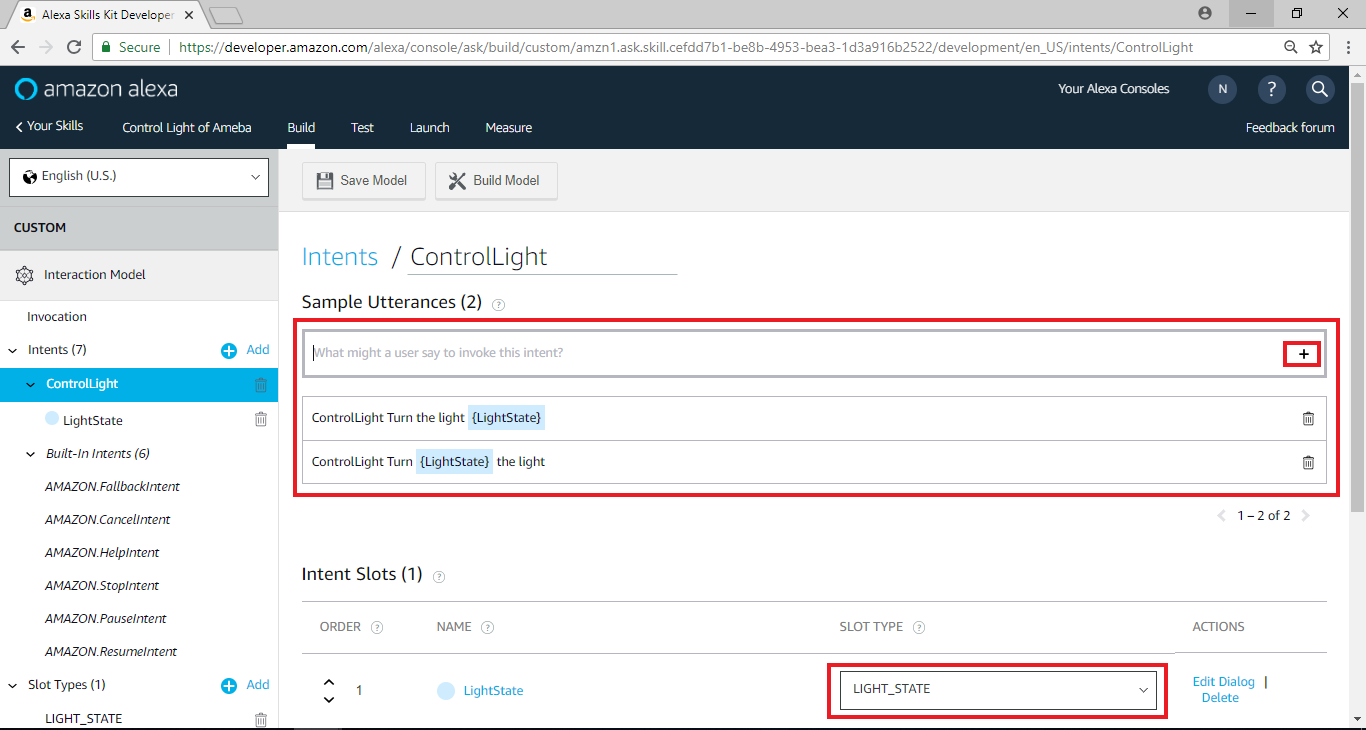
 Then we fill in Sample Utterances, this one means that when the user said something can trigger certain intent.
 Go back to Skill Home Page. The Endpoint option below needs to fill in the Endpoint with Alexa.
When users trigger Alexa intent, Alexa will transfer the intent to other services. Users can set up its own server, or using Amazon AWS Lambda. The example will show how to set AWS Lambda.
Go back to Skill Home Page. The Endpoint option below needs to fill in the Endpoint with Alexa.
When users trigger Alexa intent, Alexa will transfer the intent to other services. Users can set up its own server, or using Amazon AWS Lambda. The example will show how to set AWS Lambda.

Choose “Custom” then click “Create Skill”
Go to next page, and click “add” on Slot Type on the left
Go to Add Slot Type page, fill in “LIGHT_STATE” in Create custom slot type field. Click “Create custom slot type”.
Go to next page, and click “add” on Slot Type on the left
Go to added Slot Types page, fill in “on” and “off” in Slot Values field and click “+”.
Go to previous Skill home page, click ”Invocation Name” of Skill builder checklist on the right.
Fill in ”ameba controller” in ”Skill Invocation Name” field. This name lets Alexa recognize the session to start. Generally, there are two ways to start Alexa session. The first one is to speak complete content to make Alexa analyze the interaction model to decide which session to launch.
The second one is to speak only Invocation Name to make Alexa start certain session. We fill in “Ameba Controller” in this example.
Need to avoid Alexa keywords and the words that may cause misjudgment for Invocation Name.
Please refer to the detailed restrictions:
https://developer.amazon.com/zh/docs/custom-skills/choose-the-invocation-name-for-a-custom-skill.html
Click “Save model”
Go back to Skill home page and click “Intents, Samples, and Slots” of Skill builder checklist.
In Add intent field, fill in ControlLight in Create custom intent field and click “Create custom intent”
Then we fill in Sample Utterances, this one means that when the user said something can trigger certain intent.
ControlLight Turn {LightState} the light
ControlLight Turn the light {LightState}
The format is intent name in the front and followed by space or tab, and then the users sentence.
For example, user speaks of “Turn on the light” that would trigger ControlLight intent. Then choose LIGHT_STATE under Slot Type and click “Save Model”
Go back to Skill Home Page. The Endpoint option below needs to fill in the Endpoint with Alexa.
When users trigger Alexa intent, Alexa will transfer the intent to other services. Users can set up its own server, or using Amazon AWS Lambda. The example will show how to set AWS Lambda.
AWS Lambda – short introduction
Amazon AWS Lambda is a computation service. The supported programming language includes Node.js, Python, and java. Lambda allows users to configure the resources required by computation (such as memory, computation time…).
AWS Lambda – Create and select blueprint
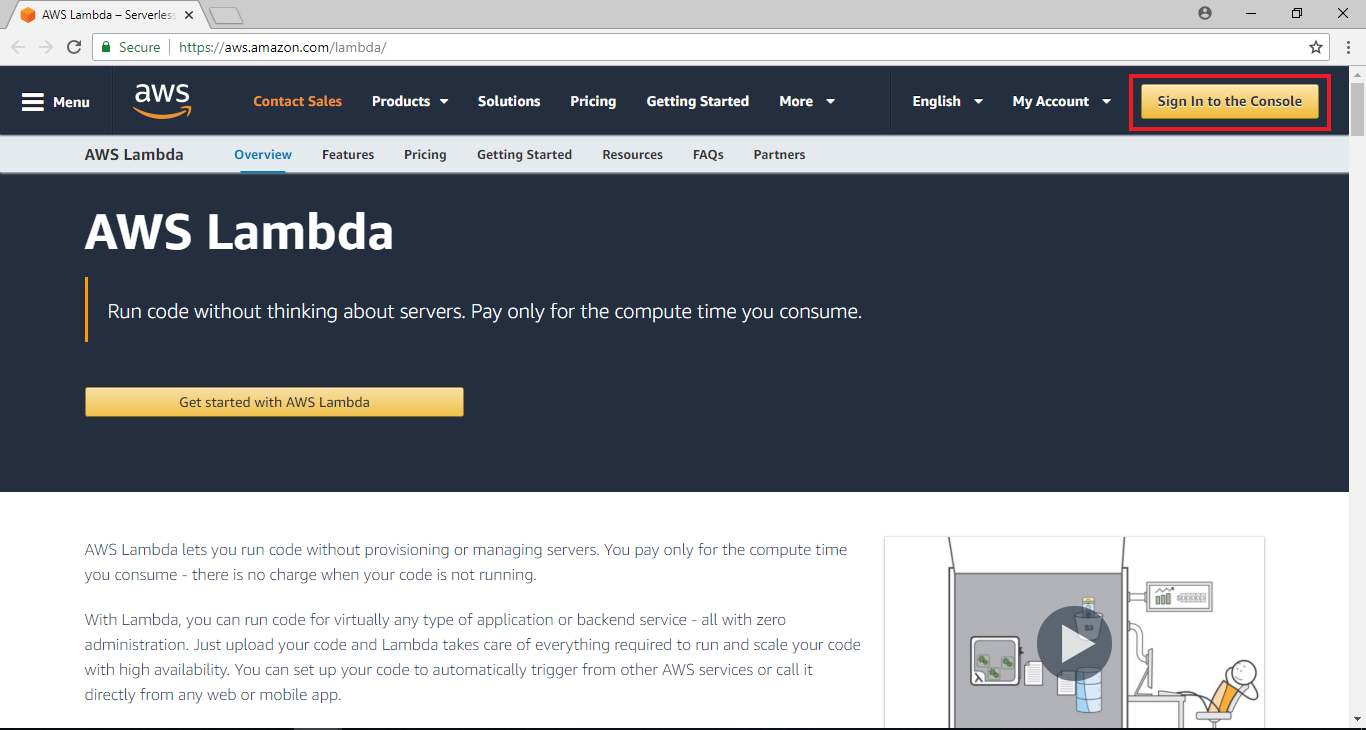
Open AWS Lambda in a new tab: https://aws.amazon.com/lambda/
Clicl “Sign in to the Console”.
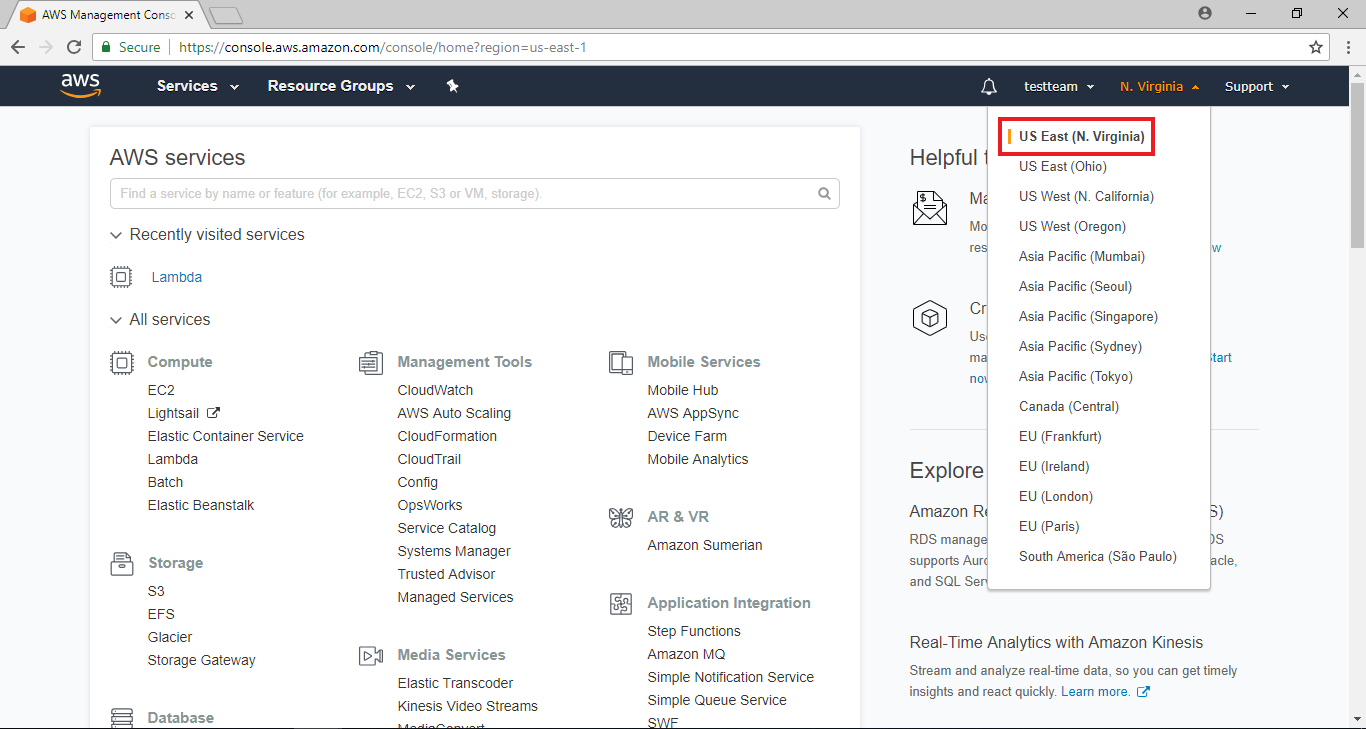
 Then, you will enter the Amazon Web Services page. Since currently the service connection of Alexa and Lambda is only provided in us-east-1 region, click upper-right drop-down list to switch region to “US East (N. Virginia)”.
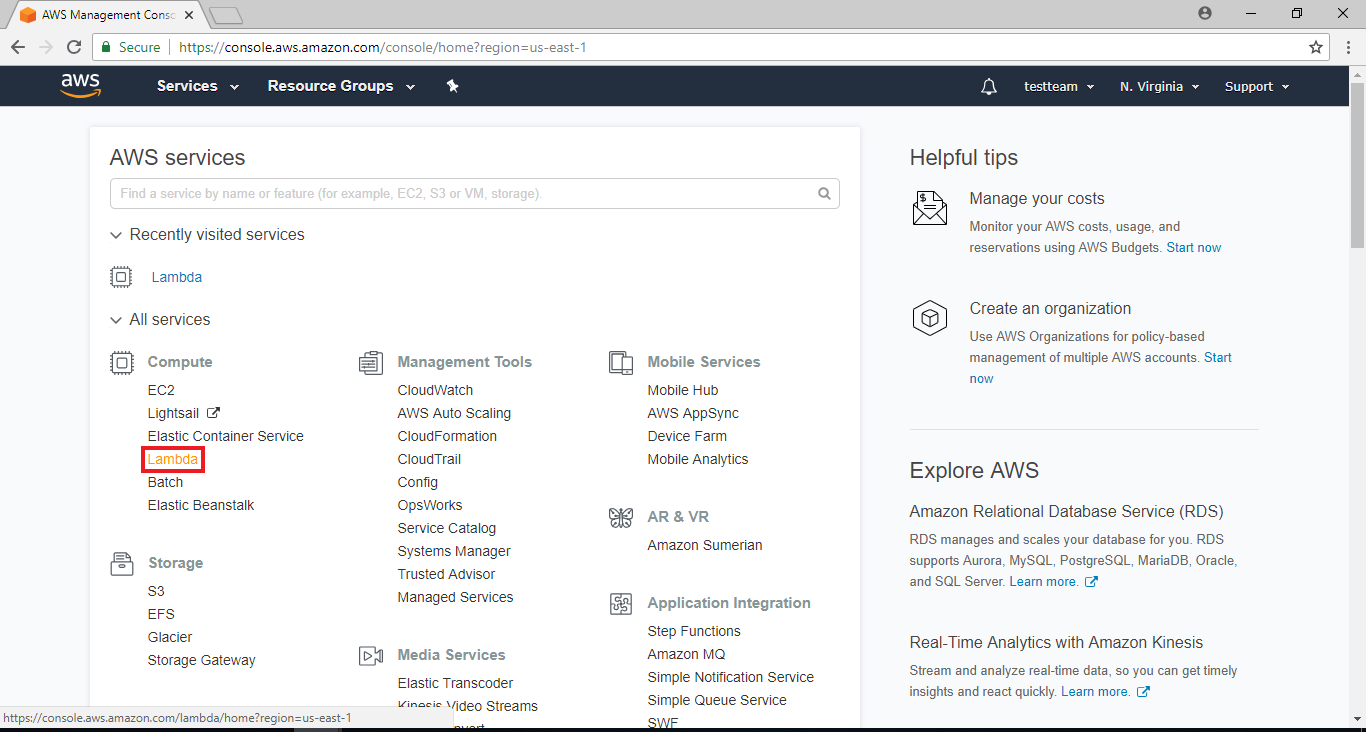
 Then click “Lambda” in the services list.
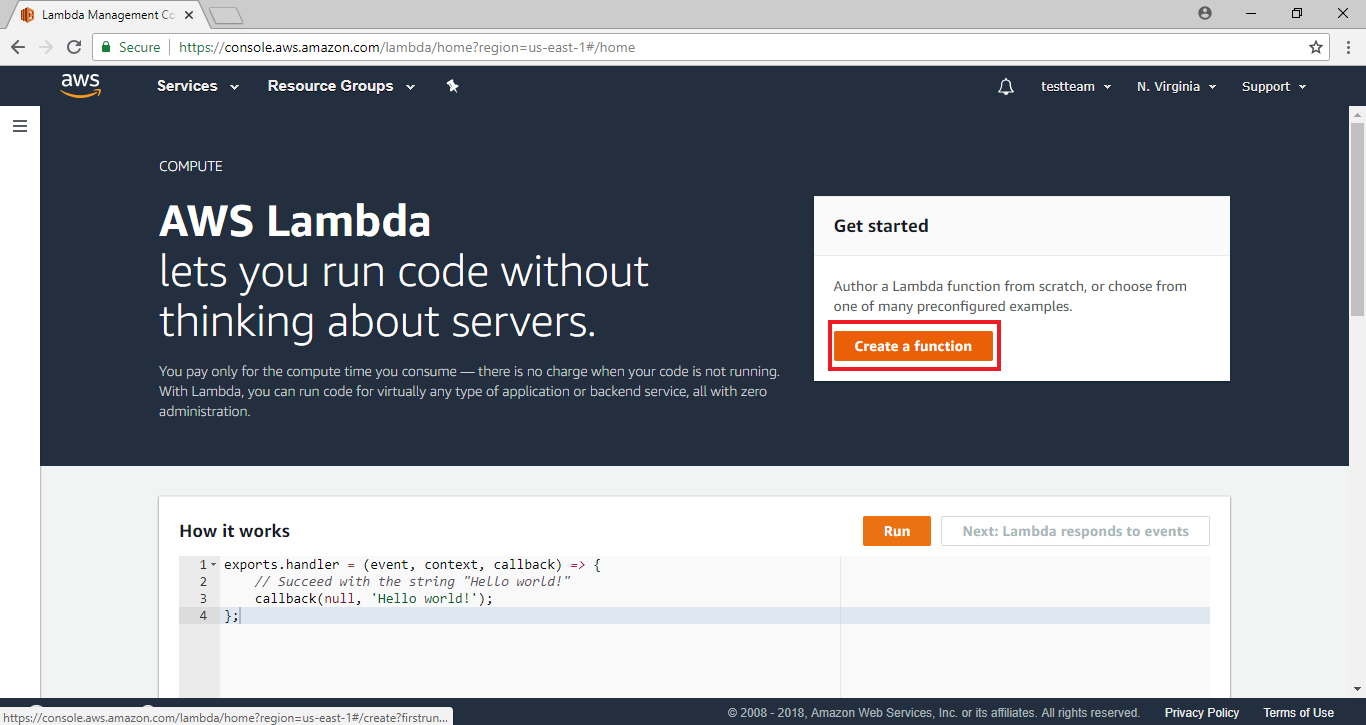
 Click “Create a Function”
 Lambda has predefined a number of usage scenarios with sample code and default setting. To connect Alexa and Lambda, fill in “Alexa” in the filter.
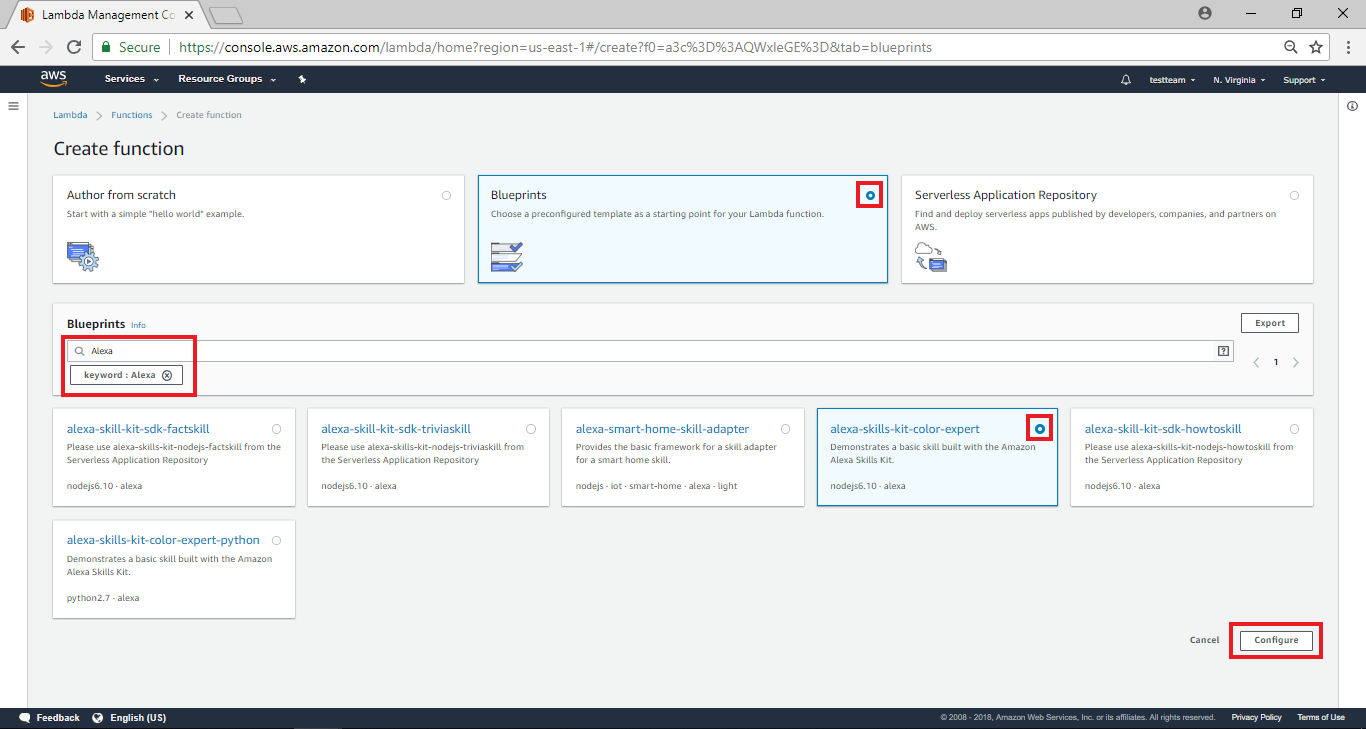 Then the blueprints related to Alexa are shown. “alexa-skills-kit-color-expert” and “alexa-skills-kit-color-export-python” are similar blueprint, the difference is “alexa-skills-kit-color-expert” using JavaScript and “alexa-skills-kit-color-export-python” using python.
And we choose “alexa-skills-kit-color-expert” in the exampel and click “configure”.
Then the blueprints related to Alexa are shown. “alexa-skills-kit-color-expert” and “alexa-skills-kit-color-export-python” are similar blueprint, the difference is “alexa-skills-kit-color-expert” using JavaScript and “alexa-skills-kit-color-export-python” using python.
And we choose “alexa-skills-kit-color-expert” in the exampel and click “configure”.
Then, you will enter the Amazon Web Services page. Since currently the service connection of Alexa and Lambda is only provided in us-east-1 region, click upper-right drop-down list to switch region to “US East (N. Virginia)”.
Then click “Lambda” in the services list.
Click “Create a Function”
Lambda has predefined a number of usage scenarios with sample code and default setting. To connect Alexa and Lambda, fill in “Alexa” in the filter.
Then the blueprints related to Alexa are shown. “alexa-skills-kit-color-expert” and “alexa-skills-kit-color-export-python” are similar blueprint, the difference is “alexa-skills-kit-color-expert” using JavaScript and “alexa-skills-kit-color-export-python” using python.
And we choose “alexa-skills-kit-color-expert” in the exampel and click “configure”.
AWS Lambda – Configure function
Go to alexa-skills-kit-color-expert setting page, fill in “ControlLight” in name field to recognize this Lambda function and choose “Create a custom role”.
The setting of “Role” is related to the permissions of Lambda. In order to prevent the Lambda function from using the service that should not be used, we can set the permissions of the Lambda function. This part of the service comes from AWS IAM, but we can set it directly here.

AWS IAM – Create role from AWS Lambda
In the AWS IAM settings page that Lambda brought out, we set the “Role Name” to “control_light” and click “Edit” to edit the Policy Document”
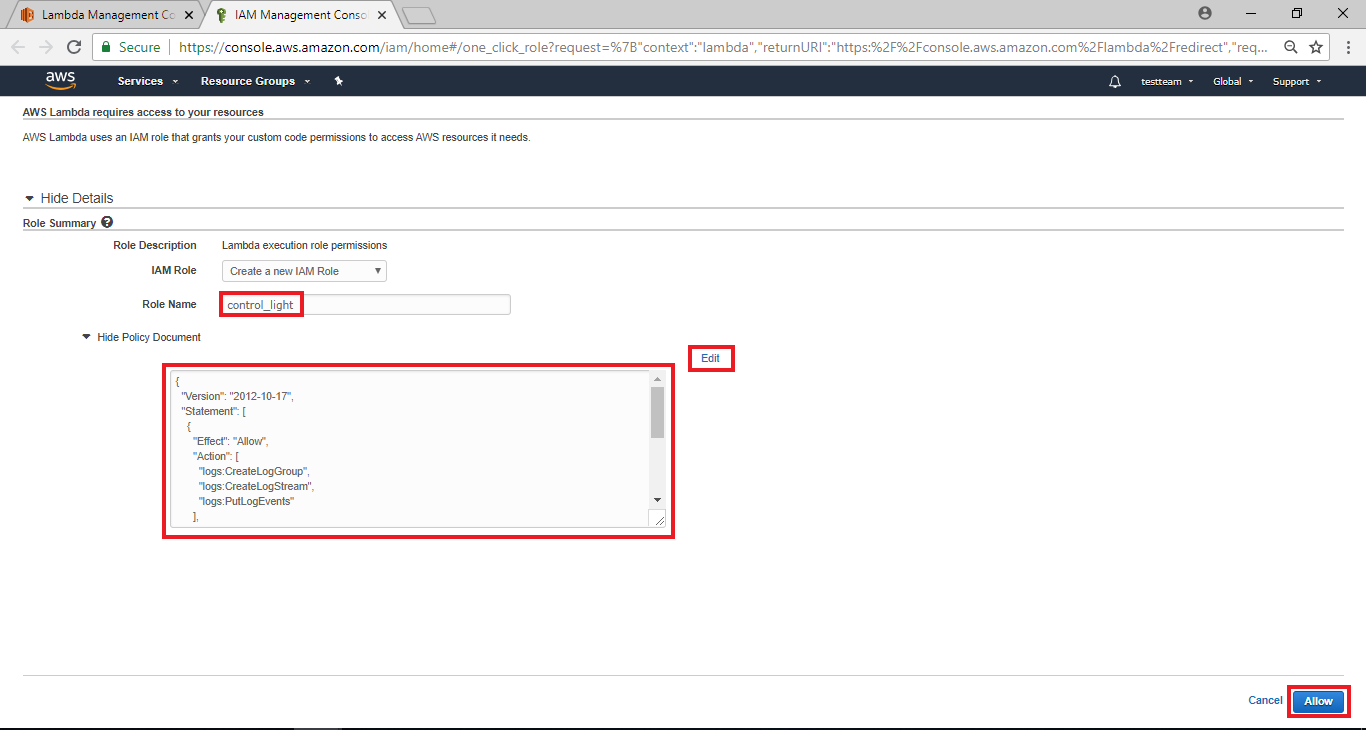 Then we can edit the permissions of this role, you can see the default value, the Role permission is only log permission, because we need to use AWS IoT permissions, so we modify it as follows
Then we can edit the permissions of this role, you can see the default value, the Role permission is only log permission, because we need to use AWS IoT permissions, so we modify it as follows
{
  "Version": "2012-10-17",
  "Statement": [
    {
      "Effect": "Allow",
      "Action": [
        "logs:CreateLogGroup",
        "logs:CreateLogStream",
        "logs:PutLogEvents"
      ],
      "Resource": "arn:aws:logs:*:*:*"
    },
    {
      "Effect": "Allow",
      "Action": [
        "iot:*"
      ],
      "Resource": "arn:aws:iot:*:*:*"
    }
  ]
}
Next, click “Allow”
Then the page will be closed and jump to the previous setting page.
AWS Lambda – Configure function (cont.)
After setting a new Role and returning from AWS IAM, you can see that the fields for “Role” and “Existing Role” already have values.
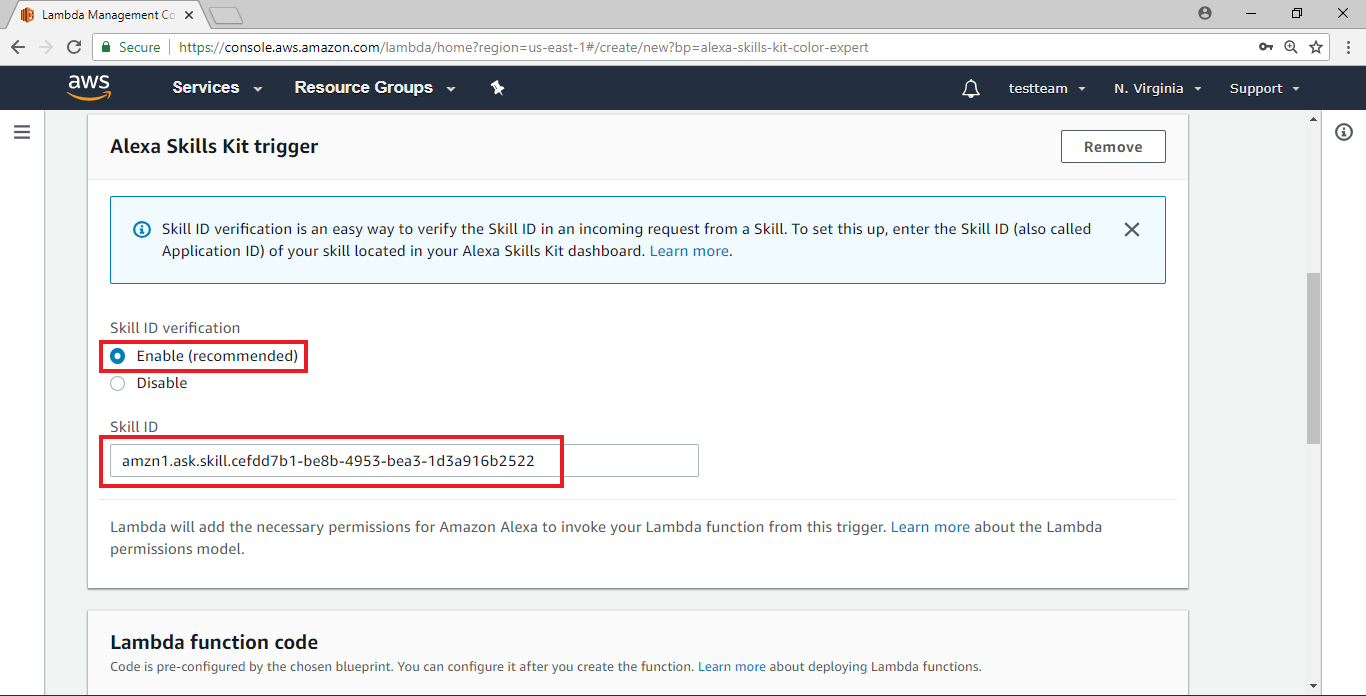
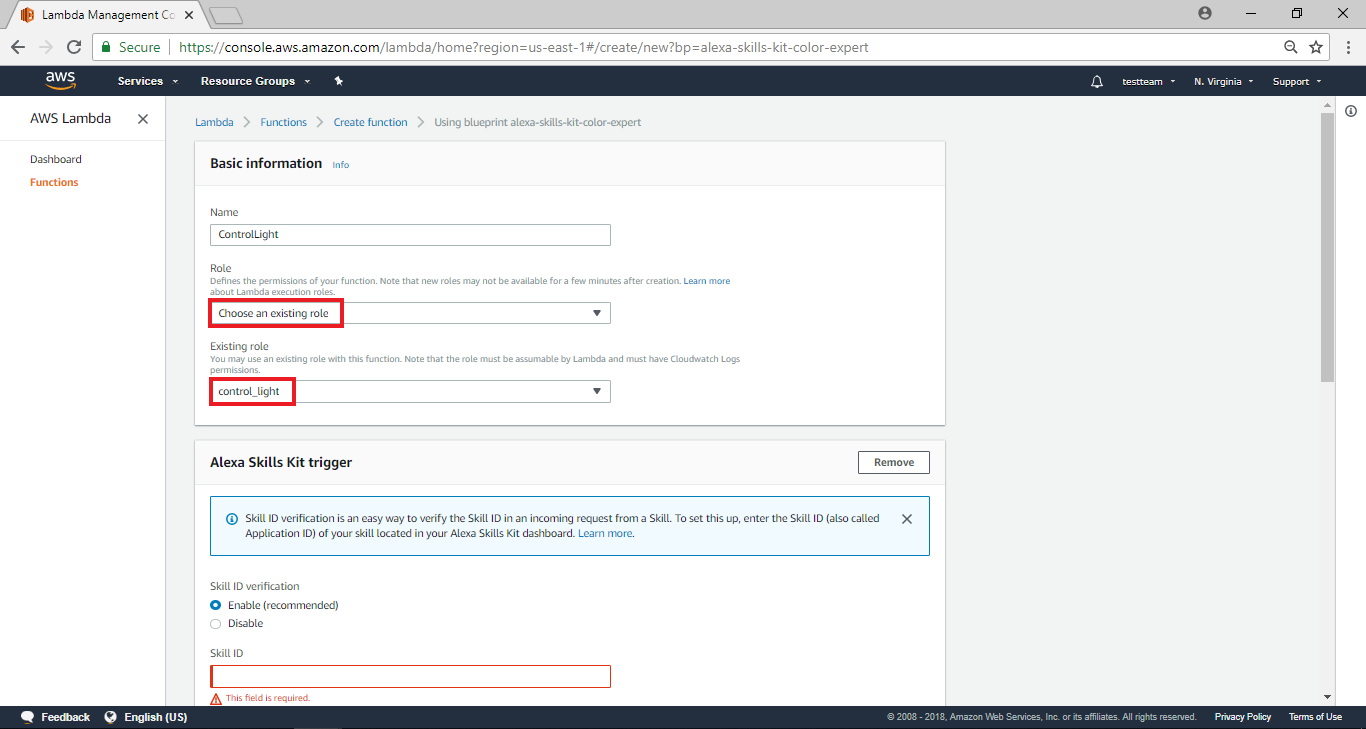 Then, at the bottom of the page, select “Enable” in the kill ID verification field, and there is also the skill ID part. We will introduce how to get the Skill ID in the next chapter.
Then, at the bottom of the page, select “Enable” in the kill ID verification field, and there is also the skill ID part. We will introduce how to get the Skill ID in the next chapter.
AWS Lambda – Get the Skill ID
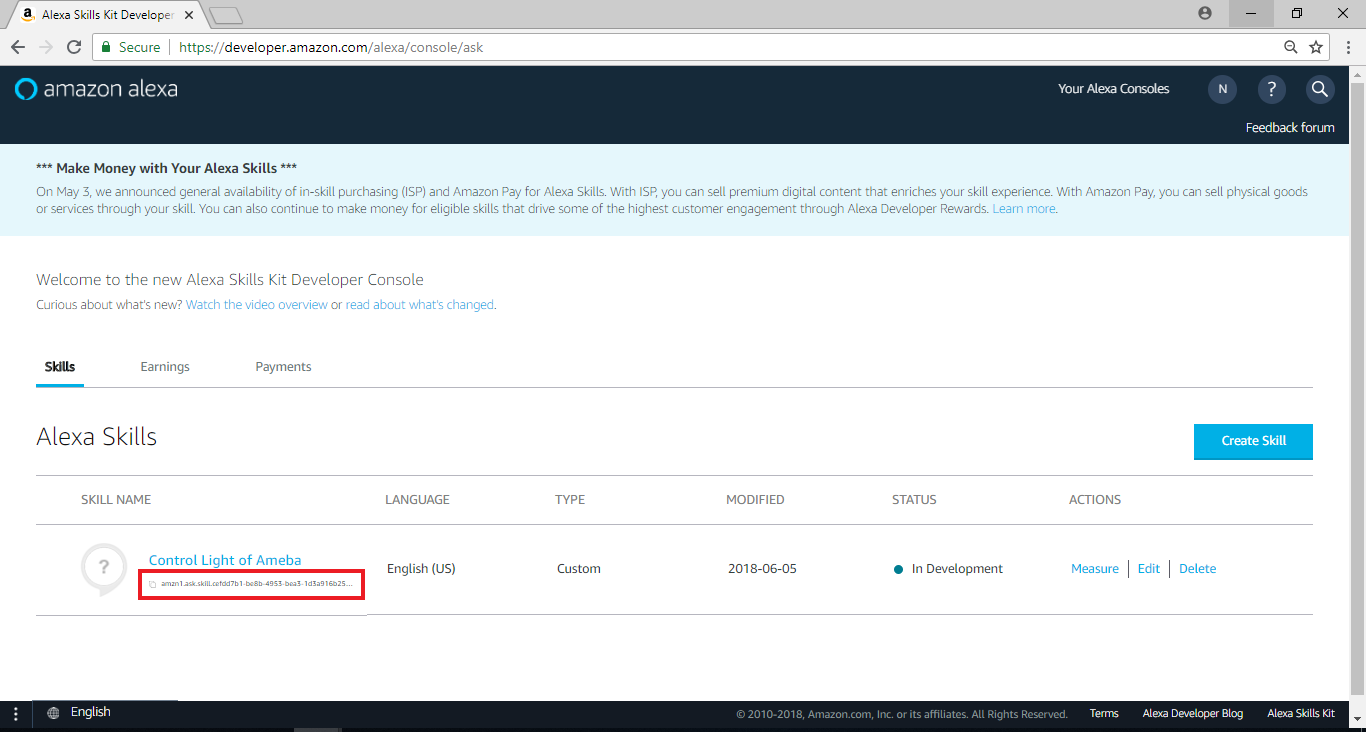
Then we have to go back to Alexa Skill’s homepage. We can see that a set of words has appeared below the Skill Name field. This is the SKILL ID we need. Clicking on it will automatically copy and return to the previous step. SKILL ID field is filled in with SKILL ID
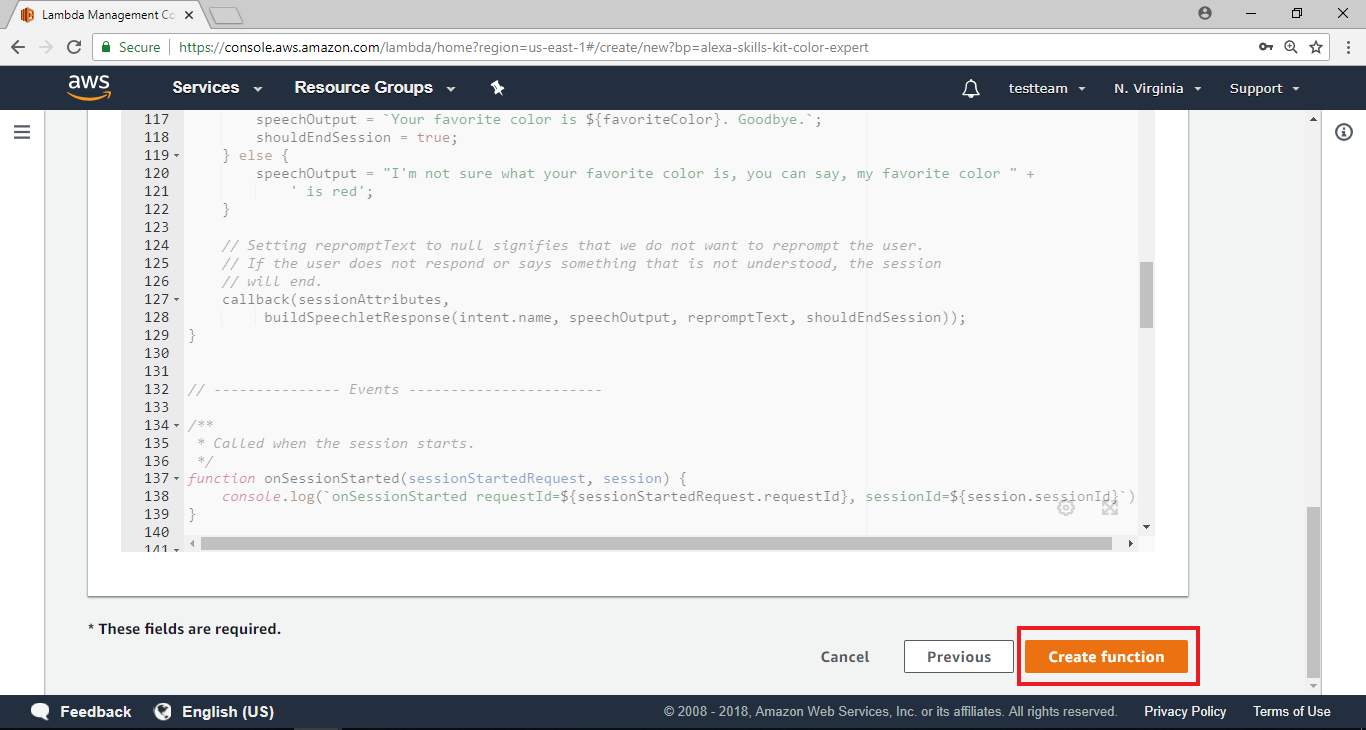
 After the Kill ID is set, then set the Function together, pull the page to the bottom, and click “Create function”.
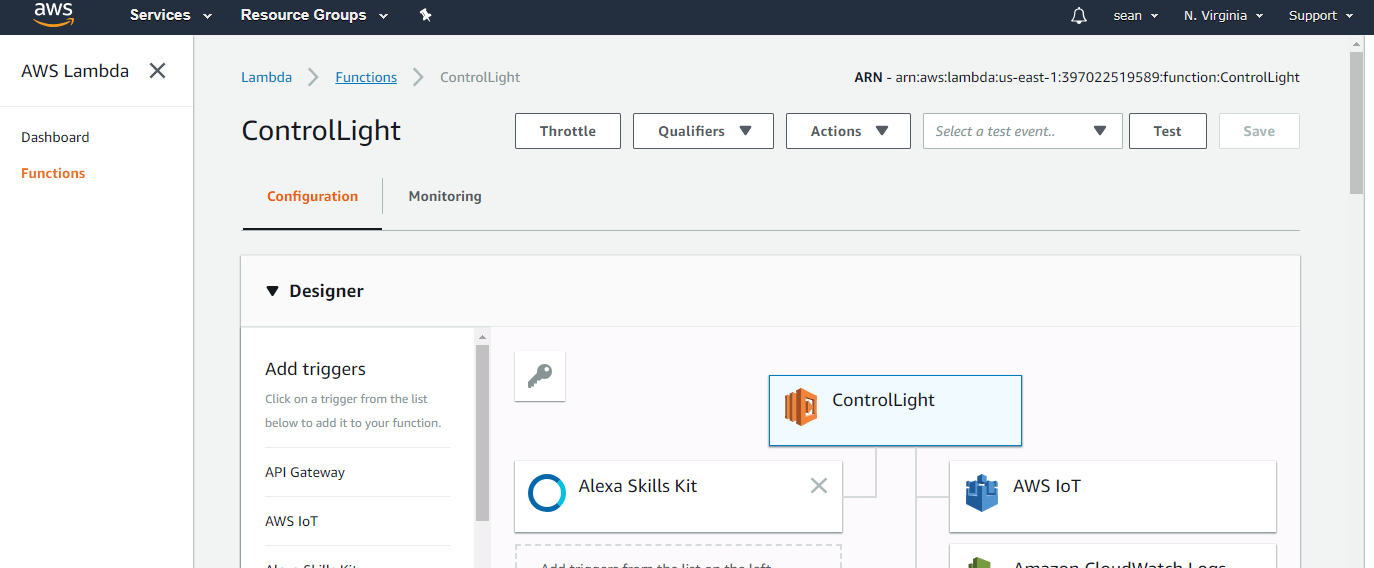
 Go to the Function Home Page
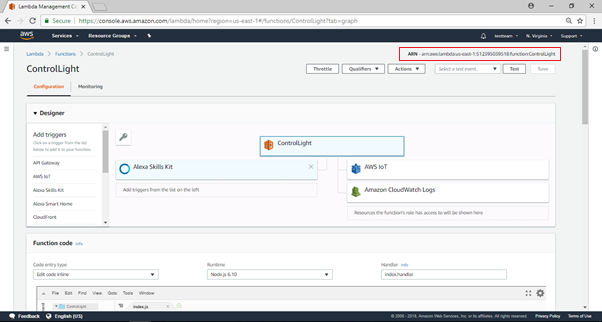 Note that in the upper right corner of the Function Home Page there is a set of strings “ARN – arn:aws:lambda:us-east-1:553661462376:function:ControlLight”, which is the end point of this Lambda function, which will be used to fill in Alexa Settings page
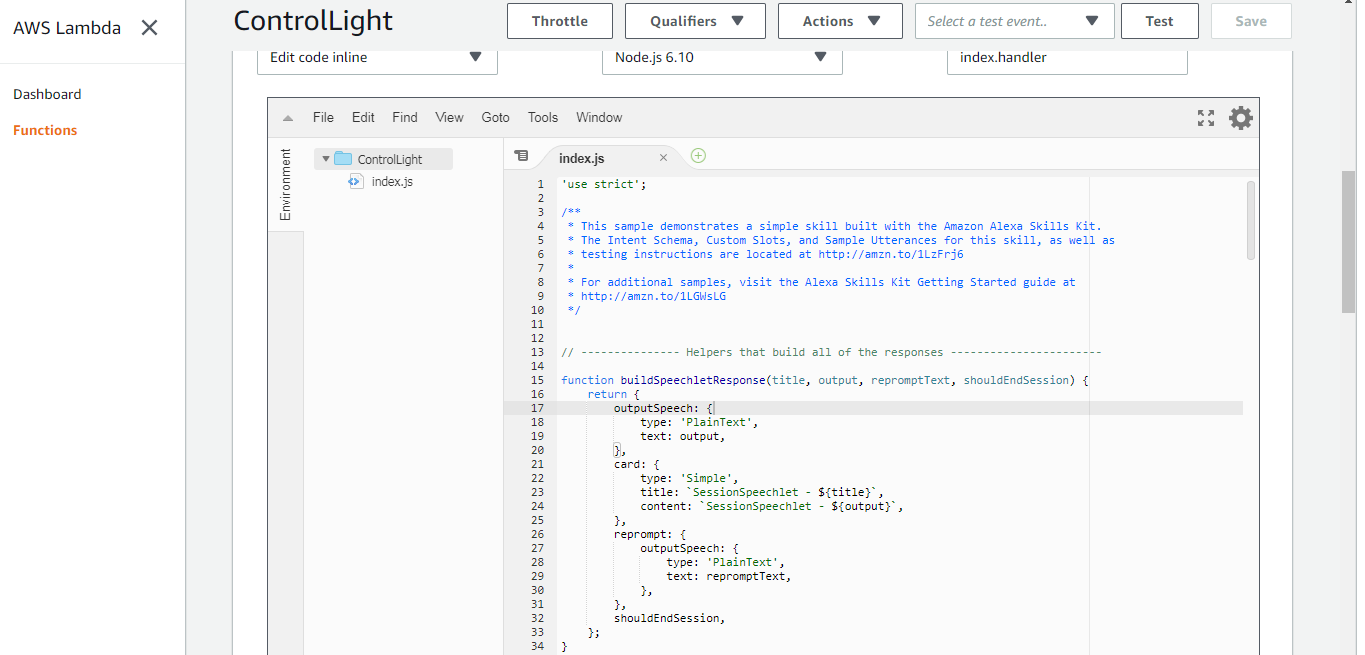
Select “Edit code inline”, “Node.js 4.3” and “index.handler” in the “Function code” field.
Note that in the upper right corner of the Function Home Page there is a set of strings “ARN – arn:aws:lambda:us-east-1:553661462376:function:ControlLight”, which is the end point of this Lambda function, which will be used to fill in Alexa Settings page
Select “Edit code inline”, “Node.js 4.3” and “index.handler” in the “Function code” field.
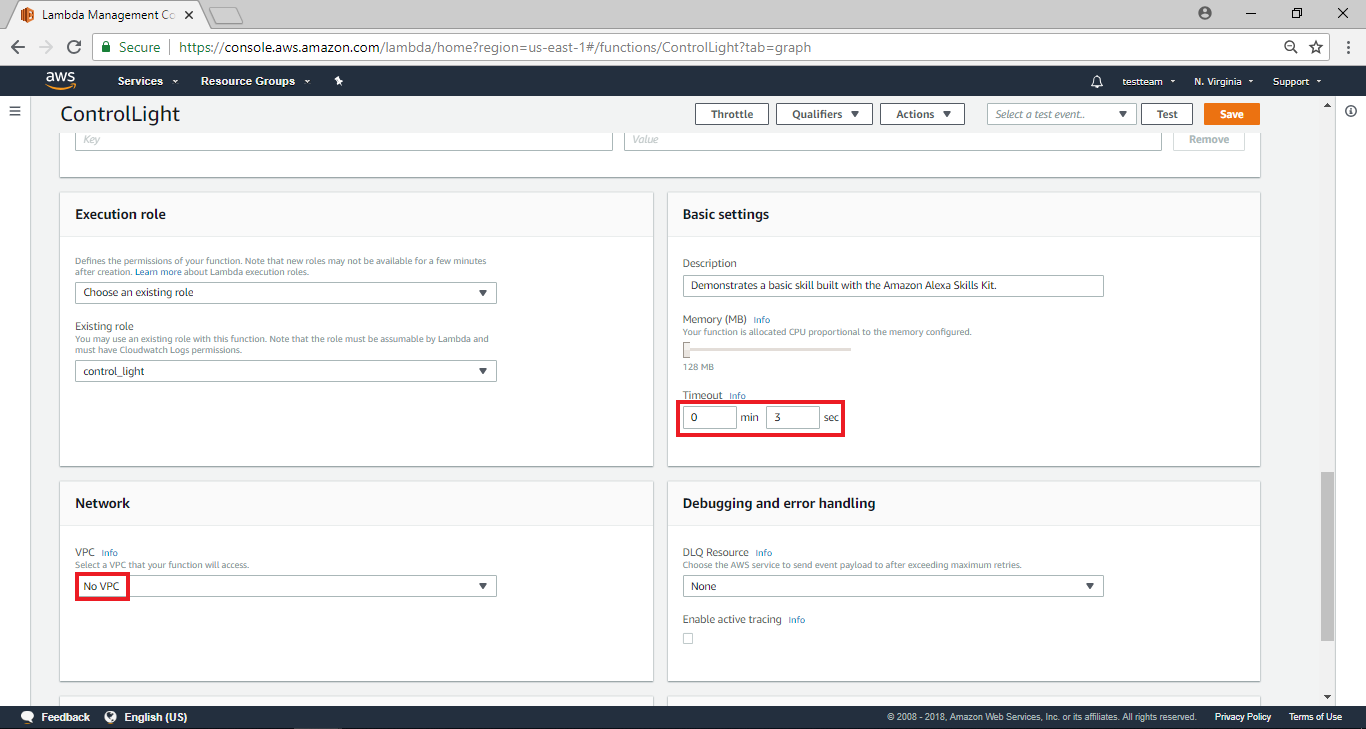
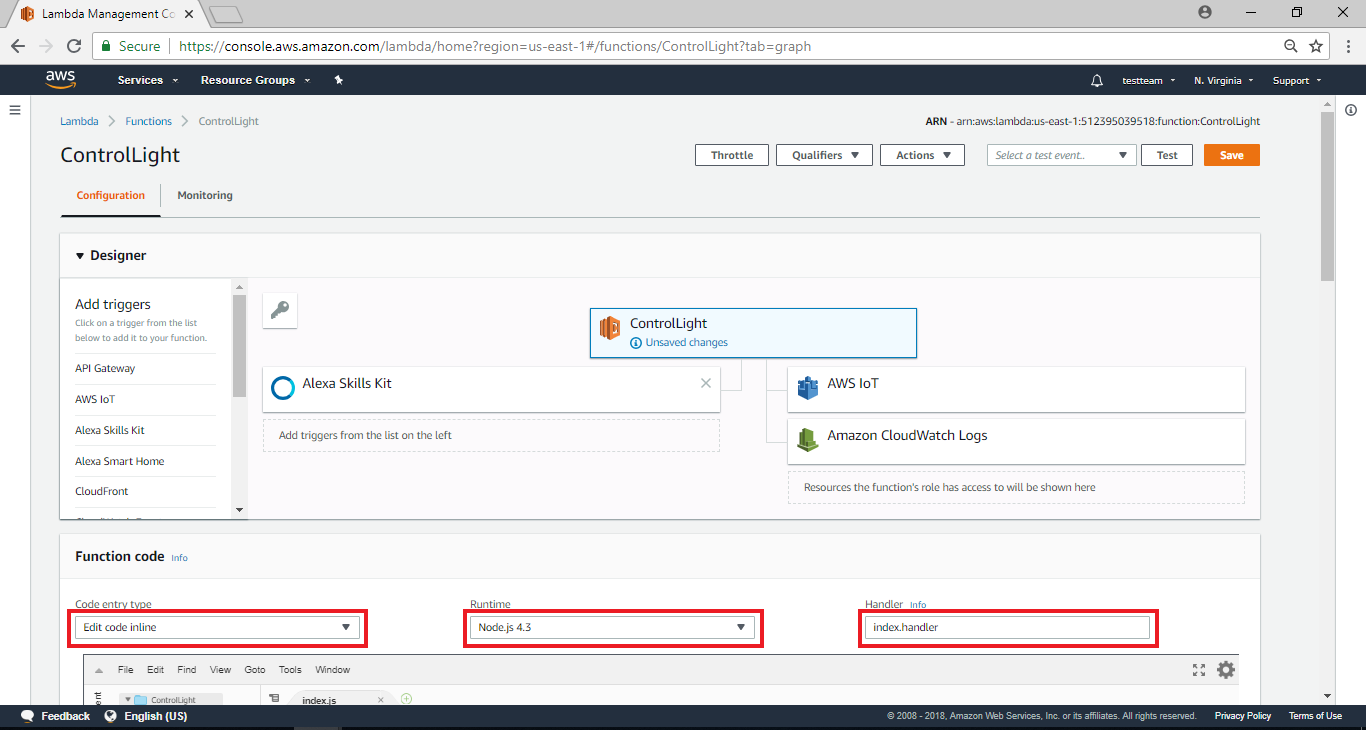 Go to the bottom of the page, type “3” sec in the Timeout field, and select “No VPC” in the Network field, then click the Save button in the upper right corner. Here we pause the AWS Lambda settings, we will come back to edit the code.
After the Kill ID is set, then set the Function together, pull the page to the bottom, and click “Create function”.
Go to the Function Home Page
Note that in the upper right corner of the Function Home Page there is a set of strings “ARN – arn:aws:lambda:us-east-1:553661462376:function:ControlLight”, which is the end point of this Lambda function, which will be used to fill in Alexa Settings page
Select “Edit code inline”, “Node.js 4.3” and “index.handler” in the “Function code” field.
Go to the bottom of the page, type “3” sec in the Timeout field, and select “No VPC” in the Network field, then click the Save button in the upper right corner. Here we pause the AWS Lambda settings, we will come back to edit the code.
AWS Lambda – Configure test events

AWS IoT – Create thing
Please refer to our previous tutorial to set up AWS IoT Shadow:
https://www.amebaiot.com/ameba-arduino-amazon-aws-iot/
We use “File” -> “Examples” -> “AmebaMQTTClient” -> “amazon_awsiot_with_ack”
Note that we should change region to us-east-1 due to the limitation of Alexa.
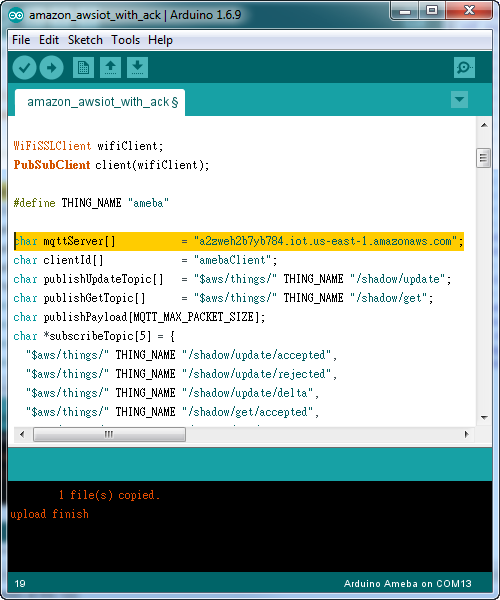 Click ameba thing to show its information on the right side. Take note of the string in the field “REST API endpoint”: “a2zweh2b7yb784.iot.us-east-1.amazonaws.com”, which will be used by Lambda service.

Click ameba thing to show its information on the right side. Take note of the string in the field “REST API endpoint”: “a2zweh2b7yb784.iot.us-east-1.amazonaws.com”, which will be used by Lambda service.
AWS Lambda – Coding
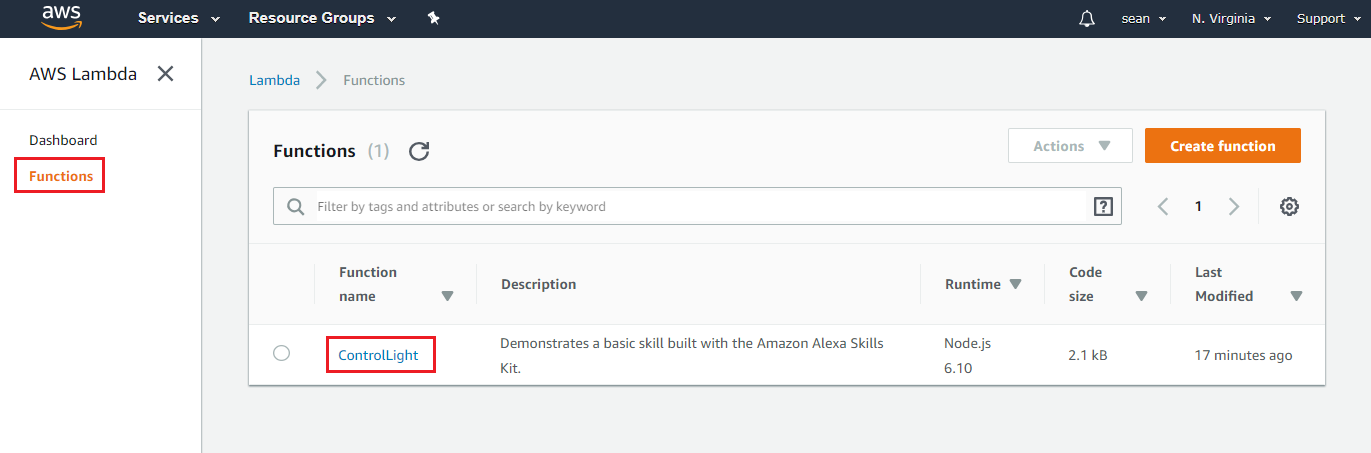
Let’s go back to the Lambda web page, select Functions on the left, and you will see the ControlLight funcion you just created. Click ControlLight and bring it to the Configure page.
 Pull the page to the code editor below
 Then we modify the following code according to the original code:
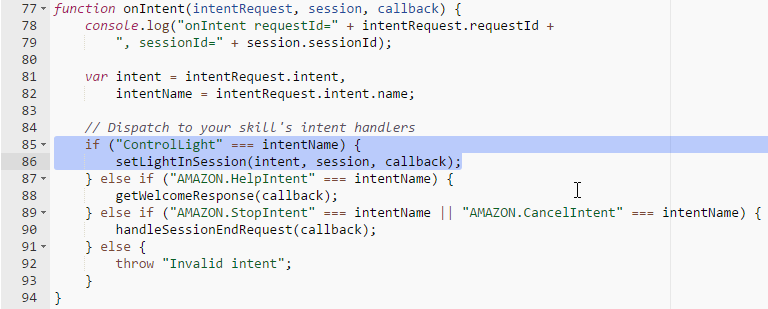
 In the onIntent function, the name of the intent will be compared. Here we will compare the intent name “ControlLight” we set, and call the processing function of setLightInSession.
The onIntent function compares the name of intent. Here we compare the intent name we set, i.e. “ControlLight” and call setLightInSession function.
In the onIntent function, the name of the intent will be compared. Here we will compare the intent name “ControlLight” we set, and call the processing function of setLightInSession.
The onIntent function compares the name of intent. Here we compare the intent name we set, i.e. “ControlLight” and call setLightInSession function.
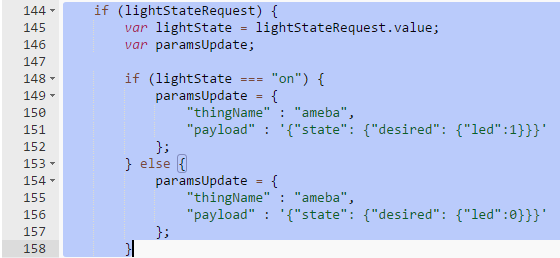
 In setLightInSession function, we get the slot information of the intent. Here we want to get the “LightState” slot.
 Then according to the value of the slot the code generates the content to upload to AWS IoT thing shadow. The “thingName” is the thingName we set in AWS IoT, and generate payload in thing shadow format.
 Afterwards, call updateThingShadow to upload to AWS IoT thing shadow
 Upon succeed, console.log is called to record to log. Then configure the text and voice response message of Alexa.
 Then confirm and click “save”.
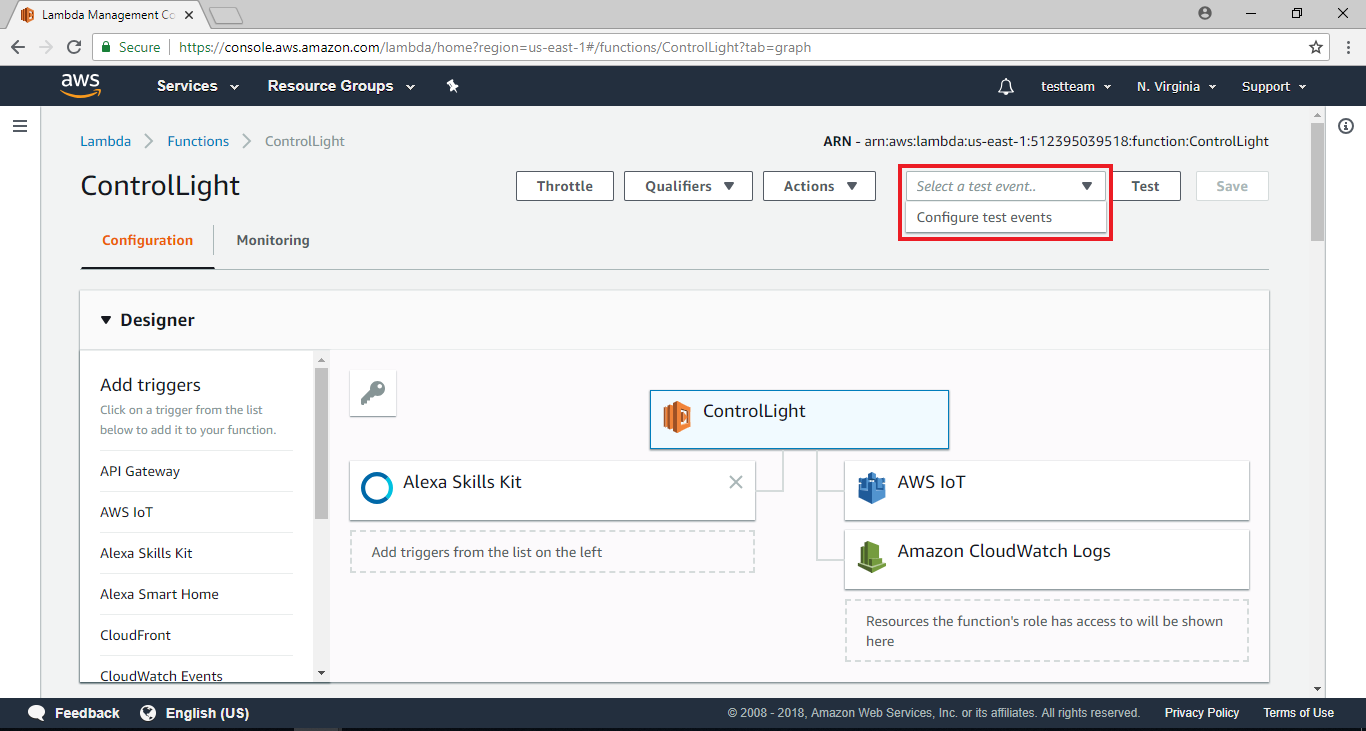
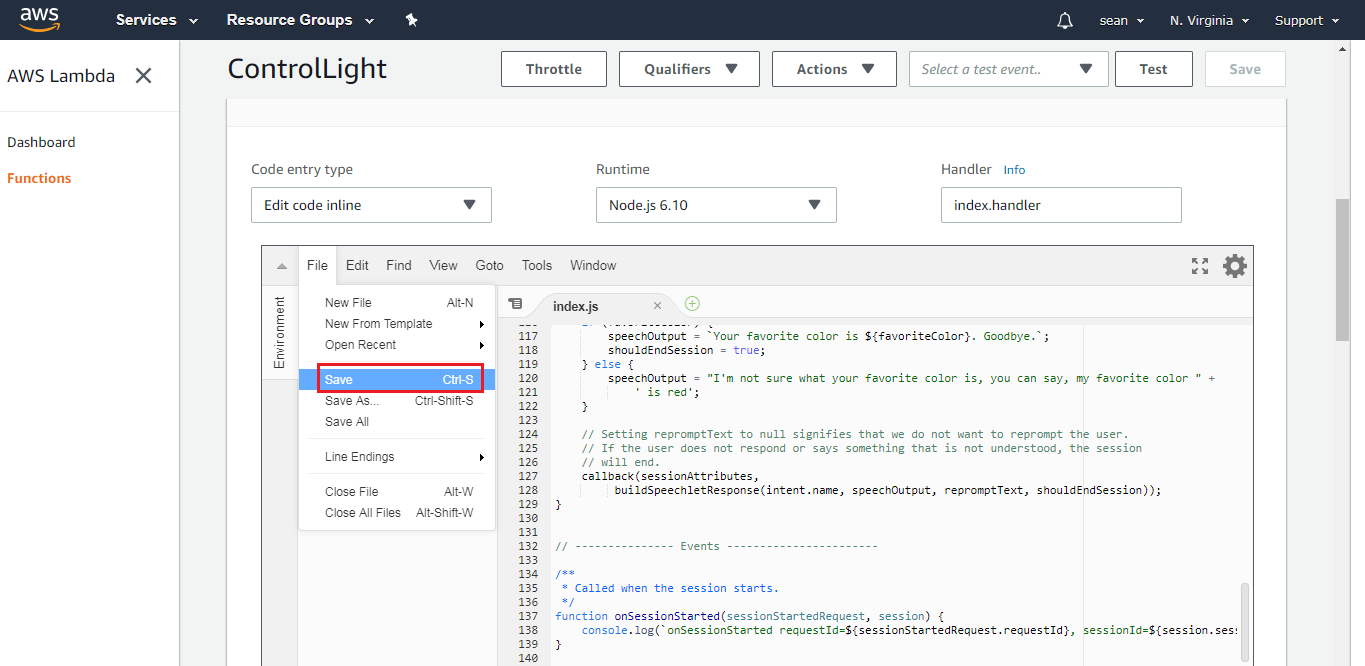 Choose “Configure test event” to configure events for testing.
 Pop up the window
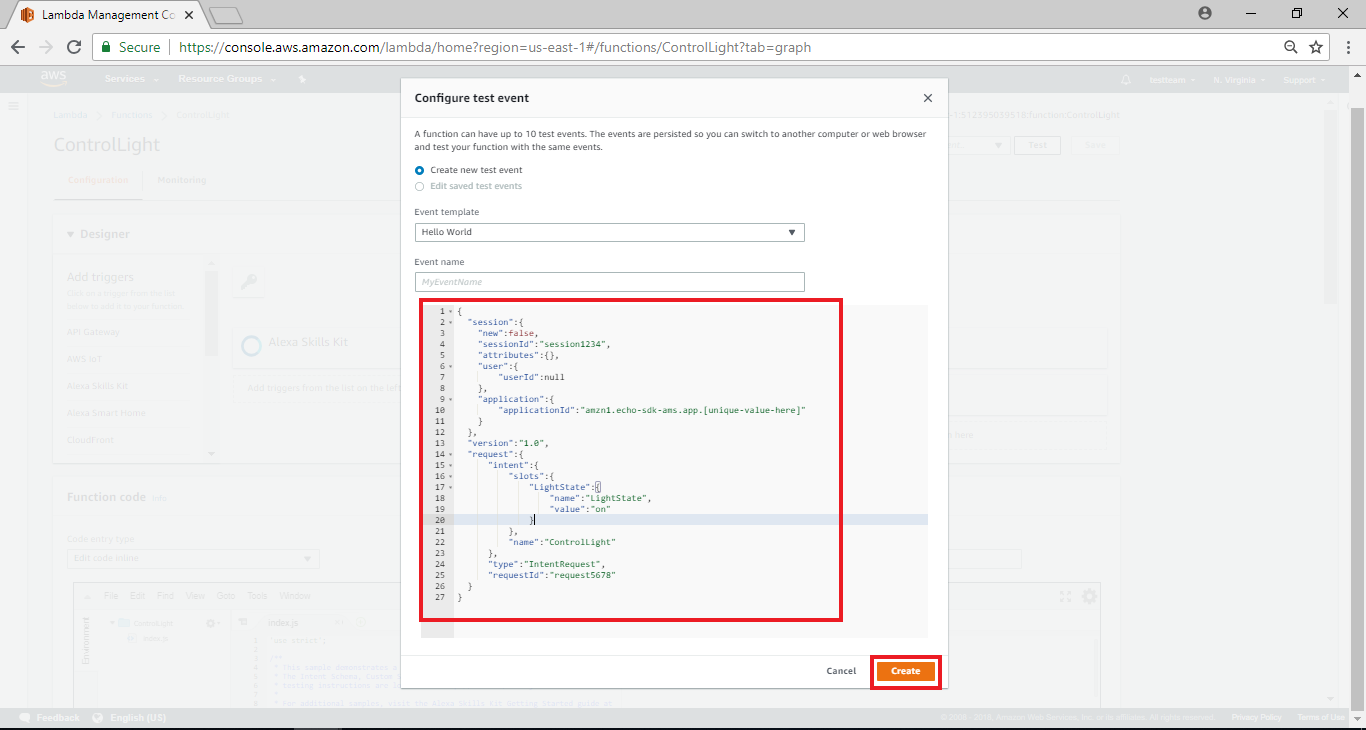 This part is to set the test event, this means we can simulate the event from Alexa, and the information carried by the event, we fill in the content as follows, the modification related to this example has intent name, slot name & value
Paste the following code into the code editor and fill in the “light” at the Event Name, then click on “create”
This part is to set the test event, this means we can simulate the event from Alexa, and the information carried by the event, we fill in the content as follows, the modification related to this example has intent name, slot name & value
Paste the following code into the code editor and fill in the “light” at the Event Name, then click on “create”
 The result and log of the execution will appear below. In the Execution result, the message in the outputSpeech of the response will be “I now know you want to turn on the light”. This text will be expected to allow Alexa to respond in a voice. Below is the log, if the writer is in trouble and needs to add log, you can see the log during execution here.
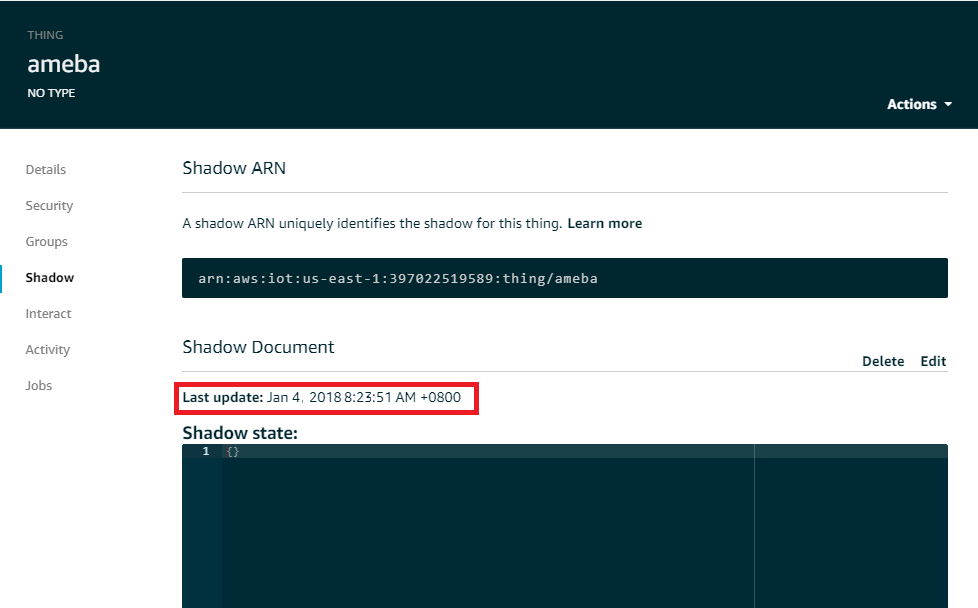
 Go to the AWS IoT page, click thing ameba, and in the information bar on the right, you will see “Last update”. There will be a recent update that represents AWS Lambda to AWS IoT.
Pull the page to the code editor below
Then we modify the following code according to the original code:
/**
 * This sample demonstrates a simple skill built with the Amazon Alexa Skills Kit.
 * The Intent Schema, Custom Slots, and Sample Utterances for this skill, as well as
 * testing instructions are located at http://amzn.to/1LzFrj6
 *
 * For additional samples, visit the Alexa Skills Kit Getting Started guide at
 * http://amzn.to/1LGWsLG
 */

var AWS = require('aws-sdk');
AWS.config.region = "us-east-1";
var iotData = new AWS.IotData({endpoint: "a2zweh2b7yb784.iot.us-east-1.amazonaws.com"});

// Route the incoming request based on type (LaunchRequest, IntentRequest, // etc.) The JSON body of the request is provided in the event parameter.
exports.handler = function (event, context) {
    try {
        console.log("event.session.application.applicationId=" + event.session.application.applicationId);

        /**
         * Uncomment this if statement and populate with your skill's application ID to
         * prevent someone else from configuring a skill that sends requests to this function.
         */
        /*
        if (event.session.application.applicationId !== "amzn1.echo-sdk-ams.app.[unique-value-here]") {
             context.fail("Invalid Application ID");
        }
        */

        if (event.session.new) {
            onSessionStarted({requestId: event.request.requestId}, event.session);
        }

        if (event.request.type === "LaunchRequest") {
            onLaunch(event.request,
                event.session,
                function callback(sessionAttributes, speechletResponse) {
                    context.succeed(buildResponse(sessionAttributes, speechletResponse));
                });
        } else if (event.request.type === "IntentRequest") {
            onIntent(event.request,
                event.session,
                function callback(sessionAttributes, speechletResponse) {
                    context.succeed(buildResponse(sessionAttributes, speechletResponse));
                });
        } else if (event.request.type === "SessionEndedRequest") {
            onSessionEnded(event.request, event.session);
            context.succeed();
        }
    } catch (e) {
        context.fail("Exception: " + e);
    }
};

/**
 * Called when the session starts.
 */
function onSessionStarted(sessionStartedRequest, session) {
    console.log("onSessionStarted requestId=" + sessionStartedRequest.requestId +
        ", sessionId=" + session.sessionId);
}

/**
 * Called when the user launches the skill without specifying what they want.
 */
function onLaunch(launchRequest, session, callback) {
    console.log("onLaunch requestId=" + launchRequest.requestId +
        ", sessionId=" + session.sessionId);

    // Dispatch to your skill's launch.
    getWelcomeResponse(callback);
}

/**
 * Called when the user specifies an intent for this skill.
 */
function onIntent(intentRequest, session, callback) {
    console.log("onIntent requestId=" + intentRequest.requestId +
        ", sessionId=" + session.sessionId);

    var intent = intentRequest.intent,
        intentName = intentRequest.intent.name;

    // Dispatch to your skill's intent handlers
    if ("ControlLight" === intentName) {
        setLightInSession(intent, session, callback);
    } else if ("AMAZON.HelpIntent" === intentName) {
        getWelcomeResponse(callback);
    } else if ("AMAZON.StopIntent" === intentName || "AMAZON.CancelIntent" === intentName) {
        handleSessionEndRequest(callback);
    } else {
        throw "Invalid intent";
    }
}

/**
 * Called when the user ends the session.
 * Is not called when the skill returns shouldEndSession=true.
 */
function onSessionEnded(sessionEndedRequest, session) {
    console.log("onSessionEnded requestId=" + sessionEndedRequest.requestId +
        ", sessionId=" + session.sessionId);
    // Add cleanup logic here
}

// --------------- Functions that control the skill's behavior -----------------------

function getWelcomeResponse(callback) {
    // If we wanted to initialize the session to have some attributes we could add those here.
    var sessionAttributes = {};
    var cardTitle = "Welcome";
    var speechOutput = "Welcome to the Ameba Controller example. " +
        "Please tell me next action by saying, turn on the light";

    // If the user either does not reply to the welcome message or says something that is not
    // understood, they will be prompted again with this text.
    var repromptText = "Please tell me next action by saying, turn on the light";
    var shouldEndSession = false;

    callback(sessionAttributes,
        buildSpeechletResponse(cardTitle, speechOutput, repromptText, shouldEndSession));
}

function handleSessionEndRequest(callback) {
    var cardTitle = "Session Ended";
    var speechOutput = "Thank you for trying the Ameba Controller example. Have a nice day!";
    // Setting this to true ends the session and exits the skill.
    var shouldEndSession = true;

    callback({}, buildSpeechletResponse(cardTitle, speechOutput, null, shouldEndSession));
}

/**
 * Sets the led in the session and prepares the speech to reply to the user.
 */
function setLightInSession(intent, session, callback) {
    var cardTitle = intent.name;
    var lightStateRequest = intent.slots.LightState;
    var repromptText = "";
    var sessionAttributes = {};
    var shouldEndSession = true;
    var speechOutput = "";

    if (lightStateRequest) {
        var lightState = lightStateRequest.value;
        var paramsUpdate;

        if (lightState === "on") {
            paramsUpdate = {
                "thingName" : "ameba",
                "payload" : '{"state": {"desired": {"led":1}}}'
            };
        } else {
            paramsUpdate = {
                "thingName" : "ameba",
                "payload" : '{"state": {"desired": {"led":0}}}'
            };
        }

		//Update Device Shadow
		iotData.updateThingShadow(paramsUpdate, function(err, data) {
			if (err){
				console.log(err, err.stack);

				speechOutput = "fail to update thing shadow";
				repromptText = "fail to update thing shadow";
				callback(sessionAttributes,buildSpeechletResponse(cardTitle, speechOutput, repromptText, shouldEndSession));
			}
			else {
				console.log(data);

        		sessionAttributes = createLightStateAttributes(lightState);
                speechOutput = "I now know you want to turn " + lightState + " the light";
                repromptText = "I now know you want to turn " + lightState + " the light";
                callback(sessionAttributes,buildSpeechletResponse(cardTitle, speechOutput, repromptText, shouldEndSession));
			}
		});
    } else {
        speechOutput = "Please try again";
        repromptText = "Please try again";
        callback(sessionAttributes,buildSpeechletResponse(cardTitle, speechOutput, repromptText, shouldEndSession));
    }
}

function createLightStateAttributes(lightState) {
    return {
        lightState: lightState
    };
}

// --------------- Helpers that build all of the responses -----------------------

function buildSpeechletResponse(title, output, repromptText, shouldEndSession) {
    return {
        outputSpeech: {
            type: "PlainText",
            text: output
        },
        card: {
            type: "Simple",
            title: "SessionSpeechlet - " + title,
            content: "SessionSpeechlet - " + output
        },
        reprompt: {
            outputSpeech: {
                type: "PlainText",
                text: repromptText
            }
        },
        shouldEndSession: shouldEndSession
    };
}

function buildResponse(sessionAttributes, speechletResponse) {
    return {
        version: "1.0",
        sessionAttributes: sessionAttributes,
        response: speechletResponse
    };
}
Some changes that need attention are as follows:
The region must be filled in the correct region, in the endpoint where you need to fill in the AWS IoT endpoint, that is, in the thing information bar, REST API endpoint information, please fill in the corresponding endpoint according to the thing you created
In the onIntent function, the name of the intent will be compared. Here we will compare the intent name “ControlLight” we set, and call the processing function of setLightInSession.
The onIntent function compares the name of intent. Here we compare the intent name we set, i.e. “ControlLight” and call setLightInSession function.
In setLightInSession function, we get the slot information of the intent. Here we want to get the “LightState” slot.
Then according to the value of the slot the code generates the content to upload to AWS IoT thing shadow. The “thingName” is the thingName we set in AWS IoT, and generate payload in thing shadow format.
Afterwards, call updateThingShadow to upload to AWS IoT thing shadow
Then confirm and click “save”.
Choose “Configure test event” to configure events for testing.
Pop up the window
This part is to set the test event, this means we can simulate the event from Alexa, and the information carried by the event, we fill in the content as follows, the modification related to this example has intent name, slot name & value
Paste the following code into the code editor and fill in the “light” at the Event Name, then click on “create”
{
  "session": {
    "new": false,
    "sessionId": "session1234",
    "attributes": {},
    "user": {
      "userId": null
    },
    "application": {
      "applicationId": "amzn1.echo-sdk-ams.app.[unique-value-here]"
    }
  },
  "version": "1.0",
  "request": {
    "intent": {
      "slots": {
        "LightState": {
          "name": "LightState",
          "value": "on"
        }
      },
      "name": "ControlLight"
    },
    "type": "IntentRequest",
    "requestId": "request5678"
  }
}
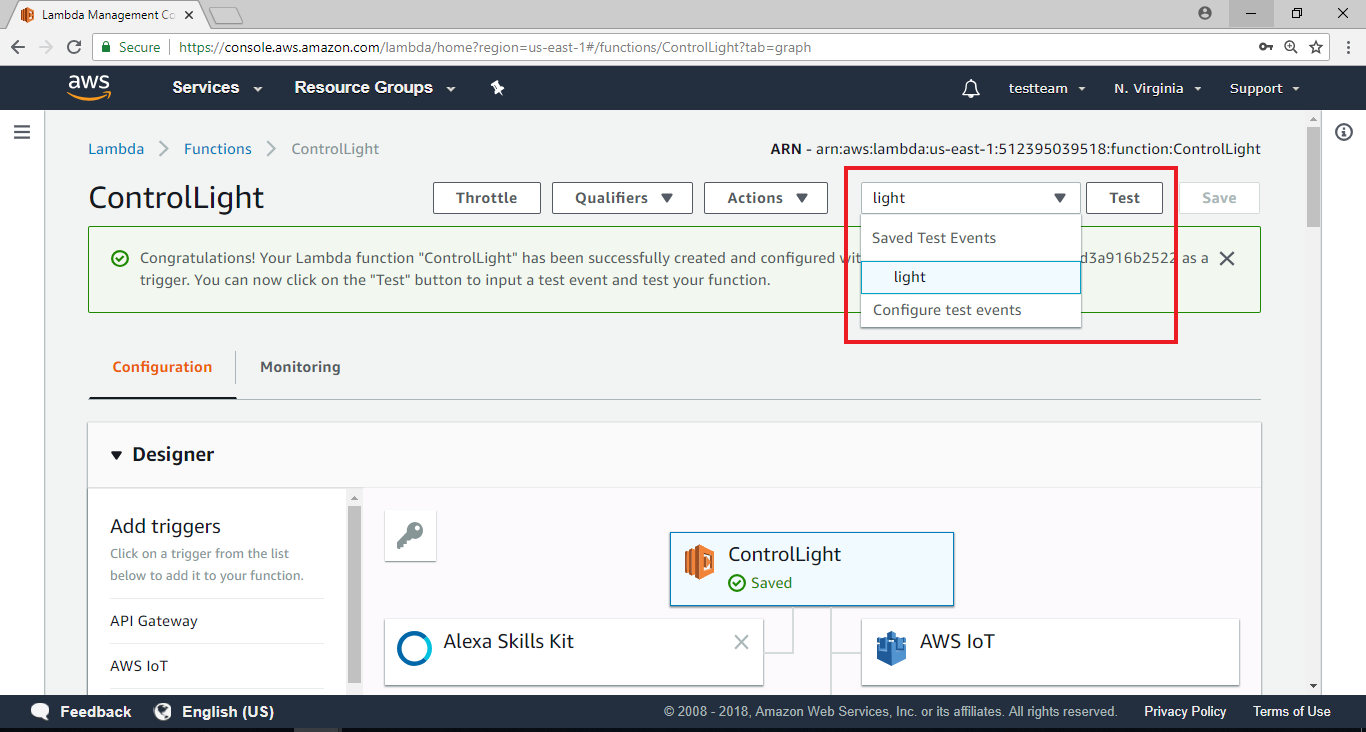
Go back to the previous page, select the light event you just created at the top, and click “Test
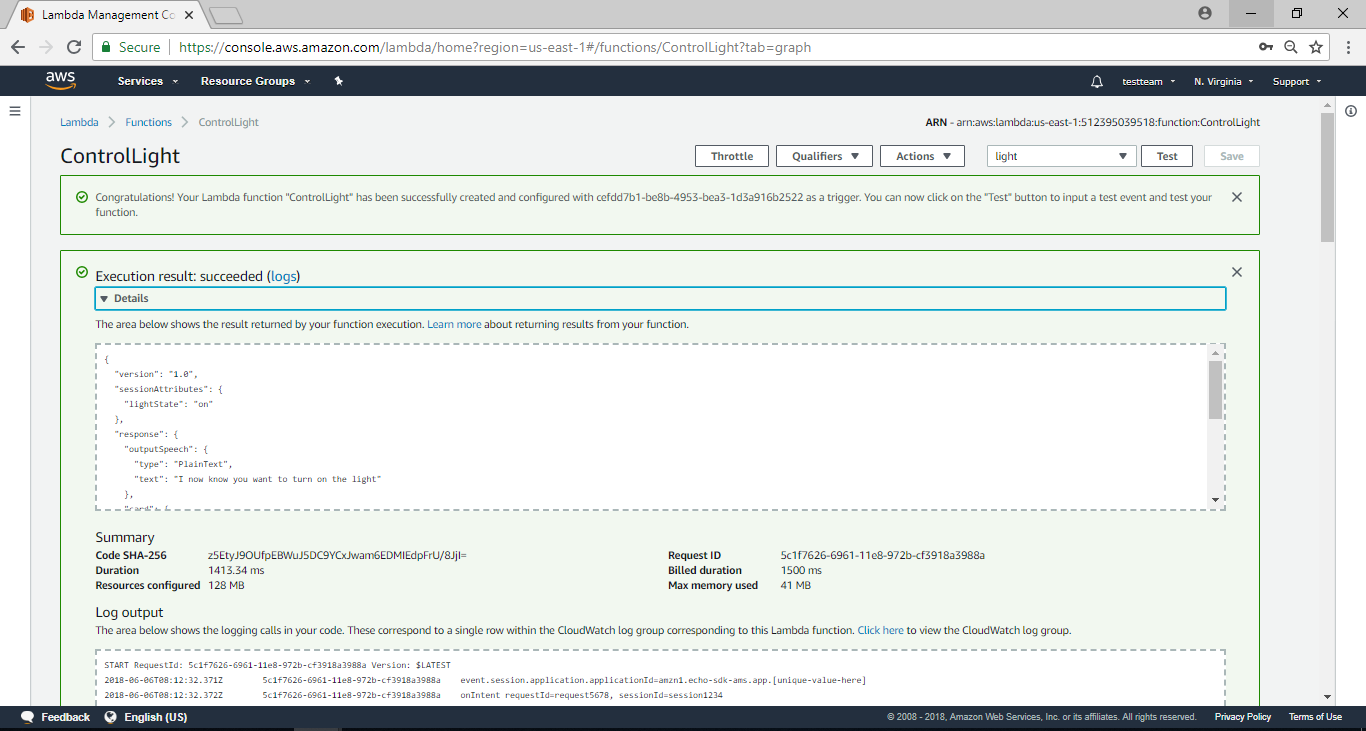
The result and log of the execution will appear below. In the Execution result, the message in the outputSpeech of the response will be “I now know you want to turn on the light”. This text will be expected to allow Alexa to respond in a voice. Below is the log, if the writer is in trouble and needs to add log, you can see the log during execution here.
Go to the AWS IoT page, click thing ameba, and in the information bar on the right, you will see “Last update”. There will be a recent update that represents AWS Lambda to AWS IoT.
Amazon Alexa – EndPoint Configuration
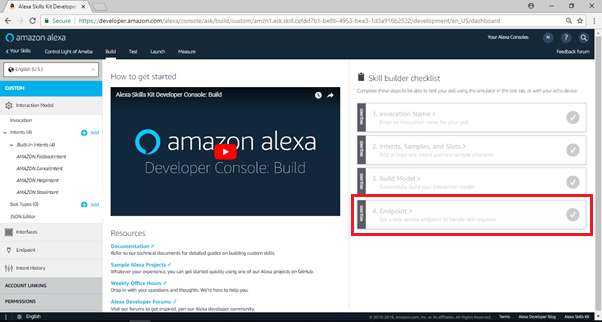
Go back to the Amazon Alexa Skill homepage, this time we’re going to set up the EndPoint, click on the bottom right. 4.Endpoint
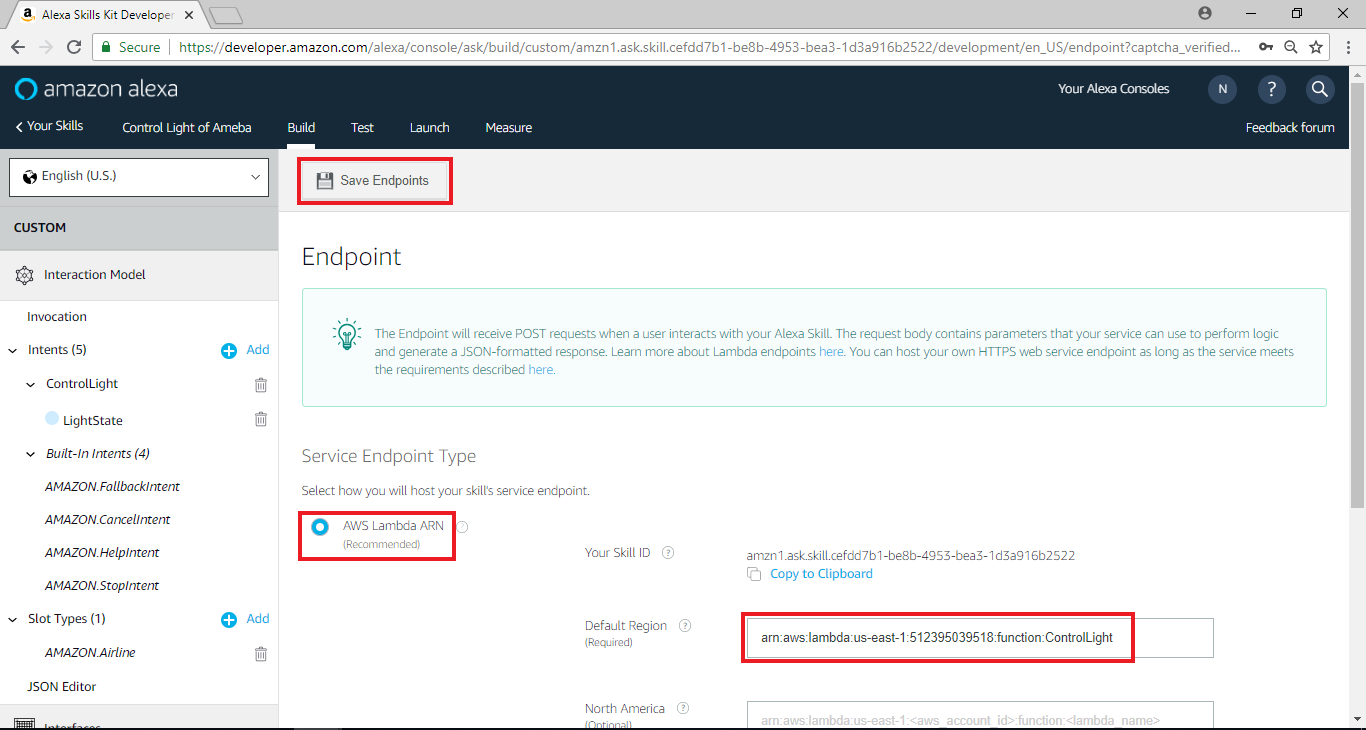
 Then go to the Edit Endpoint page, select “AWS Lambda ARN” as Service Endpoint Type, and paste the ARN string you just got, “arn:aws:lambda:us-east-1:553661462376:function:ControlLight” Default region field, please fill in the corresponding value according to the endpoint of the Lambda function you created (note that this endpoint is not the REST API endpoint of the thing in the AWS IoT, but the content of the ARN in the upper right corner of the Lumbda function), and Click on “Save Endpoint”
Then go to the Edit Endpoint page, select “AWS Lambda ARN” as Service Endpoint Type, and paste the ARN string you just got, “arn:aws:lambda:us-east-1:553661462376:function:ControlLight” Default region field, please fill in the corresponding value according to the endpoint of the Lambda function you created (note that this endpoint is not the REST API endpoint of the thing in the AWS IoT, but the content of the ARN in the upper right corner of the Lumbda function), and Click on “Save Endpoint”
Amazon Alexa – Test
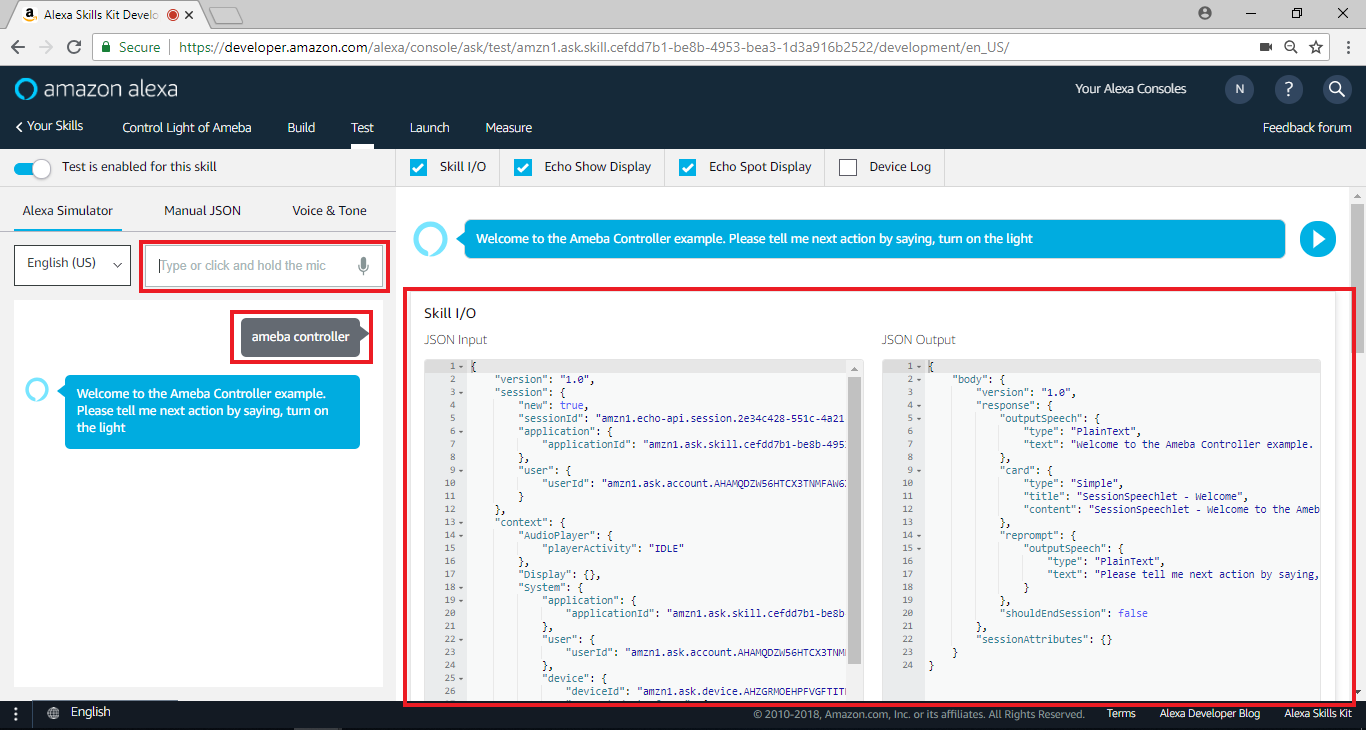
In Test page, we can conduct some basic test
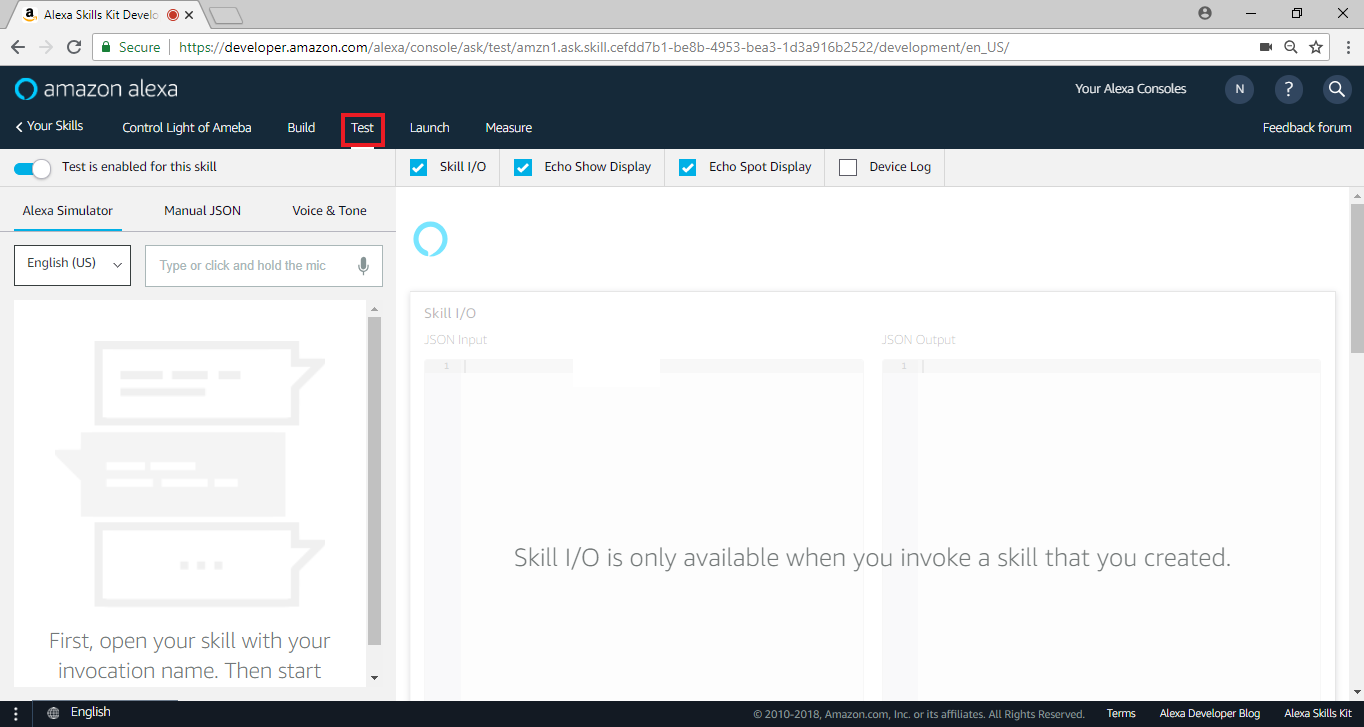 Start the skill by typing “ameba controller” on the left. We can test the voice data received by Alexa about how will it be pronounced.
It uses SSML tags to let Alexa make a specific voice like spelling hello, click on the play button to listen to the results of the voice.
The text here is also the outputSpeech content of Lambda’s return, so we can have more flexibility in Lambda’s return voice message.
Start the skill by typing “ameba controller” on the left. We can test the voice data received by Alexa about how will it be pronounced.
It uses SSML tags to let Alexa make a specific voice like spelling hello, click on the play button to listen to the results of the voice.
The text here is also the outputSpeech content of Lambda’s return, so we can have more flexibility in Lambda’s return voice message.
 We can fill in the voice message sent by the user, and let Alexa pretend to hear the message for the corresponding processing, then enter “Turn on the light” to control the light on.
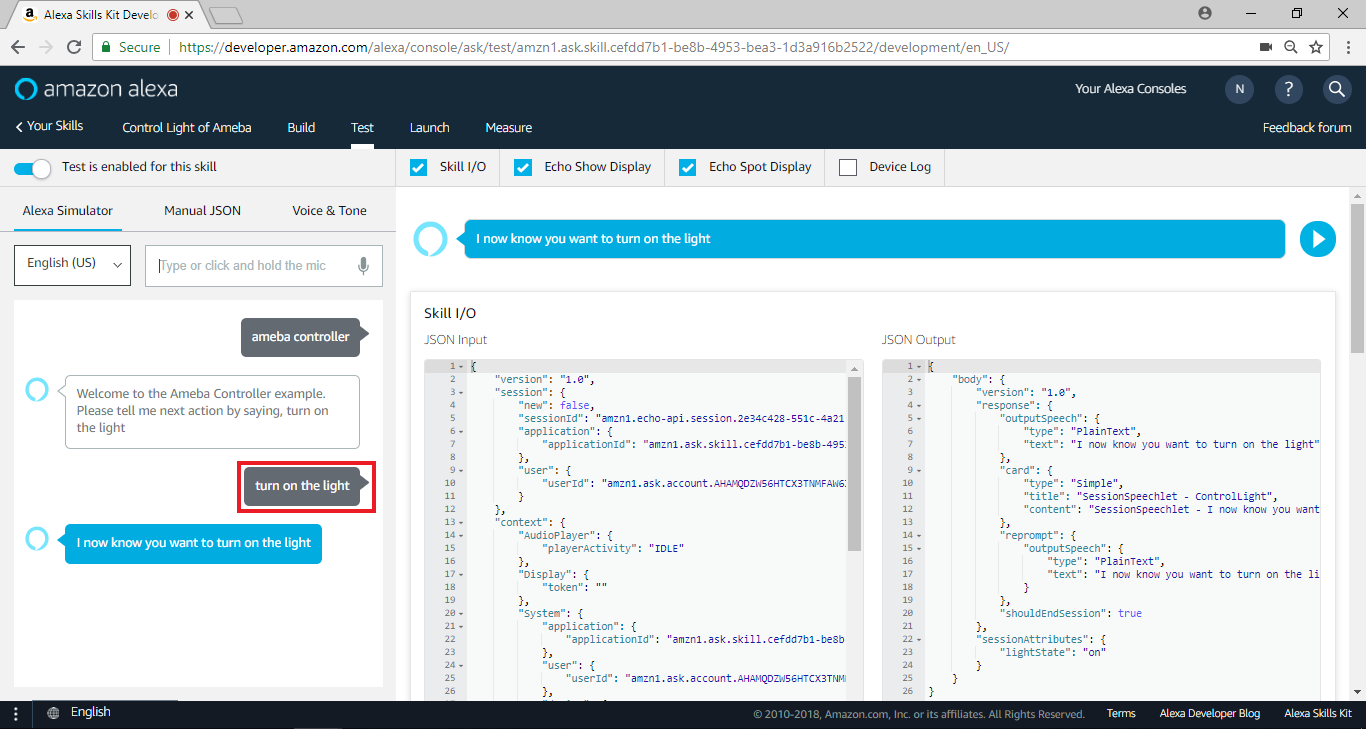 This voice message will be processed by Alexa and sent to the Lambda function. After the Lambda function is processed, the result will be returned. We can select “Voice & Tone” and “Play” to listen to the result.
 At the same time we can switch browser tab to AWS IoT to determine thing ameba have received this update
At this stage, we have finished the entire function. Since this skill is only for testing purposes, we will not proceed with the settings. If you are interested, you can continue to do “Publishing Information” and “Privacy & Compliance”.
But in the “Test” phase, the user can already use the skill that he created, and we then see how to actually test it.
At the same time we can switch browser tab to AWS IoT to determine thing ameba have received this update
At this stage, we have finished the entire function. Since this skill is only for testing purposes, we will not proceed with the settings. If you are interested, you can continue to do “Publishing Information” and “Privacy & Compliance”.
But in the “Test” phase, the user can already use the skill that he created, and we then see how to actually test it.
Start the skill by typing “ameba controller” on the left. We can test the voice data received by Alexa about how will it be pronounced.
It uses SSML tags to let Alexa make a specific voice like spelling hello, click on the play button to listen to the results of the voice.
The text here is also the outputSpeech content of Lambda’s return, so we can have more flexibility in Lambda’s return voice message.
We can fill in the voice message sent by the user, and let Alexa pretend to hear the message for the corresponding processing, then enter “Turn on the light” to control the light on.
This voice message will be processed by Alexa and sent to the Lambda function. After the Lambda function is processed, the result will be returned. We can select “Voice & Tone” and “Play” to listen to the result.
At the same time we can switch browser tab to AWS IoT to determine thing ameba have received this update
At this stage, we have finished the entire function. Since this skill is only for testing purposes, we will not proceed with the settings. If you are interested, you can continue to do “Publishing Information” and “Privacy & Compliance”.
But in the “Test” phase, the user can already use the skill that he created, and we then see how to actually test it.
Test – Alexa-supported device
Find Alexa-supported devices here:
https://www.amazon.com/Amazon-Echo-Bluetooth-Speaker-with-WiFi-Alexa/dp/B00X4WHP5E
Or you can use mobile apps:
https://itunes.apple.com/us/app/lexi-for-alexa-voice-services/id1092933088
Test – Amazon Alexa Management
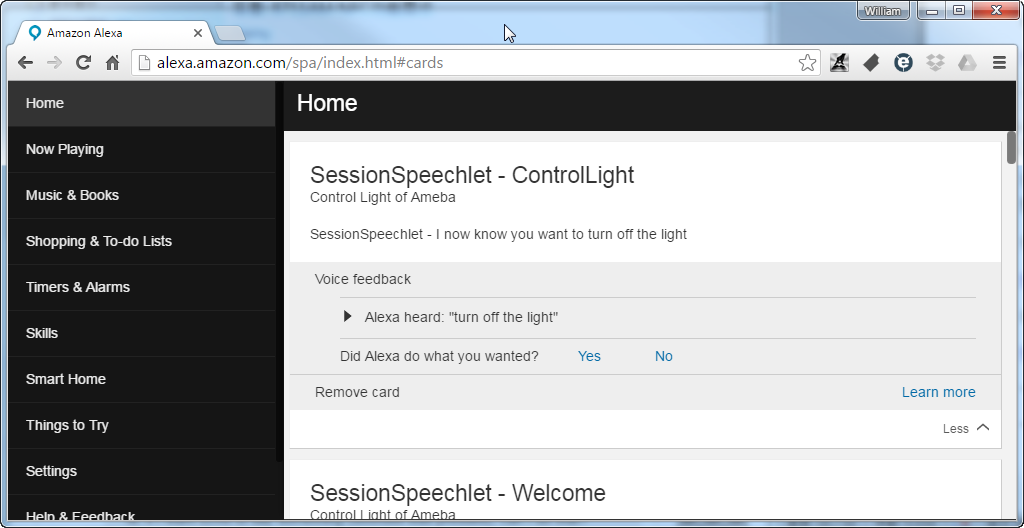
We can manage the activated skills on the Alexa device via webpage:
http://alexa.amazon.com/spa/index.html#cards
or mobile app: (currently only available in USA region)
https://www.amazon.com/gp/help/customer/display.html?nodeId=201602060
In homepage, the Voice feedback section displays the latest voice command Alexa heard.
Test – Demo
Here we test the ControlLight skill. Since the sentences “turn on” and “turn off” are highly relevant to the keywords of Amazon Smart home kit, we will use two voice commands to trigger the ControlLight skill.
1. User: “Alexa, ask Ameba Controller”
“Alexa, ask…” tells Alexa to search the Invocation Name. We have set the Invocation Name to “Ameba Controller”, therefore when Alexa hears this sentence, it opens a Ameba Controller session.
2. Alexa: “Welcome to the Ameba Controller example. Please tell me next action by saying, turn on the light”
The response message is set in the Lambda function getWelcomeResponse(). Getting this message stands for the IntentRequest is successfully received by the Lambda function.
3. User: “Turn on the light”
Lambda tries to send the command to turn on the light to AWS IoT thing shadow.
4. Alexa: “I now know you want to turn on the light”
The light should be opened by now. The Lambda function close the session after it sends command to AWS IoT thing shadow.
