Preparation
- Ameba RTL8195 x 1
- Microsoft Azure Account
Example
Microsoft Azure IoT is a cloud service, as described in the official website:
Rely on Microsoft Azure IoT Hub to easily and securely connect your Internet of Things (IoT) assets. Use device-to-cloud telemetry data to understand the state of your devices and assets, and be ready to take action when a device needs your attention. Azure IoT Hub offers sending commands and notifications via cloud-to-device messages reliably. In cloud-to-device messages, reliably send commands and notifications to your connected devices – and track message delivery with acknowledgement receipts. Device messages are sent in a durable way to accommodate intermittently connected devices.(From https://azure.microsoft.com/zh-tw/services/iot-hub/)
The following is the Azure IoT device monitoring platform architecture diagram used in the example
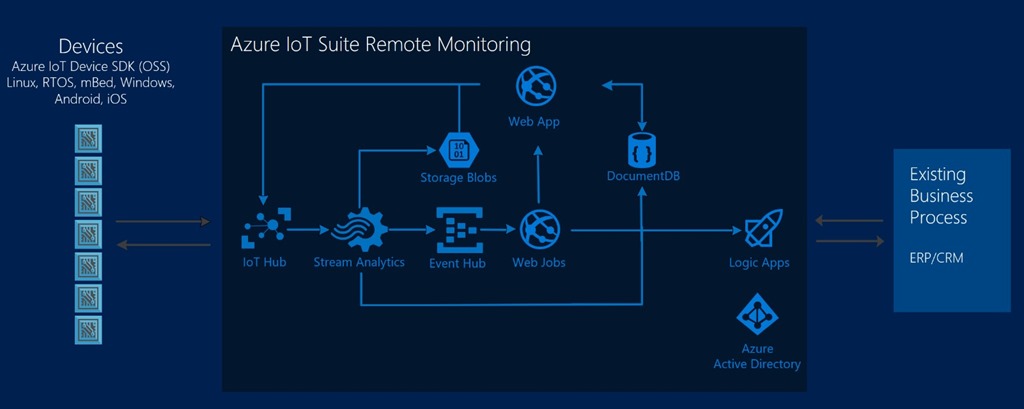 The devices on the left represent Ameba RTL8195, and they use the Shared Access Signatures(SAS) to connect with the Azure IoT Hub. Using a shared access signature (SAS) is a powerful way to grant limited access to objects in your storage account to other clients, without having to expose your account key.
The devices on the left represent Ameba RTL8195, and they use the Shared Access Signatures(SAS) to connect with the Azure IoT Hub. Using a shared access signature (SAS) is a powerful way to grant limited access to objects in your storage account to other clients, without having to expose your account key.
- Create an Azure account to use Microsoft Azure. You can find out the login and registration information here:https://azure.microsoft.com/en-us/free/ Credit card details are necessary to verify your identity and activate the service. And getting $200 credit to use on Azure services after enable the account now(2016/10/5). For details, please refer to the website content description.
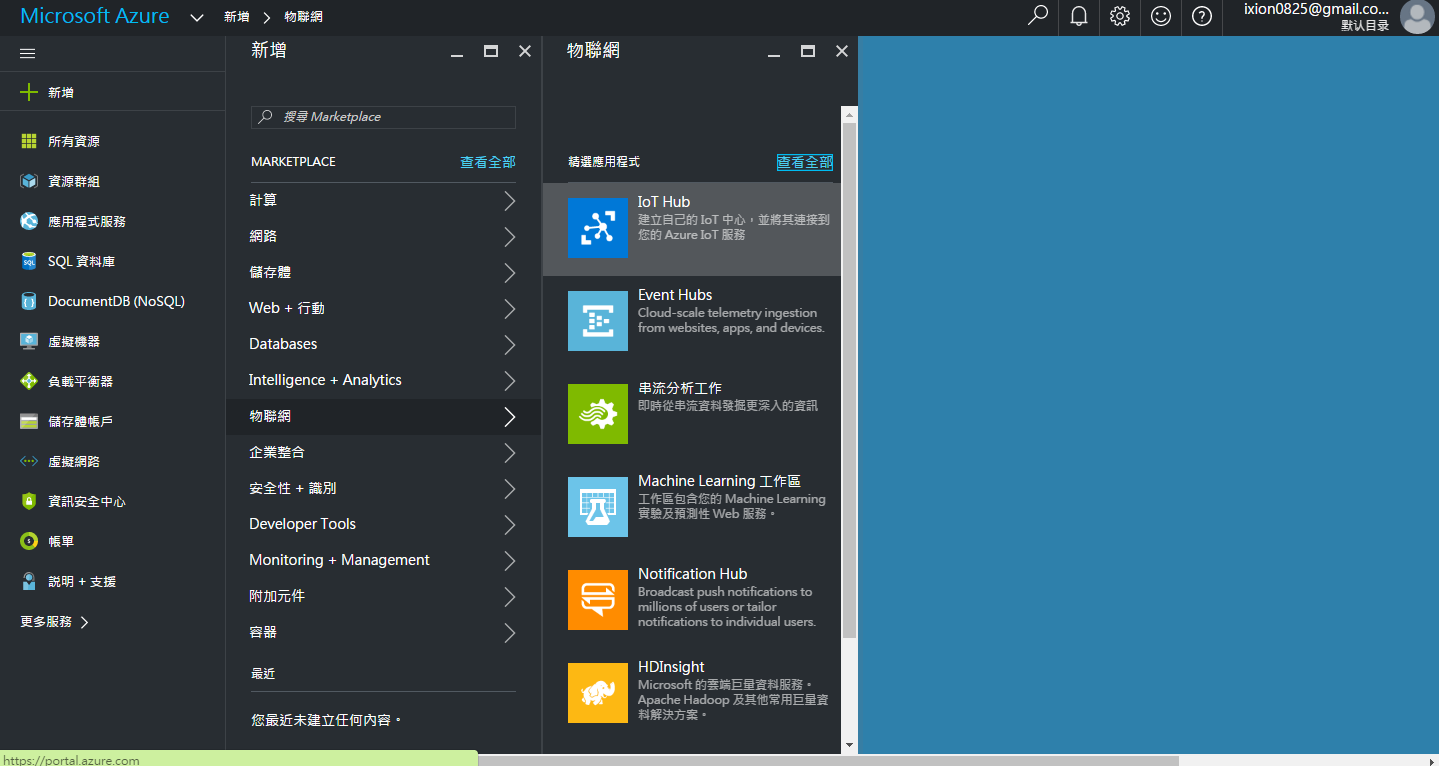
- Log in to Azure portal after the account activation and choose New > Internet of Things > Azure IoT Hub
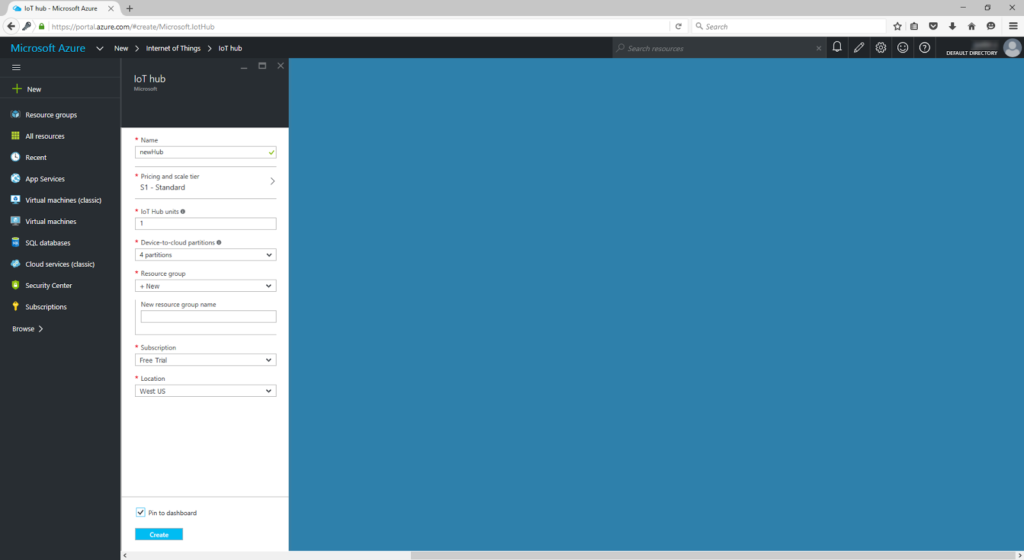
- Then we need to enter the required Information of added IoT Hub. Click the Create button after the input is complete and the Azure IoT Hub service is established. We input the IoT Hub Name as ”AmebaGO” here.
- Establish Azure IoT Suite – Remote Monitoring. Remote Monitoring is a graphical device sensor controller, which integrated the chart analysis and GPS geographic location map reference. You can refer to Microsoft Documentation

- We add a new device in the above teaching steps, and the device id is ”AmebaGO1”. It’s a non-simulated device and it is not yet enabled
- Then we need to get the Shared Access Signatures(SAS) token to let Azure IoT Hub provide authorization to Ameba RTL8195 to use Azure IoT Hub service
- Go back to the home of the panel. Click “All Resources” in list of functions on the left and the link to the added Azure IoT Hub can been seen
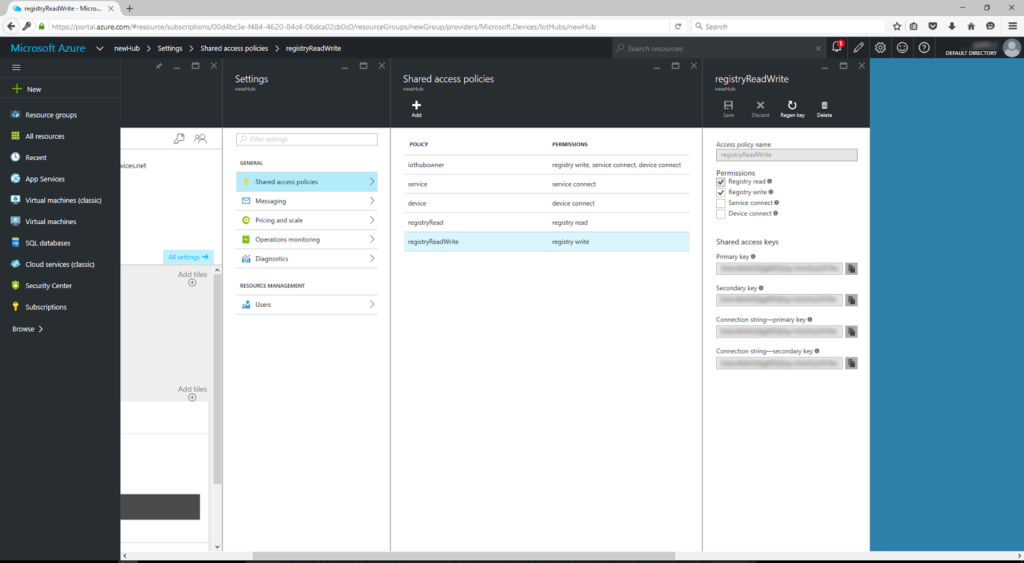
- Click Settings > Shared access policies > registryReadWrite, get Primary key and its corresponding Connection string
- Next step, adding SAS token:
1. To https://github.com/Azure/azure-iot-sdks/releases Download SetupDeviceExplorer.msi
2. Open “Device Explorer” after the installation and fill “Connection Information” in with the Connection string which obtained from the Azure IoT Hub. And click the “Update” button.
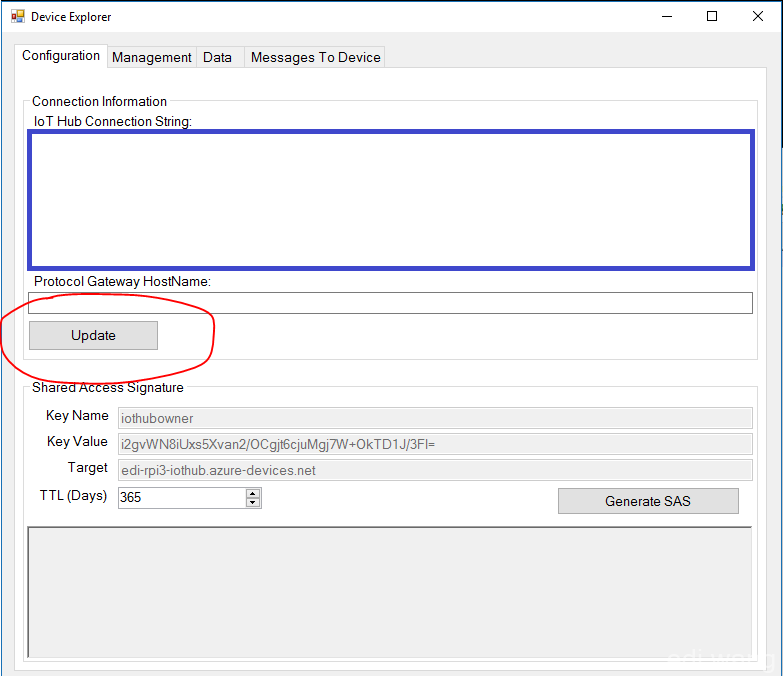 3. The information of Shared Access Signature which is beneath the Device Explorer will update automatically, and click the “Management” tab. If you have already finished the setup and adding new device on Azure IoT Suite – Remote Monitoring, the “Management” tab will display all the added devices on Remote Monitoring, and then click the “SAS Token” button which is on the upper right corner. On SASTokenForm, select your device (AmebaGO1) in the DeviceID drop down. Set your TTL. Click Generate to create your token. For more information, see: https://azure.microsoft.com/zh-tw/documentation/articles/iot-hub-mqtt-support/
4. The SAS token that’s generated has this structure: HostName={your hub name}.azure-devices.net;DeviceId=javadevice;SharedAccessSignature=SharedAccessSignature sr={your hub name}.azure-devices.net%2fdevices%2fMyDevice01&sig=vSgHBMUG…..Ntg%3d&se=1456481802。
5. The part of this token to use as the Password field to connect using MQTT is: SharedAccessSignature sr={your hub name}.azure-devices.net%2fdevices%2fyDevice01&sig=vSgHBMUG…..Ntg%3d&se=1456481802g%3d&se=1456481802。
3. The information of Shared Access Signature which is beneath the Device Explorer will update automatically, and click the “Management” tab. If you have already finished the setup and adding new device on Azure IoT Suite – Remote Monitoring, the “Management” tab will display all the added devices on Remote Monitoring, and then click the “SAS Token” button which is on the upper right corner. On SASTokenForm, select your device (AmebaGO1) in the DeviceID drop down. Set your TTL. Click Generate to create your token. For more information, see: https://azure.microsoft.com/zh-tw/documentation/articles/iot-hub-mqtt-support/
4. The SAS token that’s generated has this structure: HostName={your hub name}.azure-devices.net;DeviceId=javadevice;SharedAccessSignature=SharedAccessSignature sr={your hub name}.azure-devices.net%2fdevices%2fMyDevice01&sig=vSgHBMUG…..Ntg%3d&se=1456481802。
5. The part of this token to use as the Password field to connect using MQTT is: SharedAccessSignature sr={your hub name}.azure-devices.net%2fdevices%2fyDevice01&sig=vSgHBMUG…..Ntg%3d&se=1456481802g%3d&se=1456481802。 - Set up Ameba RTL8195
Open the example “File” -> “Examples” -> “AmebaMQTTClient” -> “azure_iot_hub_basic”
First fill in the ssid and password of AP to be connected with Ameba RTL8195
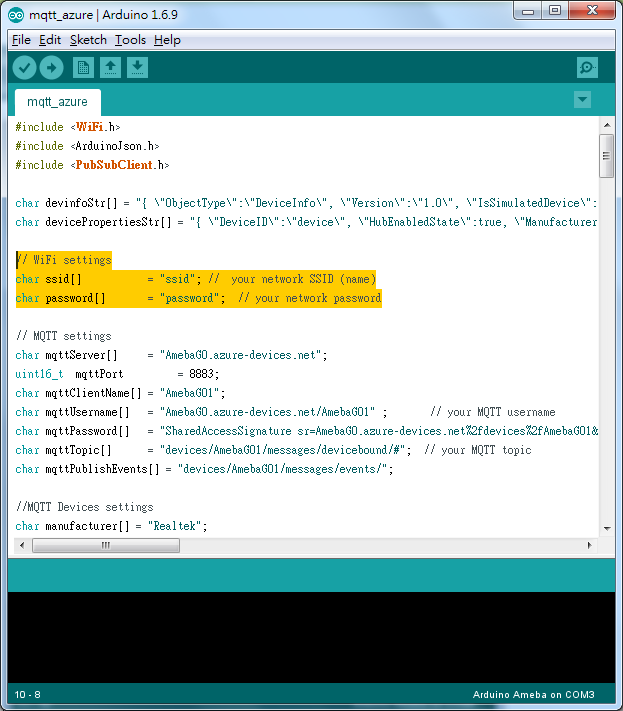 Then set up Azure MQTT related parameters
Set mqttServer as: ” [IoT Hub Name].azure-devices.net”, the setting in example is “AmebaGO.azure-devices.net”
Set mqttPort as: 8883
Set mqttClientName as: the added device name in Remote Monitoring, we set mqttClientName as AmebaGO1 in the example
Set mqttUsername as: ” [IoT Hub Name].azure-devices.net/[Dvice ID] “, the setting in example is “AmebaGO.azure-devices.net/AmebaGO1”
Set mqttPassword as: the SAS Token generated from Device Explorer, for example:SharedAccessSignature sr={ IoT Hub Name }.azure-devices.net%2fdevices%2fyDevice01&sig=vSgHBMUG…..Ntg%3d&se=1456481802g%3d&se=1456481802
Set mqttTopic as: “devices/[Dvice ID]/messages/devicebound/#”, the setting in example is “devices/AmebaGO1/messages/devicebound/#”
Set mqttPublishEvents as: “devices/[Dvice ID]/messages/events/”, the setting in example is “devices/AmebaGO1/messages/events/”
Then set up Azure MQTT related parameters
Set mqttServer as: ” [IoT Hub Name].azure-devices.net”, the setting in example is “AmebaGO.azure-devices.net”
Set mqttPort as: 8883
Set mqttClientName as: the added device name in Remote Monitoring, we set mqttClientName as AmebaGO1 in the example
Set mqttUsername as: ” [IoT Hub Name].azure-devices.net/[Dvice ID] “, the setting in example is “AmebaGO.azure-devices.net/AmebaGO1”
Set mqttPassword as: the SAS Token generated from Device Explorer, for example:SharedAccessSignature sr={ IoT Hub Name }.azure-devices.net%2fdevices%2fyDevice01&sig=vSgHBMUG…..Ntg%3d&se=1456481802g%3d&se=1456481802
Set mqttTopic as: “devices/[Dvice ID]/messages/devicebound/#”, the setting in example is “devices/AmebaGO1/messages/devicebound/#”
Set mqttPublishEvents as: “devices/[Dvice ID]/messages/events/”, the setting in example is “devices/AmebaGO1/messages/events/”
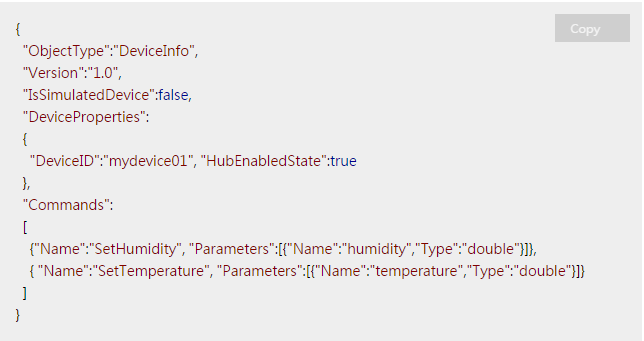
 Set up Ameba RTL8195 DeviceInfo publish message:
The added device starts by default as pending(Not activated) in Remote Monitoring, and it needs to be activated via publish DeviceInfo message. The format of DeviceInfo message is as following:
Set up Ameba RTL8195 DeviceInfo publish message:
The added device starts by default as pending(Not activated) in Remote Monitoring, and it needs to be activated via publish DeviceInfo message. The format of DeviceInfo message is as following:
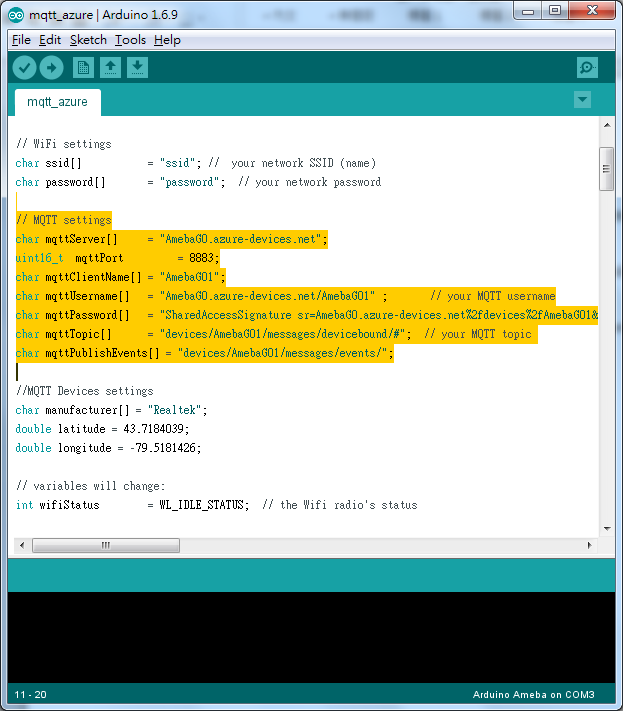
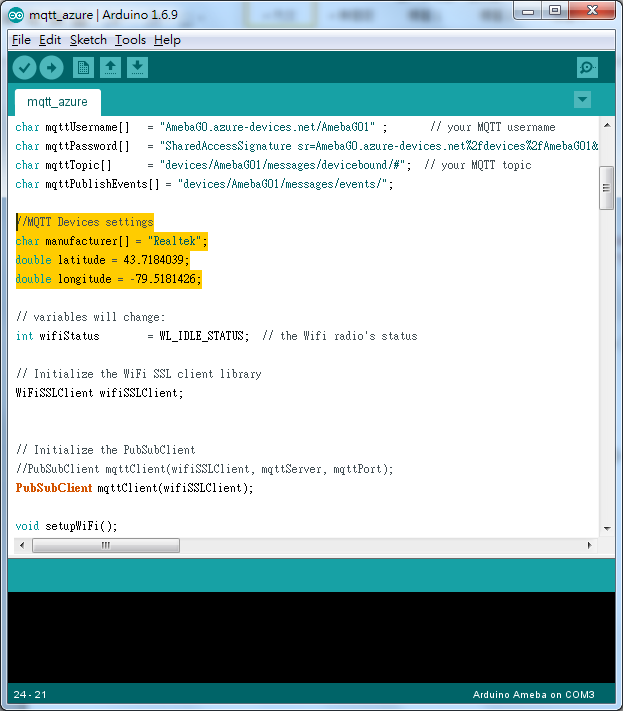
 We add extra information about manufacturer and geographic location data in DeviceProperties in this example:
To set manufacturer as Realtek in example
To set latitude as 43.7184039 in example(Latitude coordinate of Realtek)
To set longitude as -79.5181426 in example(Longitude coordinate of Realtek)
We add extra information about manufacturer and geographic location data in DeviceProperties in this example:
To set manufacturer as Realtek in example
To set latitude as 43.7184039 in example(Latitude coordinate of Realtek)
To set longitude as -79.5181426 in example(Longitude coordinate of Realtek)
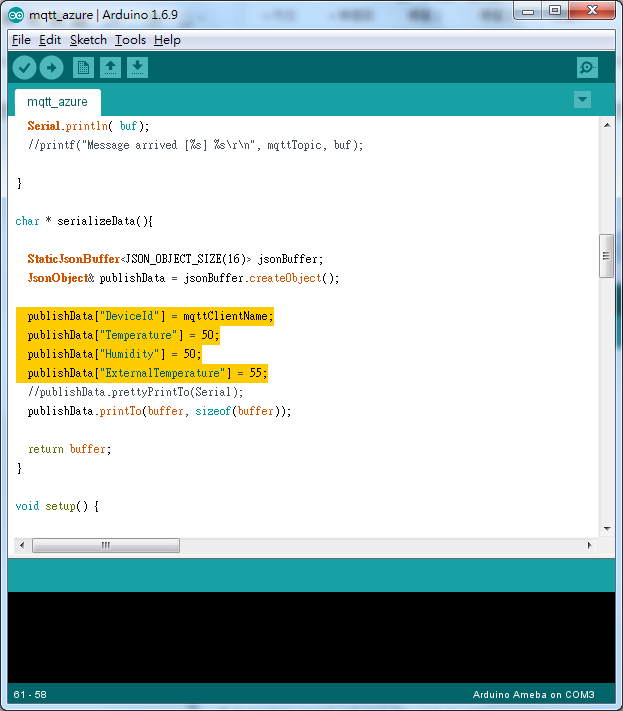
 Set up Ameba RTL8195 sensor data publish message:
Four parameters that will be published in each loop procedure in this example are DeviceId, Temperature, Humidity and ExternalTemperature. The values of temperature and humidity can be modified according to actual needs.
Set up Ameba RTL8195 sensor data publish message:
Four parameters that will be published in each loop procedure in this example are DeviceId, Temperature, Humidity and ExternalTemperature. The values of temperature and humidity can be modified according to actual needs.
- Compile and execute
After uploading the compiled example to Ameba RTL8195, click the reset button and open serial monitor to check out the results of implementation
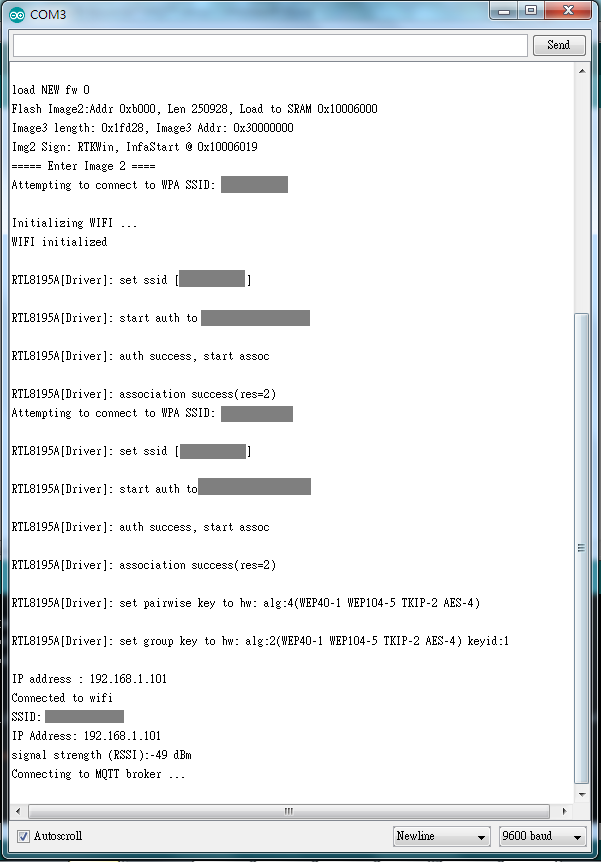 1. First step is to connect to AP and retrieve the IP Address
2. Then try to connect to MQTT Broker server, and this step takes longer time to finish.
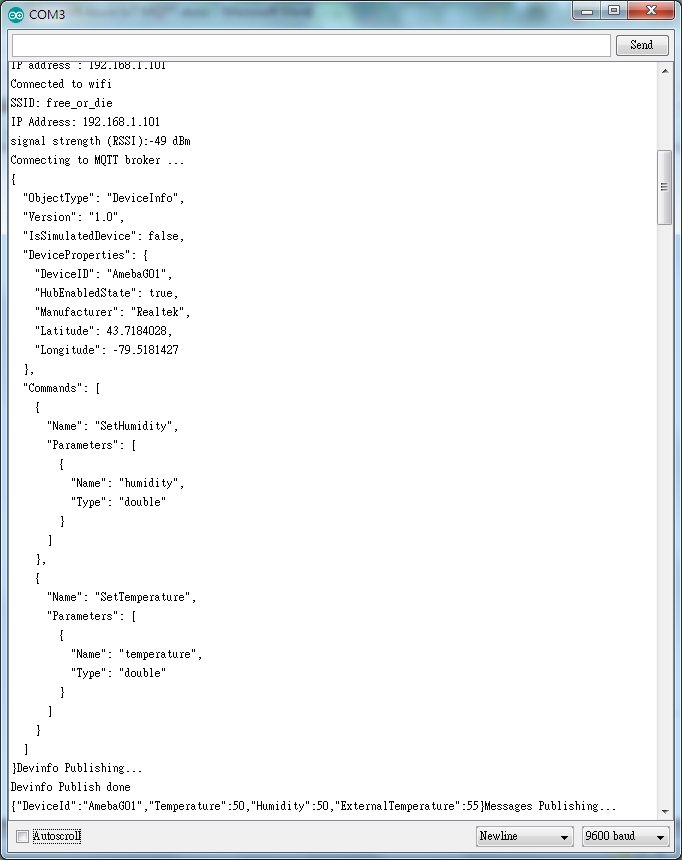
3. After the connection, Ameba RTL8195 will print out the content of Devinfo and publish to Azure IoT Hub. Next, it enters into loop status after the publishing and starts to publish the data of temperature and humidity.
1. First step is to connect to AP and retrieve the IP Address
2. Then try to connect to MQTT Broker server, and this step takes longer time to finish.
3. After the connection, Ameba RTL8195 will print out the content of Devinfo and publish to Azure IoT Hub. Next, it enters into loop status after the publishing and starts to publish the data of temperature and humidity.
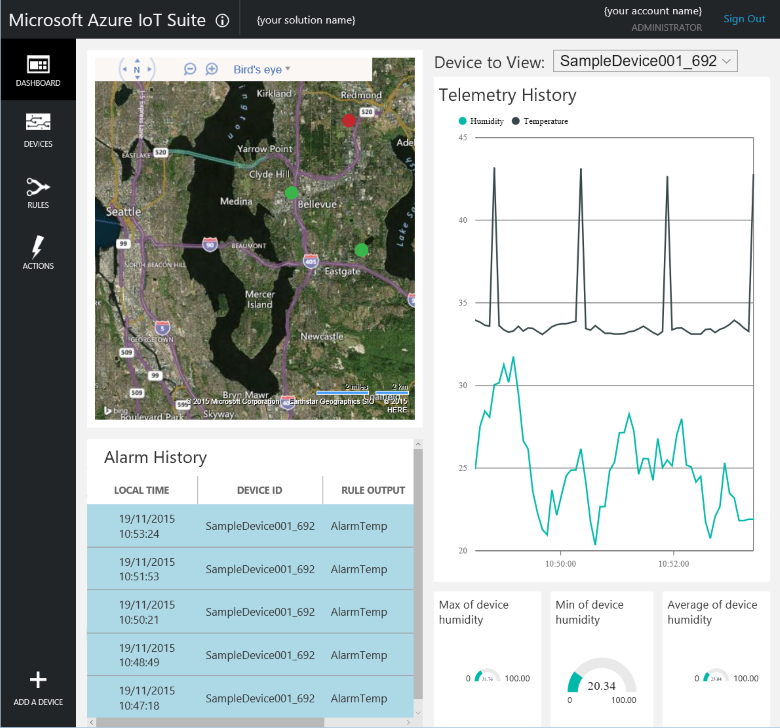
 4.Now go to Remote Monitoring page. The graphical monitoring interface which is provided by Remote Monitoring can get both sensor data of Ameba RTL8195 and its geographic location information
 – Sending commands to Ameba RTL8195 in Remote Monitoring
The dashboard in the remote monitoring solution enables you to send commands to your devices through IoT Hub. For example, in the remote monitoring solution you can send a command to set the internal temperature of a device.
In the remote monitoring solution dashboard, click Devices in the left-hand panel to navigate to the Devices list.
Click Device ID for your device in the Devices list.
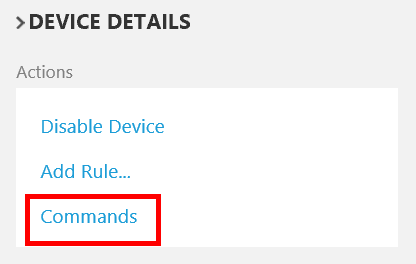
In the Device details panel, click Commands.
– Sending commands to Ameba RTL8195 in Remote Monitoring
The dashboard in the remote monitoring solution enables you to send commands to your devices through IoT Hub. For example, in the remote monitoring solution you can send a command to set the internal temperature of a device.
In the remote monitoring solution dashboard, click Devices in the left-hand panel to navigate to the Devices list.
Click Device ID for your device in the Devices list.
In the Device details panel, click Commands.
 In the Command drop-down, select SetTemperature, and then in Temperature enter a new temperature value. Click Send command to send the command to the device.
 Now the message Ameba RTL8195 receives should display as following:
Message arrived: [topic]
[Messages from Remote Monitoring]
More information about sending commands in Remote Monitoring, see:
https://azure.microsoft.com/zh-tw/documentation/articles/iot-suite-connecting-devices/
Now the message Ameba RTL8195 receives should display as following:
Message arrived: [topic]
[Messages from Remote Monitoring]
More information about sending commands in Remote Monitoring, see:
https://azure.microsoft.com/zh-tw/documentation/articles/iot-suite-connecting-devices/
Code Reference
The code uses the basic architecture of MQTT, except for MQTT Server of Azure IoT Hub and SAS Token setting which can be referred to the previous demonstration. The code description is below:
We use ArduinoJson in this example. It provides easier way to package the data like devinfo and sensor data messages which need to be transmitted through JSON format. We utilize parseObject(devinfoStr) to parse JSON format string automatically before publishing the data, and transform sensor data to key–value json object:
JsonObject& devinfo = devinfoBuffer.parseObject(devicePropertiesStr);Modify the value in key as below if needed
deviceProperties["DeviceID"] = mqttClientName;
deviceProperties["Manufacturer"] = manufacturer;
deviceProperties["Latitude"] = double_with_n_digits(latitude, 7);
deviceProperties["Longitude"] = double_with_n_digits(longitude, 7);
Last, convert the content of devinfo to JSON format and output to console before publishing devinfo data:
devinfo.prettyPrintTo(Serial);Connect to AP: this part is a general wifi connection code without modification
setupWiFi();Set up certificate: this part requires attention, the wifiClient is
WiFiSSLClient wifiSSLClient; WiFiSSLClient inherits Client, so it can be regarded as PubSublicant’s constructor parameter,
PubSubClient mqttClient(wifiSSLClient);Next, MQTT PubClient sets MQTT Broker server as QOS1 and sets the callback() function. Then it makes a connection.
mqttClient.setServer(mqttServer, mqttPort);
mqttClient.setPublishQos(MQTTQOS1);
mqttClient.setCallback(callback);
After the connection, subscribe to the topic that
mqttClient.subscribe(mqttTopic);Listen to topic and respond when users send commands to Ameba RTL8195 in Remote Monitoring.
void callback(char* topic, byte* payload, unsigned int length) {
  char buf[MQTT_MAX_PACKET_SIZE];
  strncpy(buf, (const char *)payload, length);
  buf[length] = '\0';

  Serial.print(F("Message arrived: "));
  Serial.println(topic);
  Serial.println( buf);
}
