Introduction to Ameba Quadcopter
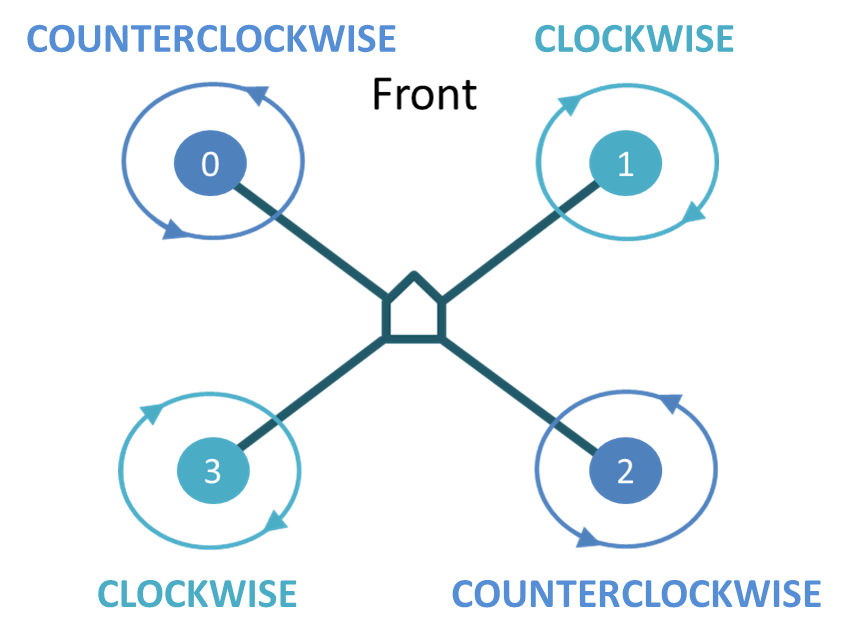
- Motor index and rotation
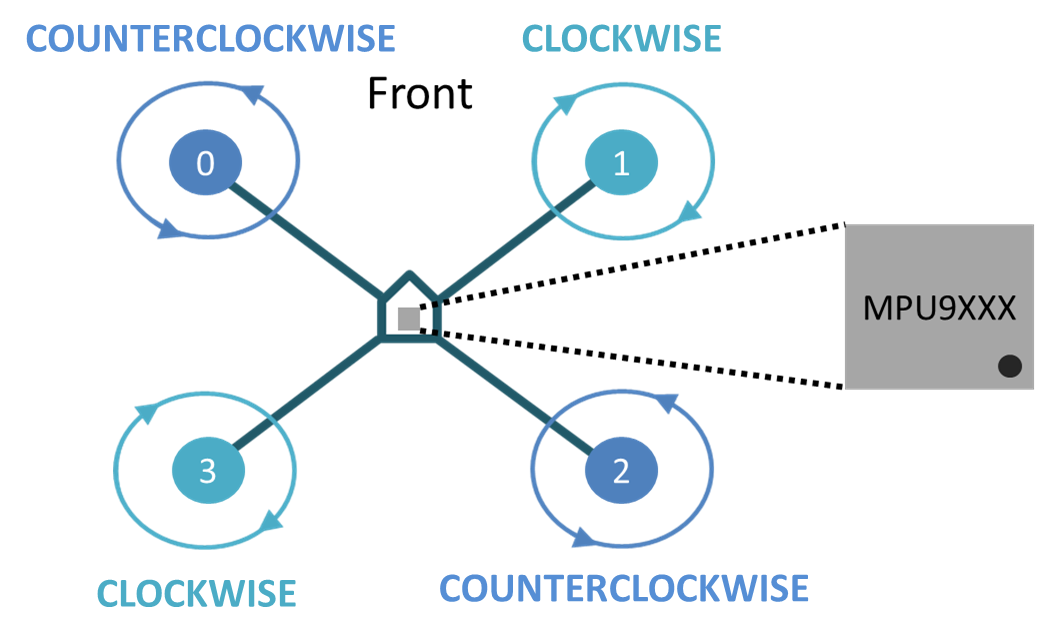
The motors are indexed to 0, 1, 2 and 3. The index and corresponding rotation direction are shown below:
- Principle
The pilot attitude of a quadcopter involves “roll”, “pitch” and “yaw”:
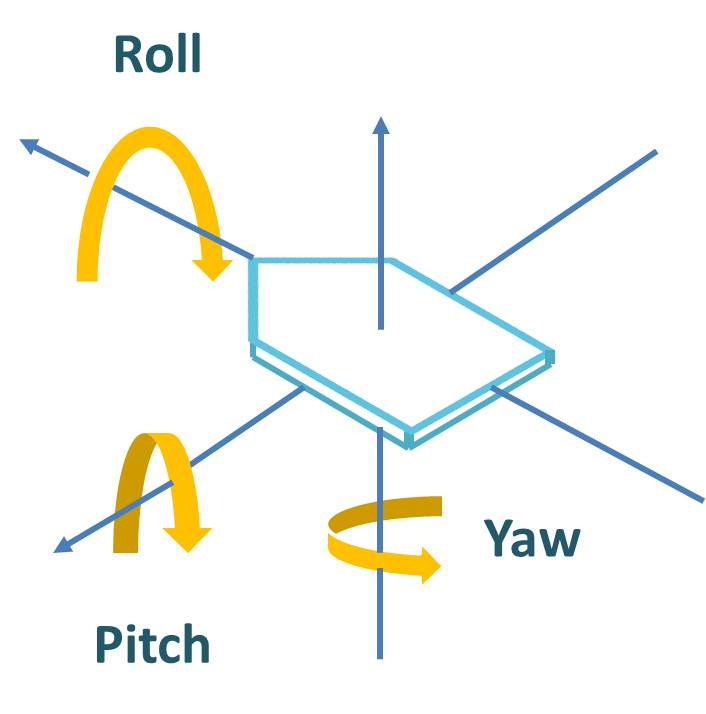 Control “roll”, “pitch” and “yaw” to control the move of quadcopter:
[Roll]
– Turn right: motor 0 and 3 speed up, motor 1 and 2 speed down
– Turn left: motor 0 and 3 speed down, motor 1 and 2 speed up
[Pitch]
– Move forward: motor 2 and 3 speed up, motor 0 and 1 speed down
– Move backward: motor 2 and 3 speed down, motor 0 and 1 speed up
[Yaw]
– Rotate clockwise: motor 0 and 2 speed up, motor 1 and 3 speed down
– Rotate counterclockwise: motor 0 and 2 speed down, motor 1 and 3 speed up
Control “roll”, “pitch” and “yaw” to control the move of quadcopter:
[Roll]
– Turn right: motor 0 and 3 speed up, motor 1 and 2 speed down
– Turn left: motor 0 and 3 speed down, motor 1 and 2 speed up
[Pitch]
– Move forward: motor 2 and 3 speed up, motor 0 and 1 speed down
– Move backward: motor 2 and 3 speed down, motor 0 and 1 speed up
[Yaw]
– Rotate clockwise: motor 0 and 2 speed up, motor 1 and 3 speed down
– Rotate counterclockwise: motor 0 and 2 speed down, motor 1 and 3 speed up
Ameba Quadcopter Hardware
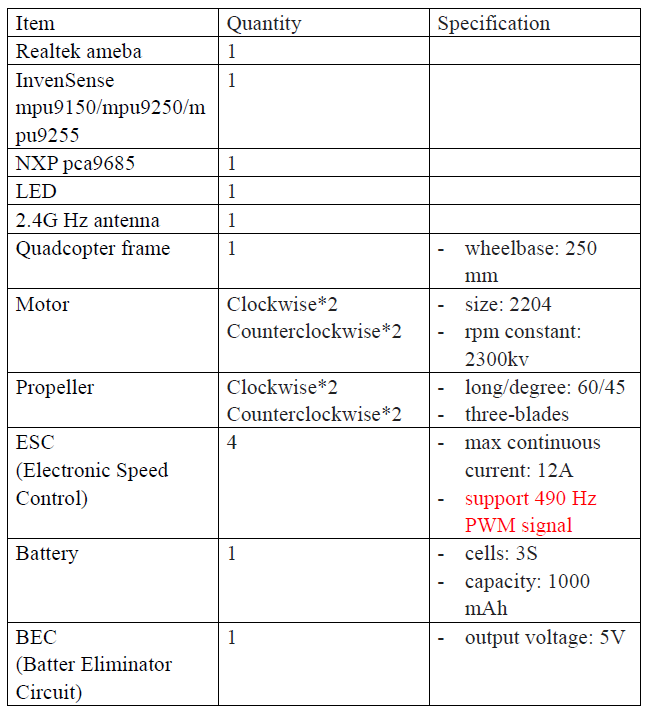
- Component List and Spec
- Wiring
Refer to below wiring diagram, each motor should be connect to corresponding PCA9685 PWM channel.
 Please weld MPU9xxx to connection board. And connect connection board with Ameba via pin header, to increase stability during flight. As shown in the figure below:
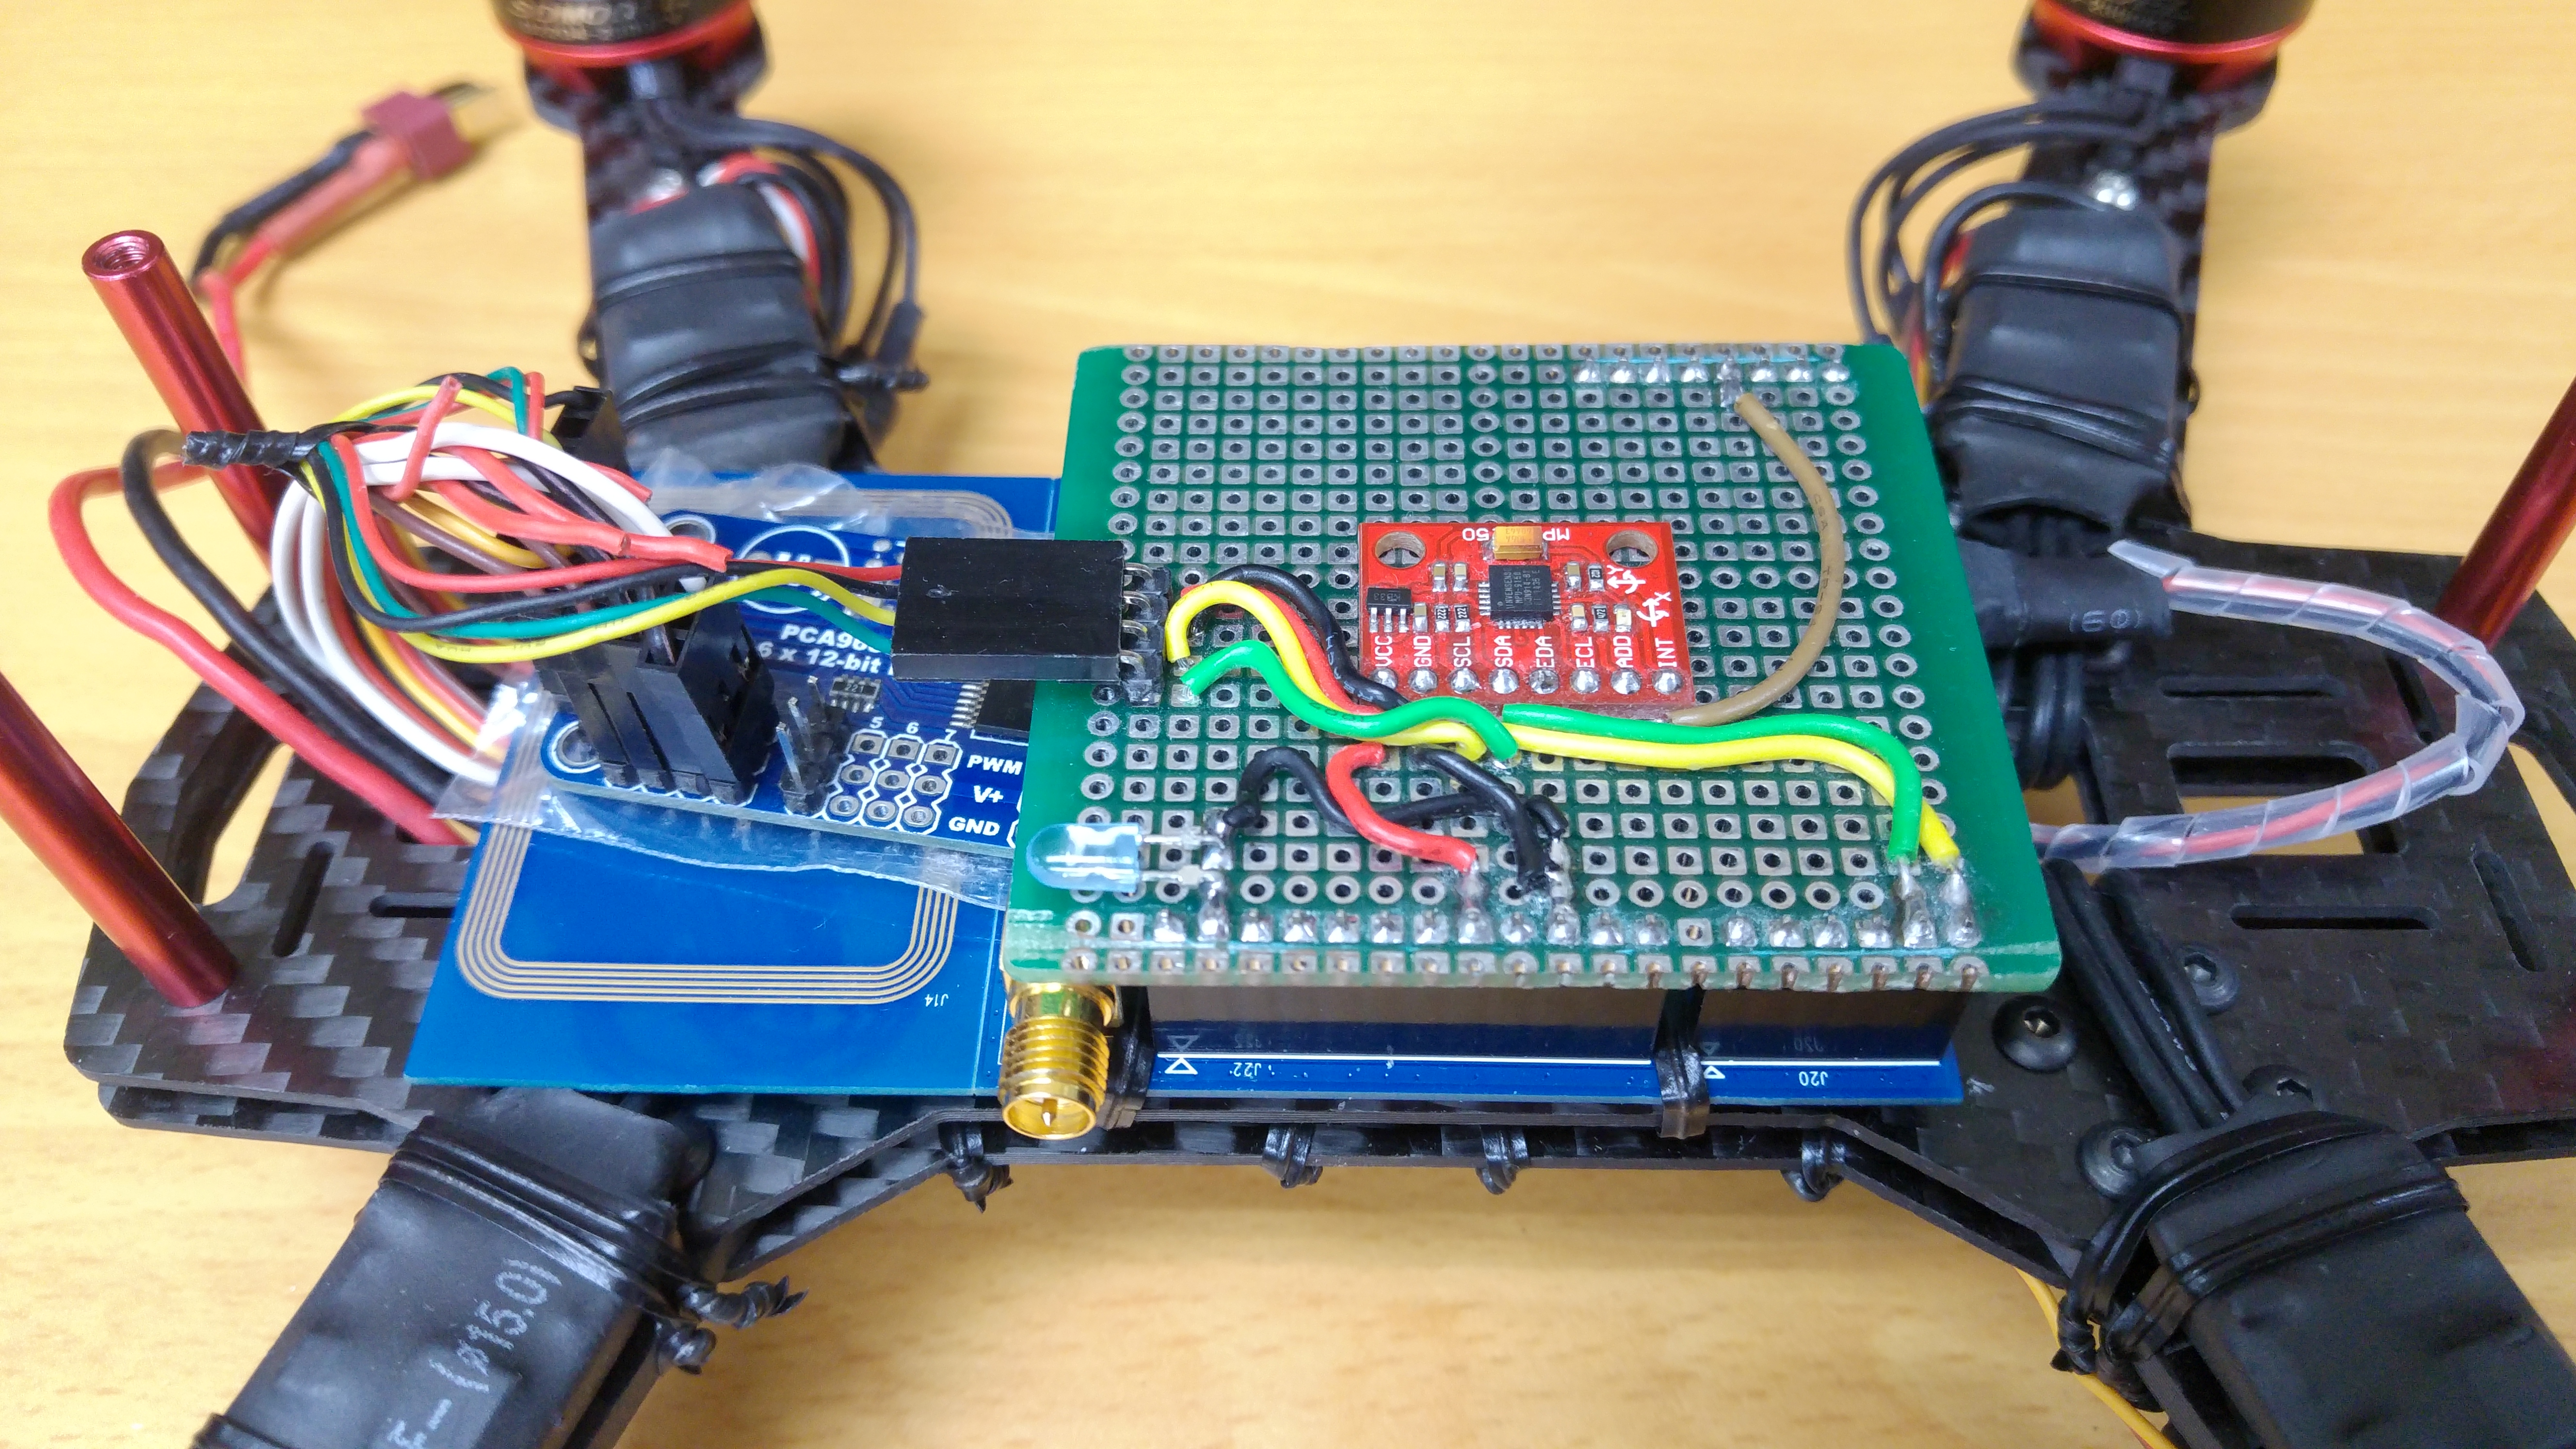 MPU9XXX should be placed in the center of the quadcopter body, with direction identical to the figure below:
Ameba Quadcopter Software
- Ameba
Please download the sketch: https://github.com/ambiot/amb1_arduino/raw/master/sketch/RealtekQuadcopter.zip
And unzip to the workspace of Arduino.
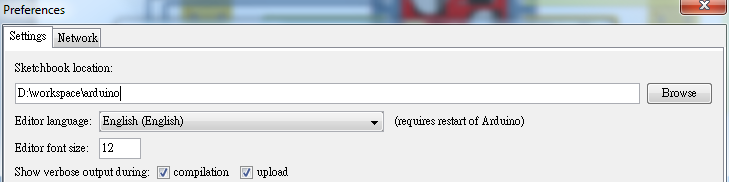
The workspace location can be found in “File” -> “Preferences”, the “Sketchbook location” is where Arduino IDE place sketches and library by default.
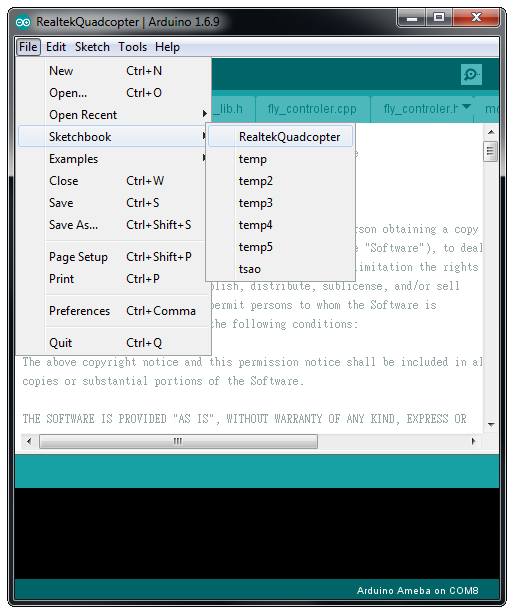
 Then restart Arduino IDE, and you can see “RealtekQuadcopter” in sketch.
 Compile and download to Ameba directly.
 - Control APP
Search and download “Realtek Pilot APP” in google play, or open the link in browser to download: https://play.google.com/store/apps/details?id=com.quadcopter.quadpilot
- UI
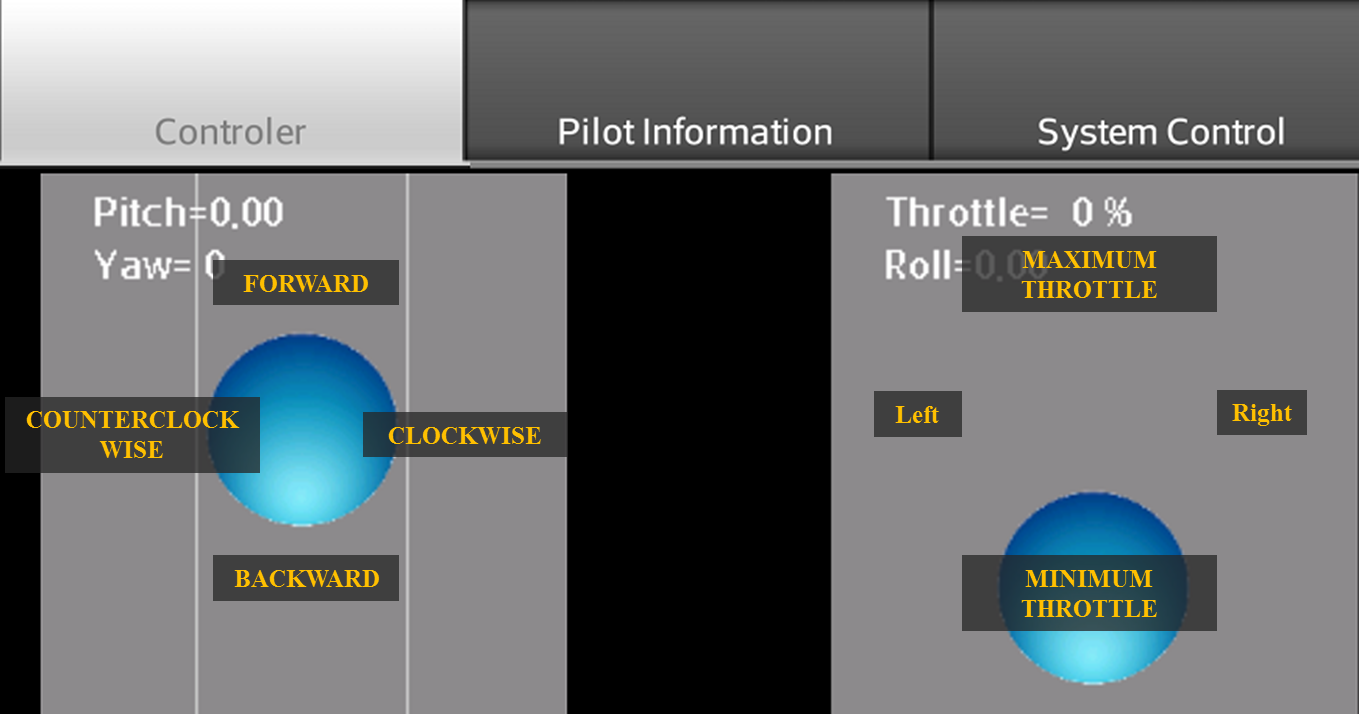
Use the APP UI to control the flight of the quadcopter:
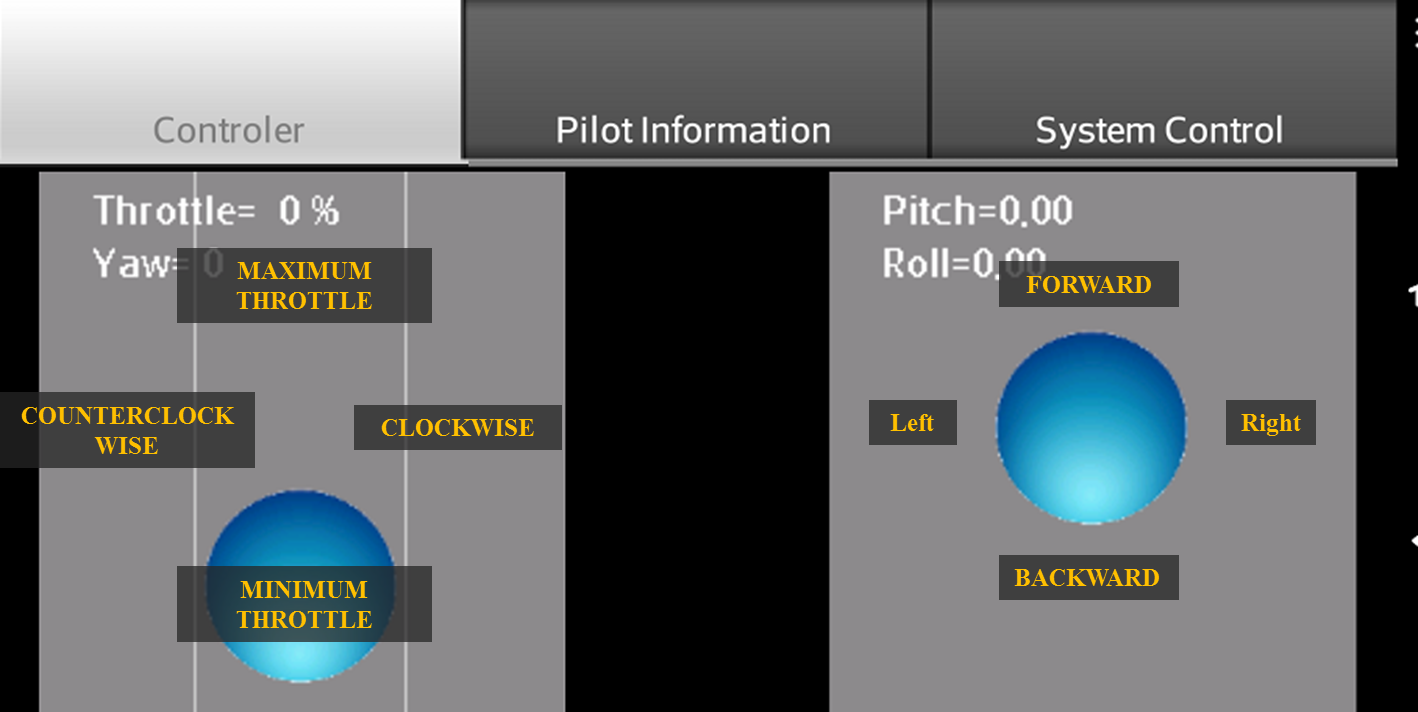
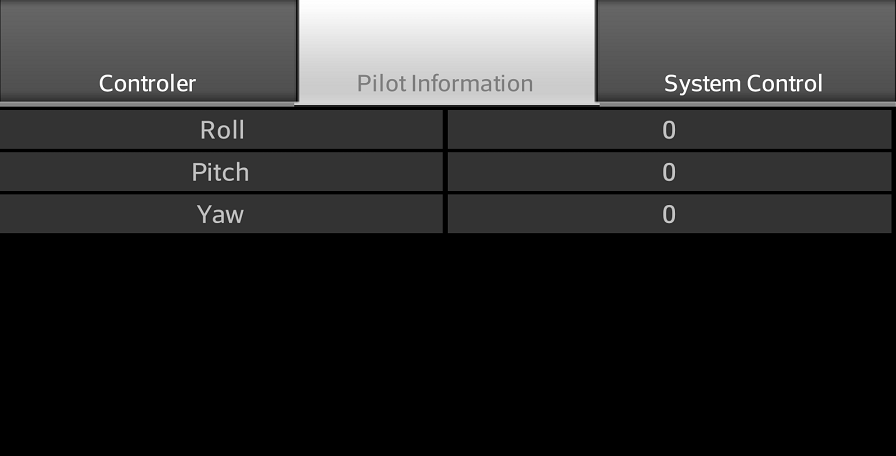
- Pilot information
This page shows the Pitch, Roll and Yaw values reported by the quadcopter. The values can be used to confirm that the MPU9XXX functions correctly.
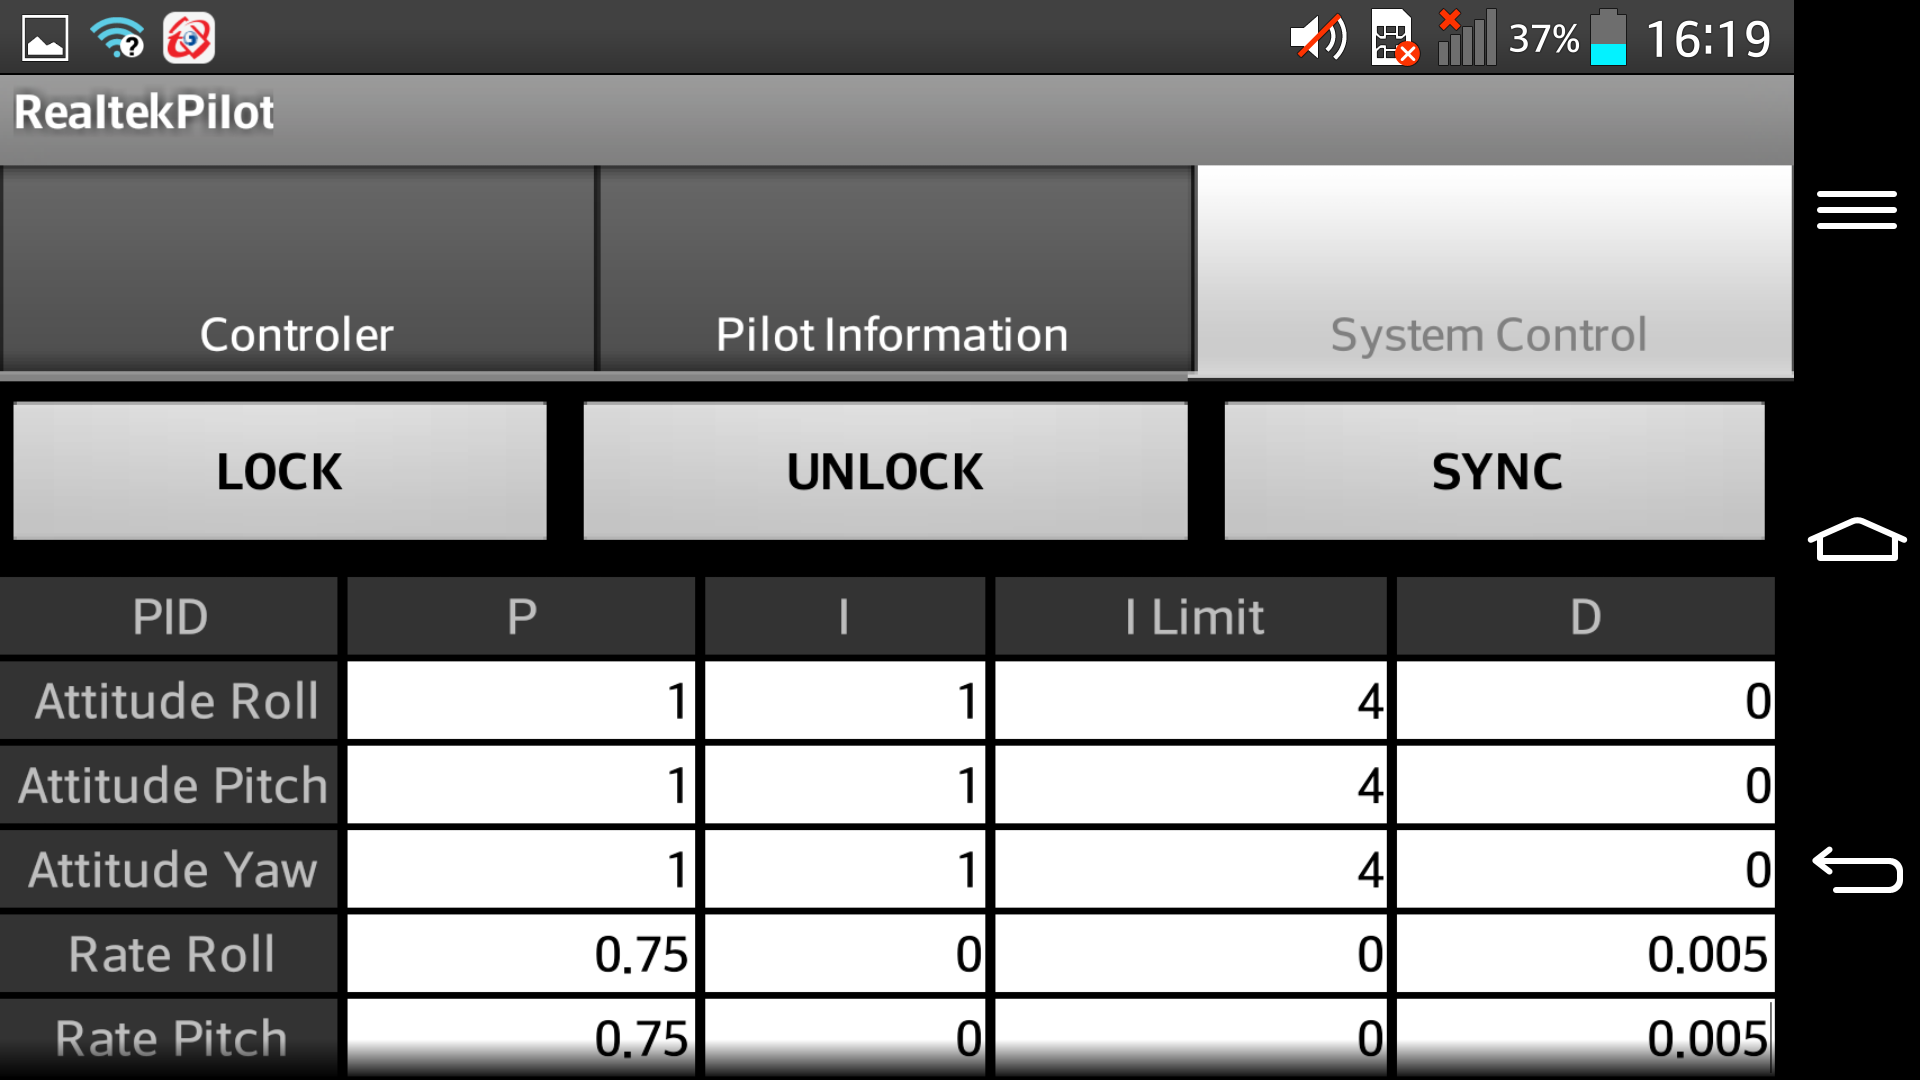
- System control
This page is used to set parameters related to system control. Please read next section for detailed explanation.
- UI
Use the APP UI to control the flight of the quadcopter:
System control parameter
- PID Controller
 Ameba quadcopter uses two PID controllers, i.e., Pilot PID controller and Angular Velocity PID controller. Normally, we only need to correct following parameter:
– The P value of Pilot PID controller, that is, attitude Roll, Pitch and Yaw values.
– The I value and I Limit value of Pilot PID controller, that is, attitude Roll, Pitch and Yaw values.
– The P value of Angular Velocity PID controller, that is, rate Roll, Pitch and Yaw values.
– The D value of Angular Velocity PID controller, that is, rate Roll, Pitch and Yaw values.
The correction should be done as follows:
1. Set all parameters of both PID controllers to 0.
2. Set the P values of attitude Roll, Pitch and Yaw to 1.
3. Set the P values of rate Roll, Pitch and Yaw to 0.1. Try to start a flight and modify the value according to the flight. Finally, you can get a set of P values which makes the flight stable and balanced.
4. If shaking still occurs in the flight, set the D values of rate Roll, Pitch and Yaw to 0.0001. Start a flight and increase the value gradually until the shaking is eliminated.
5. If the quadcopter is too sensitive to the stick control, adjust the I value and I Limit values of attitude Roll, Pitch and Yaw. Initially, set attitude I values to 1 and attitude I Limit values to 5. Start a test flight and modify the values according to observation. Increase I Limit if the quadcopter is still too sensitive to control, otherwise decrease the I Limit value.
6. Observer test flights and repeat step 1-5.
Ameba quadcopter uses two PID controllers, i.e., Pilot PID controller and Angular Velocity PID controller. Normally, we only need to correct following parameter:
– The P value of Pilot PID controller, that is, attitude Roll, Pitch and Yaw values.
– The I value and I Limit value of Pilot PID controller, that is, attitude Roll, Pitch and Yaw values.
– The P value of Angular Velocity PID controller, that is, rate Roll, Pitch and Yaw values.
– The D value of Angular Velocity PID controller, that is, rate Roll, Pitch and Yaw values.
The correction should be done as follows:
1. Set all parameters of both PID controllers to 0.
2. Set the P values of attitude Roll, Pitch and Yaw to 1.
3. Set the P values of rate Roll, Pitch and Yaw to 0.1. Try to start a flight and modify the value according to the flight. Finally, you can get a set of P values which makes the flight stable and balanced.
4. If shaking still occurs in the flight, set the D values of rate Roll, Pitch and Yaw to 0.0001. Start a flight and increase the value gradually until the shaking is eliminated.
5. If the quadcopter is too sensitive to the stick control, adjust the I value and I Limit values of attitude Roll, Pitch and Yaw. Initially, set attitude I values to 1 and attitude I Limit values to 5. Start a test flight and modify the values according to observation. Increase I Limit if the quadcopter is still too sensitive to control, otherwise decrease the I Limit value.
6. Observer test flights and repeat step 1-5. - Angular Velocity Limit
 Use this value to limit the maximum output of the Angular Velocity PID controller. In normal case, this value is set to a large number (e.g., 1000). In testing enviroment with more interference (e.g., windy environment), a smaller value is preferred.
- Roll/Pitch Angular Calibration
 When the center of gravity deviates or the MPU9XXX tilts aside, the quadcopter would tend to fly towards a specific direction. At this time, we need to set angular calibration parameter to correct this behavior.
– Towards left: Set roll angular calibrarion > 0, as the parameter is set to a larger value, the calibration effect increases.
– Towards right: Set roll angular calibrarion < 0, as the parameter is set to a smaller value, the calibration effect increases.
- Towards forward: Set pitch angular calibrarion < 0, as the parameter is set to a smaller value, the calibration effect increases.
- TOwards backward: Set pitch angular calibrarion > 0, as the parameter is set to a larger value, the calibration effect increases.
When the center of gravity deviates or the MPU9XXX tilts aside, the quadcopter would tend to fly towards a specific direction. At this time, we need to set angular calibration parameter to correct this behavior.
– Towards left: Set roll angular calibrarion > 0, as the parameter is set to a larger value, the calibration effect increases.
– Towards right: Set roll angular calibrarion < 0, as the parameter is set to a smaller value, the calibration effect increases.
- Towards forward: Set pitch angular calibrarion < 0, as the parameter is set to a smaller value, the calibration effect increases.
- TOwards backward: Set pitch angular calibrarion > 0, as the parameter is set to a larger value, the calibration effect increases. - Stick Gain
 Modify this value to change the stick control gain.
 - Max Throttle Percentage
 Limit the maximum throttle value.
 - Control UI Display Setting
 Set the display mode of APP UI
 - Lock/Unlock/Sync
 – Lock: Click to lock control. In locked status, we are not able to control quadcopter with APP.
– Unlock: Unlock control and sync control parameters with quadcopter.
– Sync: CLick to sync the control parameters we set in APP to the quadcopter. This should be performed everytime we modify the parameters.
– Lock: Click to lock control. In locked status, we are not able to control quadcopter with APP.
– Unlock: Unlock control and sync control parameters with quadcopter.
– Sync: CLick to sync the control parameters we set in APP to the quadcopter. This should be performed everytime we modify the parameters.
Make a flight
- Flight Site Suitable site to make a flight should satisfy following conditions: – Open and spacious – With low wind velocity – Meadow land is preferred (avoid serious damage when quadcopter falls to the ground).
- Turn on quadcopter and establish connection with APP – Power on ameba. Search ameba WiFi AP (SSID: quadcopter) on android phone and connect to the network. – Click “Pilot Information” tab and check the Roll, Pitch and Yaw values.
- ESC Calibration Before the first flight, please perform ESC Calibration according to following steps: – Remove the propellers on the quadcopter. – Reset all PID parameter to 0. – Set Max Throttle Percentage to 100%. – Unlock system control. – Perform calibration according to ESC user manual.
- Unlock system control After ameba quadcopter is powered on, the system control is locked initially. Click unlock button to unlock system control, at the time the LED connect to pin 18 would light.
- Take off – Throttle up slowly, observe the take off of the quadcopter. – If the quadcopter cannot be controled smoothly, please try to modify PID and roll/pitch angular calibration parameters.
- Other point for attention – It is recommended to lock control before approaching the quadcopter. – As the signal strength decreases as the distance increases, please keep the distance between quadcopter and controller smaller than 10 meters for safety. – Over discharge of Li-Po batteries leads to degradation of battery quality. Therefore, please keep battery power higher than 3.8V.
Trouble shooting
- Unable to boot – Download quadcopter sample to ameba again. – Check if the components are wired to correct pins.
- The flight is imbalanced – Check if the motor is rotating in correct direction. – Check the propeller installation. – Check ESC and PCA9685 is connected to correct channel. – Re-calibrate ESC. – Adjust PID parameter. – Make sure the circuit is not short. – Avoid too much 2.4GHz signal in test-flight environment.
- Tends to fly in a specific direction Modify the Roll/Pitch Angular Calibration parameter.
