Navigate to the “Getting started” page for each Ameba development boards to see the pin diagram via Ameba ARDUINO
[AMB21/22] Refer to the Link
[AMB23] Refer to the Link
[BW16] Refer to the Link
[AMB01] Refer to the Link
[AMB21/22] Refer to the Link
[AMB23] Refer to the Link
[BW16] Refer to the Link
[AMB01] Refer to the Link
First, open the Serial Monitor and enter download mode. If you successfully enter download mode, you will see “#Flash Download Start” in the Serial Monitor.
They are the same, they burn the bin file into the Ameba development boards.
They uses the same chip; however, the PCB are different in size and offer different number of pins and functions.
AMB21/22 does not have any user-configurable push buttons and LEDs.
AMB23 has 1 user-configurable push buttons and 2 user-configurable LEDs.
Both boards support BLE 5.0. Classic Bluetooth (BR/EDR) is not supported.
AMB21/22 and AMB23 can operate as either a BLE Central or BLE Peripheral device.
No, those marked “NC” are not connected to any pin and thus unusable.
Yes, it is supported.
AMB21 and AMB23 supports dual band 2.4G + 5G WiFi. AMB22 only supports single band 2.4G WiFi.
Press and hold the UART DOWNLOAD button. Then Press the RESET button and release both UART DOWNLOAD and RESET buttons.
Please make sure the antenna is connected properly. Check your code for the correct Bluetooth configurations.
Try to debug your program using printf and Serial.print statements. If the issue persists, you can ask for help at Forum.
Boards by default are configured at 115200 baud rate, please check if your serial terminal is configured to 115200.
The default antenna for RTL8722CSM/RTL8722DM uses the I-Pex Connector. Please change/connect the I-Pex Connector antenna.
Please make sure the connector J38 beside resistor R43 is connected. The connector is used to link the power to IC.
Please go to https://ftdichip.com/drivers/ for USB driver.
When the green LED flashes, it indicates that the board is waiting in download mode. When the red LED flashes, it indicates that the sketch’s code is being downloaded to the board.
No. You only have to connect it if you wish to use the onboard USB port to upload sketches into BW16.

Ensure that you have followed all the instructions to enter download mode. If issue still persist, please raise the question in Forum
BW16 has 1 user-configurable RGB LED.
To use the NFC function on AMB01, you need to first weld the NFC antenna on the board. Please refer to one of the NFC examples for more information.
To determine which software to download, by depending on the SDK and IDE you intend to use, you can visit here and refer to the “Getting Started” page based on the Ameba development board you are using.
Make use of any terminal tools, such as SecureCRT/teraterm/putty etc.
Check that the json link is added to “Preferences” in Arduino IDE (find the respective json link from “Getting Started” page for each Ameba development boards).
If you are still unable to find the Ameba development board in the Arduino IDE’s “Boards Manager”, you can download the offline packages from here.
To set the serial terminal baud rate value, it should be same as the baud rate set in the ino file. Eg, ” Serial.begin(9600);”
You can find the Serial Monitor at the top right-hand corner of the Arduino IDE by clicking on 
You can find it at “Tool” -> “Serial Plotter”.
No, because the upload command includes compiling and uploading.
Shortcut to add a file is “Ctrl+Shift+N” and rename the file accordingly.
Download libraries from Github and follow the instruction at https://docs.arduino.cc/software/ide-v1/tutorials/installing-libraries to install.
Firstly, please try the instructions on Arduino website at https://docs.arduino.cc/software/ide-v1/tutorials/Linux
If you still encounter the same issue afterwards, please uninstall the IDE, and then re-install it using terminal in the Arduino IDE root directory and type the following command in the terminal: sudo ./install.sh
 Check that you have updated the DAP firmware. You can refer to the link to learn how to update DAP firmware.
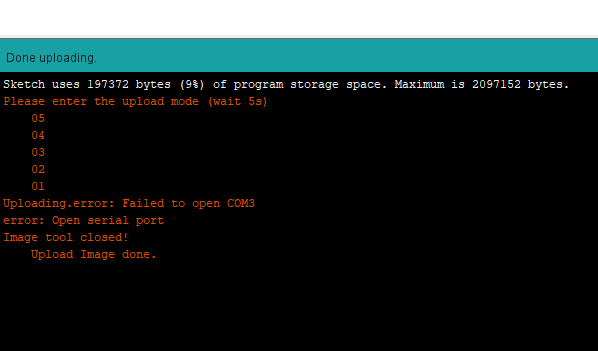
1. Check that you have correctly selected the board and COM port number on Arduino IDE.
2. Check if it’s a hardware issue.
3. If issue still persist, please raise the issue in the Forum.
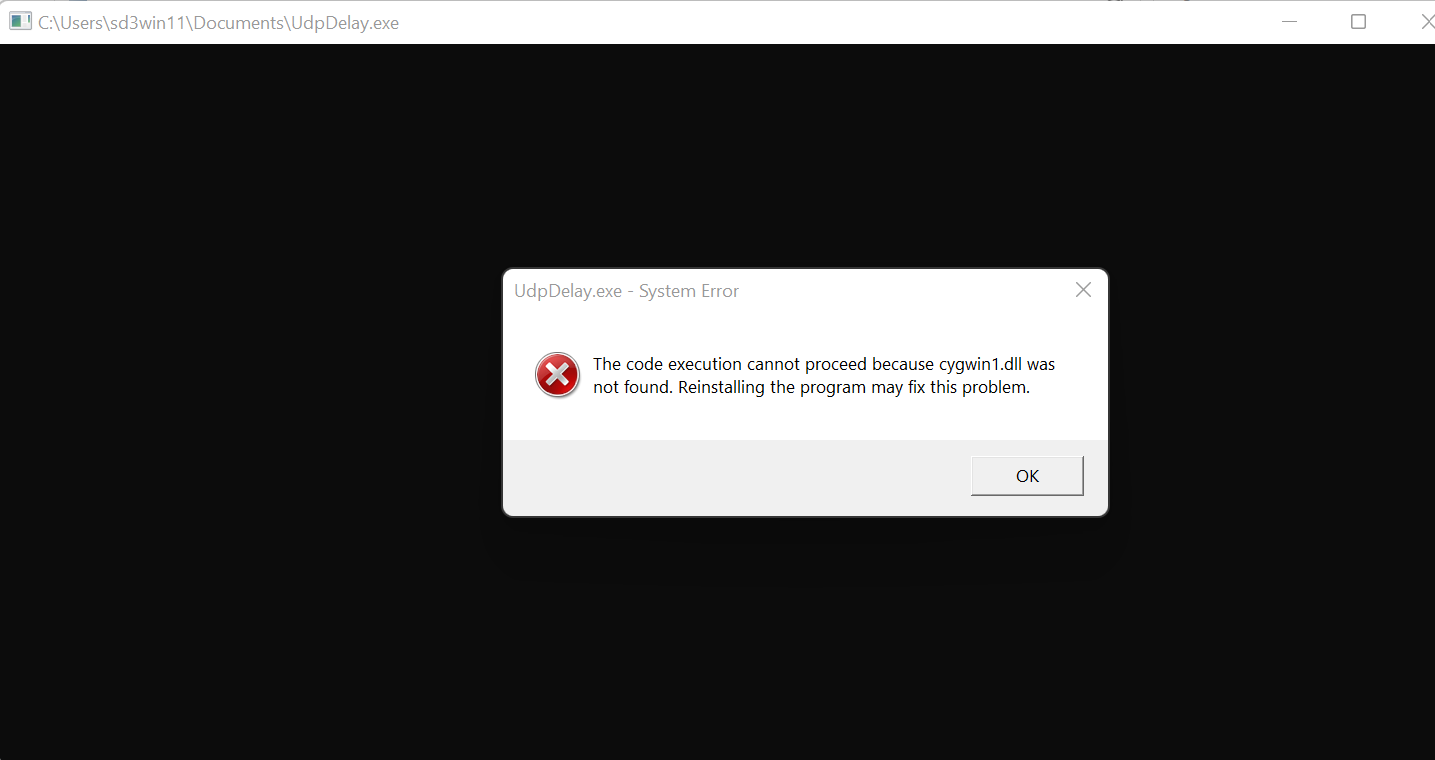 Look for cygwin folder in C drive, then look for cygwin1.dll in the bin folder and add cygwin1.dll to “C:\windows” directory.
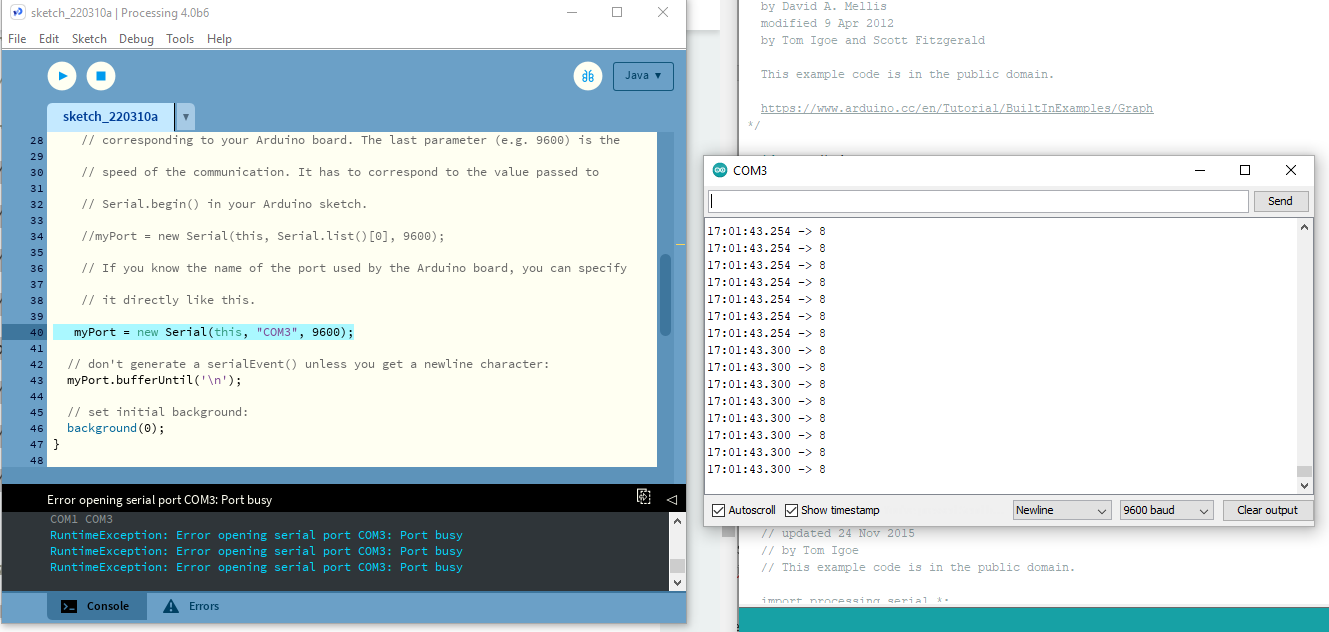 At any given time, only 1 Serial Monitor can access 1 particular COM port. There are two Serial Monitors trying to open the same COM port in the above example.
 It is suggested to connected to the same network as the laptop/computer.

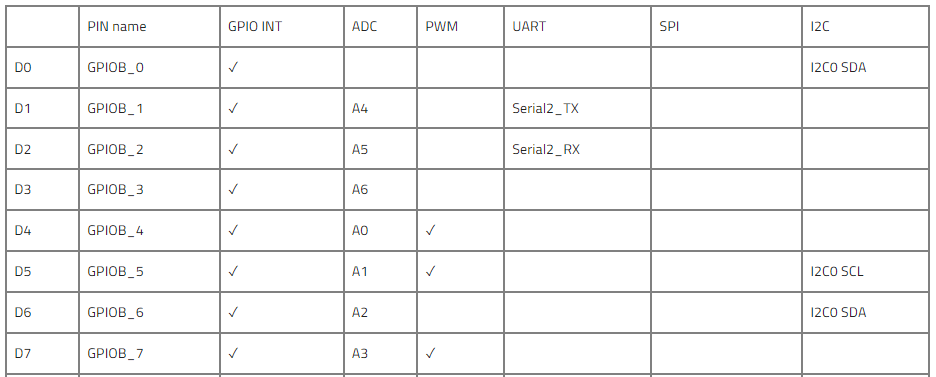
D13 refers to Pin 13 on Ameba development board. You can refer to the pin diagram for each board under “Getting Started” on the link
Follow the example in “Getting Started” on the link
Yes, however, the wiring connection will be different from using Arduino Uno. Suggest referring to the pin diagram of the board you are using.
D7 is NC on AMB21/22. NC is “Not Connected”.
Make sure that your Bluetooth and Location Service are both turned on.
Do remember to install the patches from here and necessary Arduino library in Arduino IDE. Installation instructions can be found in the readme file.
Same network should be used on your computer and development board.