- Ameba x 1
- AS606 fingerprint identification module x 1
Example
In this example, a fingerprint identification module is used to store fingerprints and identify them. This module uses SYNOCHIP AS606 chip, which can store up to 1000 sets of fingerprints. The libraries we need are:
https://github.com/ambiot/amb1_arduino/raw/master/Arduino_libraries/AmebaFingerprint.zip
For the way to install the library, please refer to the teaching article of the Arduino official website to add the zip file library to Ameba:
https://www.arduino.cc/en/Guide/Libraries#toc4
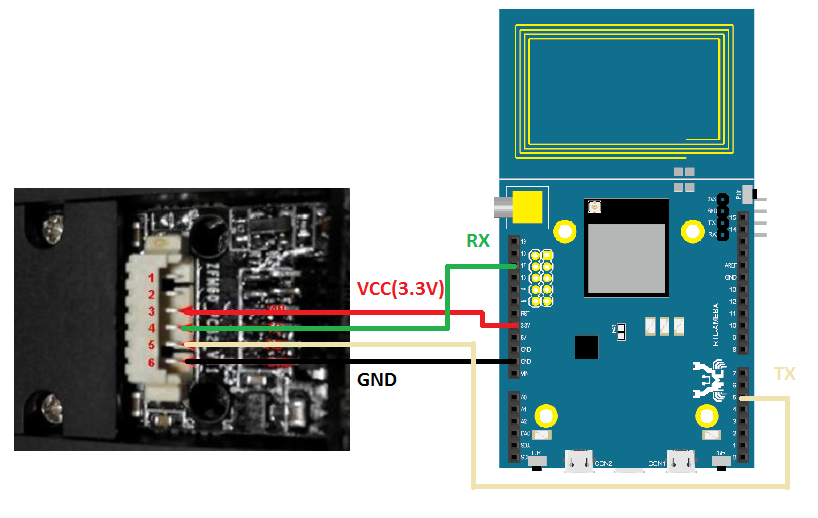
This module uses UART to communicate with AMEBA. In addition to VCC (3.3V) and GND, and using UART TX and RX lines, we turn the module to the back. The RTL8195 example wiring is as follows:
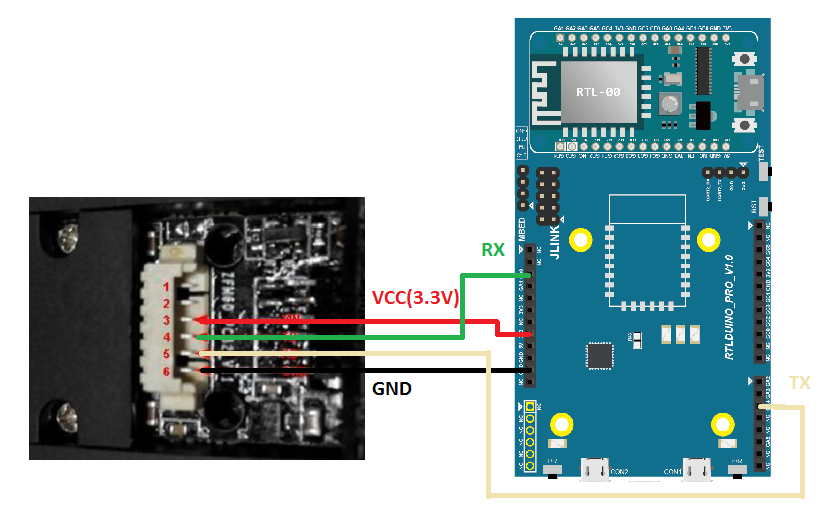
The RTL8710 example wiring is as follows:
We open the example “File” -> “Examples” -> “AmebaFingerprint” -> “enroll”, compile and upload to Ameba and press the Reset button. At this point, open the terminal and you should see the fingerprint identification module message:
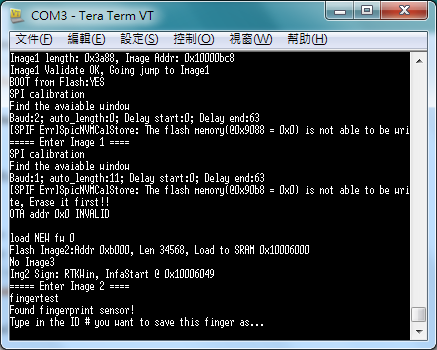
Then follow the message at the console prompt, we type a letter ‘a’ on the keyboard.
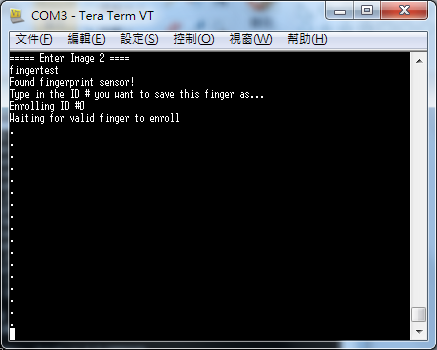
The console prints the “waiting for valid finger to enroll” message, and you can place your finger on the module window.

If the module has correctly collected the fingerprint, then it will ask to remove the fingerprint and then place the same finger on the window.

If the fingerprint is collected correctly, the console will mention printfs matched and store the fingerprint. Then you can try to collect more fingerprints from different fingers.
Then we have to test whether the fingerprint identification module can successfully identify the fingerprint that has just been stored. We open the example “File” -> “Examples” -> “AmebaFingerprint” -> “fingerprint”, compile and upload to Ameba and press Reset button, open the terminal at this time, you should see the message that can find the fingerprint identification module:
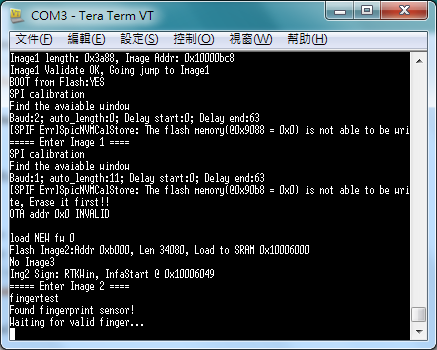
And the prompt is waiting for the verification fingerprint, at this time, place the same finger just sampled in the fingerprint recognition window.
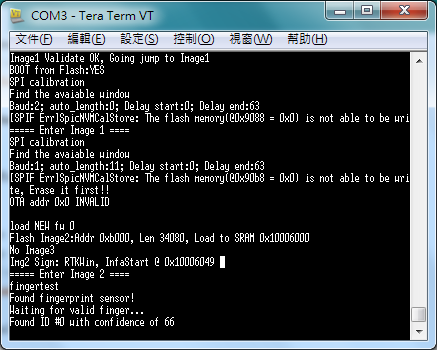
The Console will display the message “Found ID #x with confidence of xx”, which means the identification is successful.
Code Reference
Enroll.ino
Fingerprint sampling is mainly divided into four parts, namely, sampling GenImg, image feature generation Img2Tz, feature template synthesis RegModel and storage template store. Because the AS606 fingerprint identification module uses UART communication, the program is declared globally at the beginning:
SoftwareSerial mySerial(17, 5);
Representatives use D17 (RX) and D5 (TX)
Initialization process in setup()
finger.begin(57600);
Including setting the data rate of the sensor
finger.verifyPassword();
And in the handshake loop() that must be performed to verify the sensor UART communication
while (true) {	//Wait for user to enter a character and use it as the number of the fingerprint sample
    while (! Serial.available());
    char c = Serial.read();
    if (! isdigit(c)) break;
    id *= 10;
    id += c - '0';
  }

while (!  getFingerprintEnroll(id) );  //Start the process of fingerprint sampling

p = finger.getImage(); //When the finger is placed on the sensor window and the sensor senses the sample, the sample result will be returned.

p = finger.image2Tz(1); //After returning FINGERPRINT_OK, it will enter the image feature generation program and return FINGERPRINT_OK to represent the image sampling correctness. It will prompt to remove the finger and prepare to perform a pattern acquisition program from the beginning. When it is finished twice image2Tz, it will collect. The two patterns are compared, and then the image feature template is synthesized:

p = finger.createModel();

//When the FINGERPRINT_OK is returned, the comparison is successful, and then the synthesized image module is stored and the process of fingerprint sampling is completed:

p = finger.storeModel(id);
Fingerprint.ino
The fingerprint identification process is divided into several parts, namely, sampling GenImg, image feature generation Img2Tz and image feature search fingerFastSearch.
The initialization process in setup() is the same as the initial program of enroll.ino. We go directly to loop():
getFingerprintIDez(); //Start fingerprinting
uint8_t p = finger.getImage(); //Put your finger on the sensor window and the sensor senses the sample

p = finger.image2Tz();//When the FINGERPRINT_OK is returned, the image feature generator will be entered.

p = finger.fingerFastSearch(); //Perform image feature search. When FINGERPRINT_OK is returned, it means fingerprint identification is successful.
