- Ameba x 1
範例說明
這個範例裡說明了如何在AMEBA上使用Cloud IoT Core。本範例不需要額外的Library,單純使用WiFiSSLClient及PubSubClient來進行連線,在準備編譯進Ameba之前,需要先註冊及設置Google Cloud IoT Platform,其教學可參考於Standard SDK的範例:
https://www.amebaiot.com/google-cloud-iot/
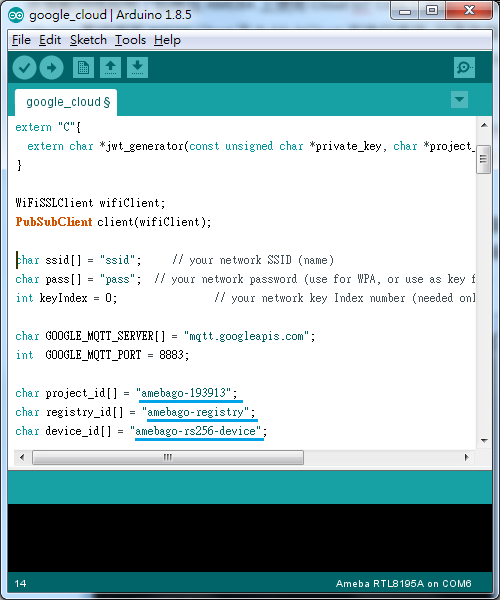
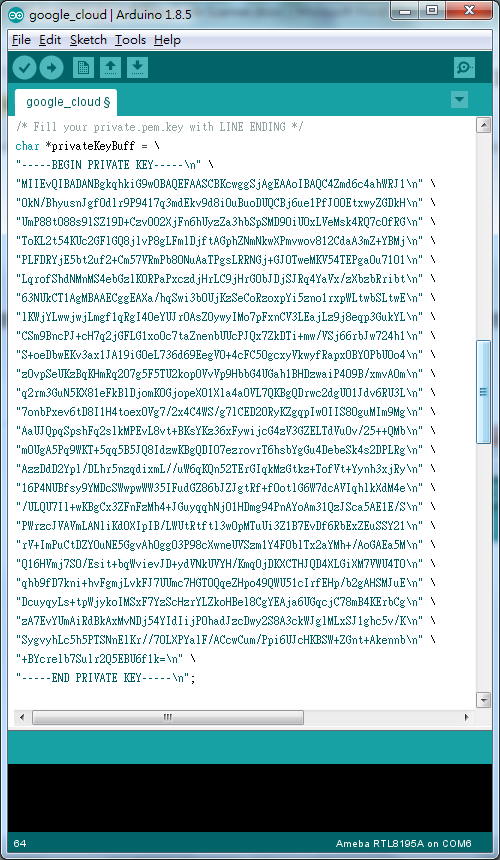
我們打開範例 “File” -> “Examples” -> “AmebaMQTTClient” -> “google_cloud”, 如果Google Cloud IoT Platform已設置完成,我們將能得到project_id, registry_id, device_id 及private.pem.key。如下圖所示,在此範例中project_id測試用的參數填入amebago-193913, registry_id填入amebago-registry及device_id填入amebago-rs256-device,請記得privateKeyBuff也要填入生成的private.pem.key,以上參數更新完畢後即可編譯並燒錄至Ameba。
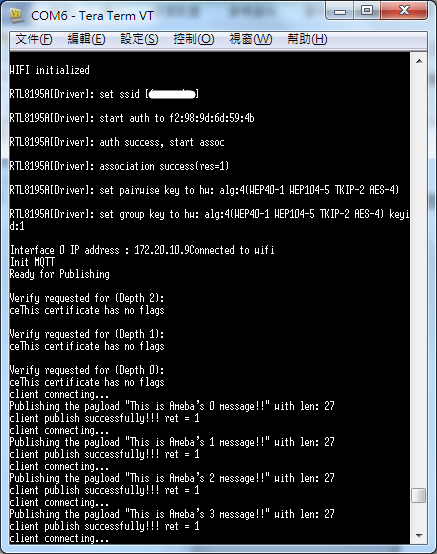
接著我們打開終端機軟體,如下圖在順利連接上網路後 開始進行Google Cloud的連接,並在連接成功之際發佈訊息” This is Ameba’s x message!!”,其中x為每次迴圈遞增的數值。
驗證:
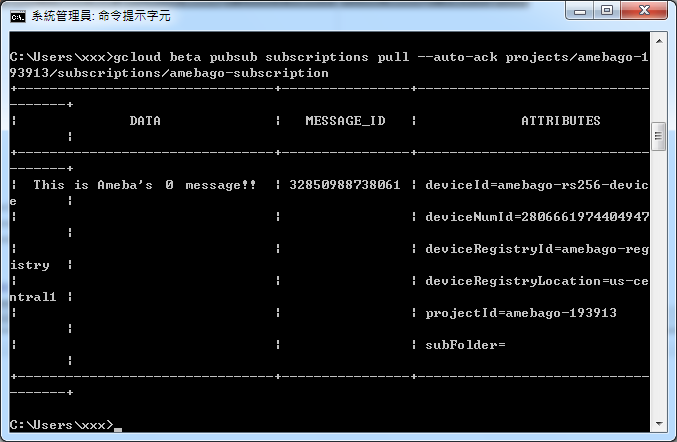
在Google Cloud SDK Shell底下鍵入:
$ gcloud beta pubsub subscriptions pull --auto-ack \
projects/amebago-193913/subscriptions/amebago-subscription
下圖即顯示最近來自Ameba發佈的訊息
程式碼說明
 wifiClient.setRootCA((unsigned char*)rootCABuff);
  wifiClient.setClientCertificate(NULL, (unsigned char*)privateKeyBuff);
在loop()裡,每次的loop都會檢查網路狀況,如果網路環境有問題就會重新進行連線
if (WiFi.status() != WL_CONNECTED) {
    while (WiFi.begin(ssid, pass) != WL_CONNECTED)
    {
      delay(1000);
    }
    Serial.println("Connected to wifi");
  }
在開始準備發佈之際需要產生mqtt_id,clientPass及pub_topic:
產生mqtt_id:
mqtt_id = (char *)malloc(strlen("projects/") + strlen(project_id) + strlen("/locations/us-central1/registries/") + strlen(registry_id) + strlen("/devices/") + strlen(device_id) + 1);
sprintf(mqtt_id, "projects/%s/locations/us-central1/registries/%s/devices/%s", project_id, registry_id, device_id);
產生clientPass(經由JWT Format產生):
clientPass = jwt_generator((unsigned char*)privateKeyBuff, project_id, 3600*1);產生pub_topic:
pub_topic = (char *)malloc(strlen("/devices/") + strlen(device_id) + strlen("/events") + 1);
sprintf(pub_topic, "/devices/%s/events", device_id);
MQTT Server參數設定:
 client.setServer(GOOGLE_MQTT_SERVER, GOOGLE_MQTT_PORT);
 client.setPublishQos(MQTTQOS1);
 client.waitForAck(true);
接著開始進行google cloud的連線
if (client.connect(mqtt_id, clientUser, clientPass) )
 {
	..........
	for(int i = 0; i < count; i++){
     ..........
     sprintf(payload, "This is Ameba's %d message!!", i);
     ret = client.publish(pub_topic, payload);
     ..........
 }
	..........
   client.disconnect();
 }
 free(mqtt_id);
 free(pub_topic);
如果成功,就會將payload以client.publish method發佈出去,最後別忘了作正確的斷線及free掉mqtt_id及pub_topic的buffer。